

Outlook
In one line: Connect your Microsoft Outlook mailbox so your UnleashX agent can send and reply to email, draft messages, organize your inbox, and manage contacts — on your behalf.
1. Overview
Outlook is Microsoft’s email and contacts service, part of Microsoft 365. It holds your mailbox, folders, categories, and your personal address book — and it’s where a huge amount of day-to-day work happens. Once connected to UnleashX, your agent can do the things you’d normally do by hand: find a specific email, send a new message, reply in a thread, save a draft for you to review, move messages into folders, mark them as read, and look up or update contacts. You stay in control — the agent acts on your real mailbox using your own Microsoft sign-in. Connecting Outlook to UnleashX turns email from a chore into a conversation. Instead of digging through your inbox, you can ask your agent to “reply to the last email from Priya confirming Tuesday” or “draft a follow-up to everyone who didn’t respond,” and it handles the Outlook side for you.2. What you’ll need
- A Microsoft account with an Outlook mailbox (personal
@outlook.com/@hotmail.com, or a Microsoft 365 / Exchange Online work or school account). - Permission to use that mailbox — for work accounts, your organization must allow third-party apps to connect via Microsoft Graph.
- An UnleashX account with access to Data Connectors.
You do not need to create or paste an API key. Outlook uses OAuth — you simply click Authorize and sign in with Microsoft.
3. Get your credentials
There’s nothing to copy and paste. Outlook authentication is handled entirely through Microsoft’s secure OAuth sign-in.1
Start the connection in UnleashX
When you connect Outlook (see Section 4), UnleashX opens a Microsoft Authorize window.
2
Sign in with Microsoft
Enter your Outlook / Microsoft 365 email and password at
https://login.microsoftonline.com (Microsoft’s official sign-in). Complete multi-factor authentication if prompted.3
Review and accept the permissions
Microsoft shows exactly what UnleashX is asking for (see the scopes table below). Click Accept to grant access.
4
You're returned to UnleashX
Microsoft redirects you back automatically and the connector is now linked to your mailbox.
These are standard Microsoft Graph delegated scopes. Microsoft, not UnleashX, enforces them — UnleashX can never do more than the scopes you approve.
4. Connect on UnleashX
1
Open your agent
Go to https://www.tryunleashx.com and open the agent you want to give Outlook access to.
2
Open Data Connectors
In the agent, go to Data Connectors.
3
Find Outlook
Locate Outlook in the list and click Connect (or Add / Configure).
4
Authorize with Microsoft
Click Authorize. Sign in with your Microsoft account and accept the permissions.
5
Confirm success
You’re returned to UnleashX and the Outlook connector shows a Connected badge.
Use Outlook in a Workflow
Once connected, you can add Outlook to any automation from the Workflows builder. Its triggers and tools appear in the Apps panel, marked with an MCP badge.1
Add a trigger node
Open Workflows → New Workflow. On the canvas, click + Add Trigger. In the Paths panel, open the Apps tab and select Outlook — its Triggers are listed underneath. Use the search box if you have many connectors.
2
Add an action node
Click the + below any node to add a step, then pick Outlook again — this time the panel lists its Actions.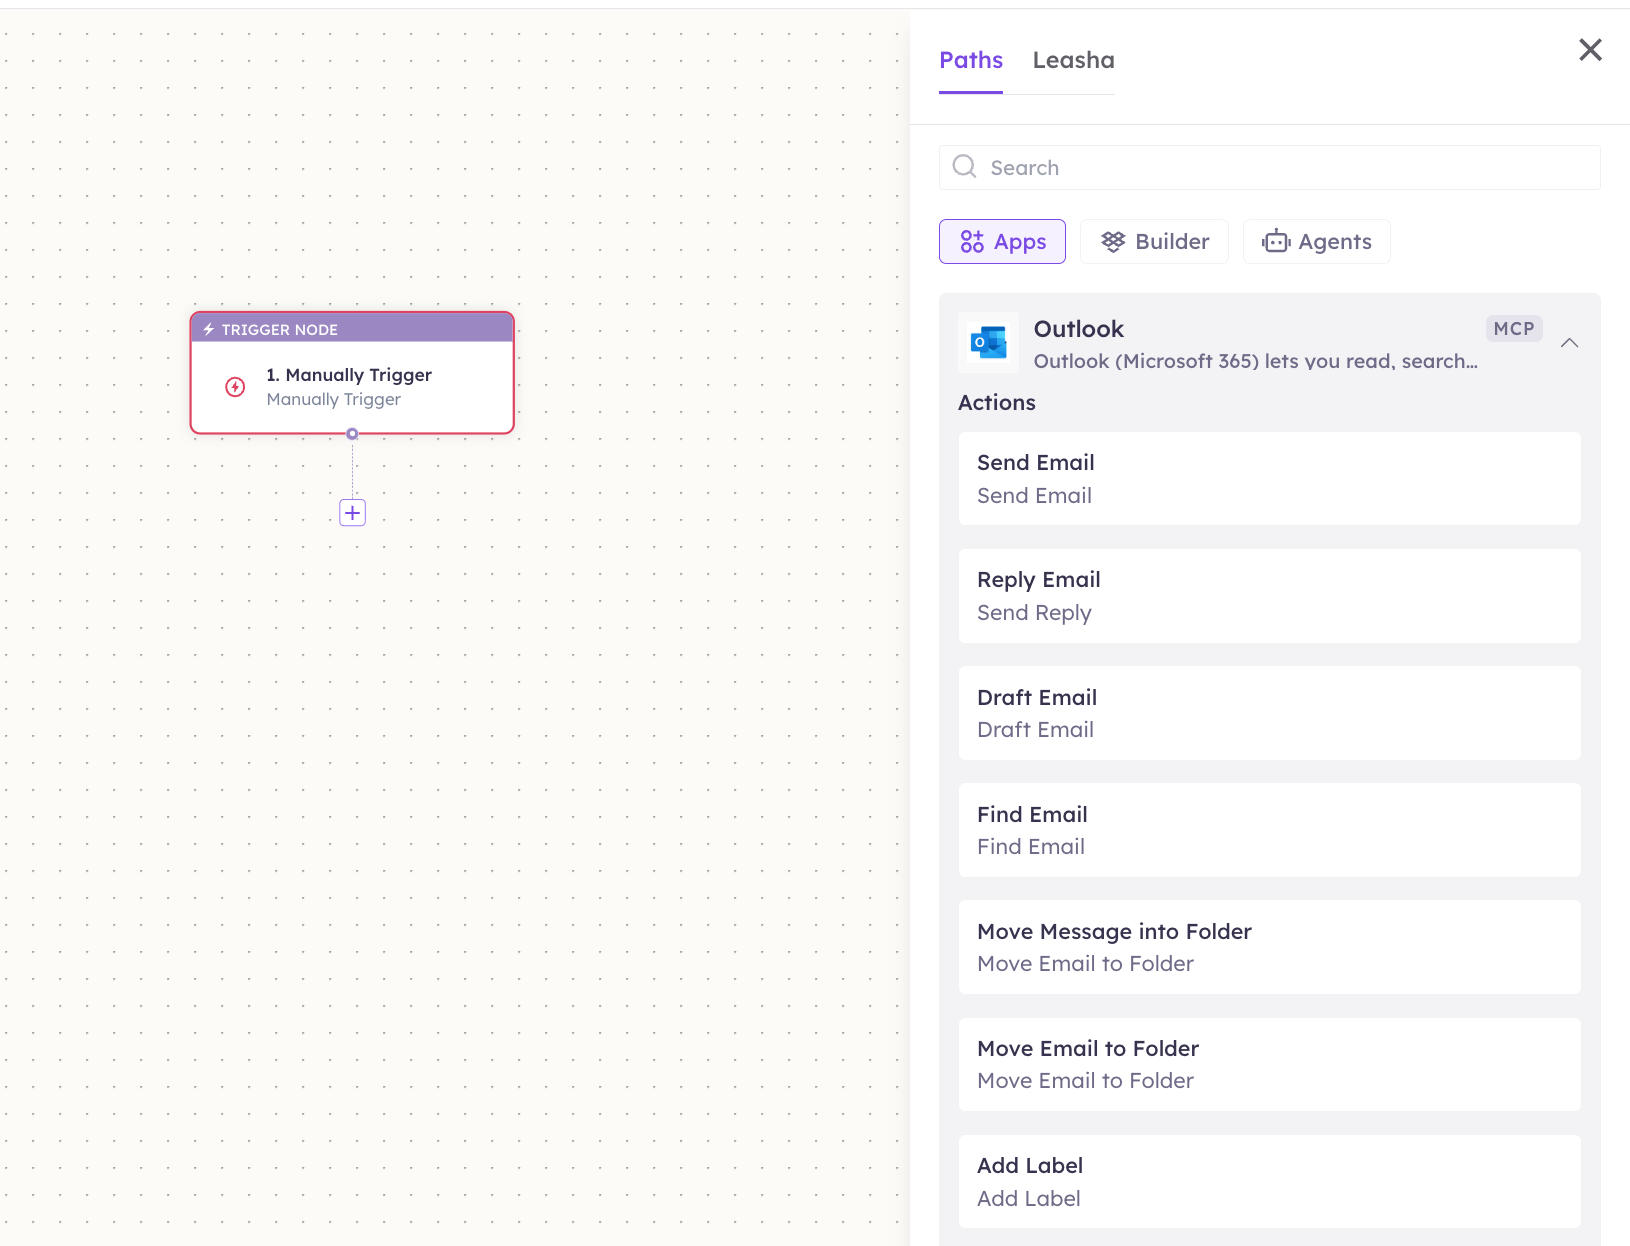
3
Configure the step
Fill in the fields for the trigger or action you picked. Required fields are marked with a red asterisk (*).
4
Add or select your account
Under Selected account, choose an already-connected account, or click Add Account to connect one now.
5
Save and test
Click Save. Use Test to verify the step, then toggle Publish when the workflow is ready.
The steps are the same for every connector. For the full workflow builder guide, see Using MCP in Workflows.
5. Available tools
6. Example usage
“Reply to the latest email from the finance team and let them know the invoice is approved.” → Runs Find Email (or List Emails) to locate the thread, then Send Reply to send your response. “Draft a welcome email to our new vendor contact, and add them to my contacts.” → Runs Create Contact to save the vendor, then Create Draft Email so you can review the message before it goes out.7. Permissions & data access
UnleashX can:- Read, search, and list emails in your mailbox and folders.
- Send new emails and replies as you.
- Create drafts, move messages, mark them read/unread, and add or remove categories (labels).
- List, find, create, and update contacts.
- Permanently delete your emails (it can move and recategorize them, but the tool set doesn’t expose a hard-delete).
- Access other Microsoft 365 services (Teams, SharePoint, OneDrive) — only Outlook mail and contacts within the scopes you approved.
- Change your Microsoft password or account security settings.
https://account.microsoft.com/privacy/app-access (or, for work accounts, via your organization’s My Apps portal). Disconnecting revokes access immediately.
8. Troubleshooting
For general MCP issues, see /mcp/integrations.
9. Frequently asked questions
Is my email data stored by UnleashX? No. UnleashX accesses your mailbox live through Microsoft Graph to perform each request. It doesn’t keep a copy of your inbox. Can multiple team members connect their own Outlook? Yes. Each person authorizes their own Microsoft account, so the agent acts on each user’s own mailbox with their own permissions. Do I ever need to re-authenticate? Usually not —offline_access keeps the connection refreshed. If Microsoft revokes the session (password change, MFA reset, or admin policy), just reconnect.
Can the agent send email as someone else?
No. It can only send as the account you signed in with.
10. References
- Microsoft Graph mail overview: https://learn.microsoft.com/en-us/graph/api/resources/mail-api-overview
- Microsoft Graph permissions reference: https://learn.microsoft.com/en-us/graph/permissions-reference
- Manage app access / revoke (personal): https://account.microsoft.com/privacy/app-access
- Microsoft sign-in: https://login.microsoftonline.com