

Webflow
In one line: Connect Webflow so your UnleashX agent can create and update CMS items, edit page content, read form submissions, manage assets, and publish the site — without opening the Designer.
1. Overview
Webflow is a visual web development platform. Sites are built in the Designer, dynamic content lives in CMS collections, and everything goes live through a publish step. Once connected to UnleashX, your agent works against the Webflow Data API v2: list sites, pages, and collections; create, update, delete, and publish CMS items; read a page’s content DOM and write text back to it; list forms and their submissions; register and upload assets; read ecommerce products and SKUs; manage webhooks; and publish the site. Two polling triggers let a workflow start on its own — when a CMS item is created, or when a form submission arrives. Connecting Webflow to UnleashX means the site stops being a manual step: a new blog post gets drafted straight into the CMS, a form submission lands in your CRM, and the site publishes itself when the content is ready.2. What you’ll need
- A Webflow site you have access to, on a plan that includes the CMS if you want to use collection tools.
- Permission to generate a site API token — you must be the site owner or have admin access to the site’s settings.
- The site API token itself, with the scopes listed in Section 3.
This connector uses a site API token, not the OAuth app flow. A token is scoped to one site — connect each site as its own account.
3. Get your credentials
Webflow authenticates with a site API token sent as a bearer token against the Data API v2.1
Open the site's settings
In the Webflow Dashboard, open the site, then go to Site settings → Apps & integrations.
2
Find API access
Scroll to the API access section, which lists any tokens already generated for this site.
3
Generate a new token
Click Generate API token. Give it a name you’ll recognise later — for example “UnleashX”.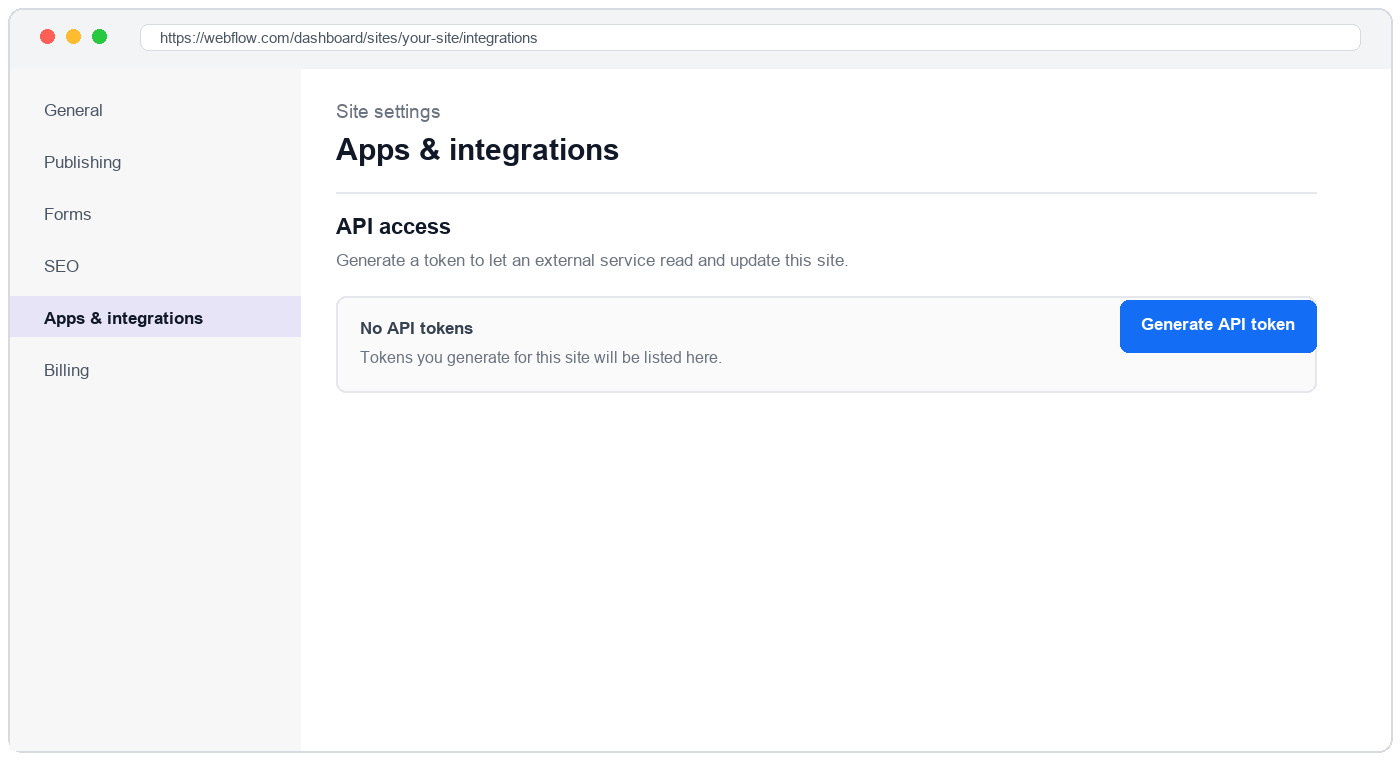
4
Select the scopes
Tick the scopes the connector needs (see the table below). A missing scope doesn’t fail at connect time — it fails later, on the one tool that needs it.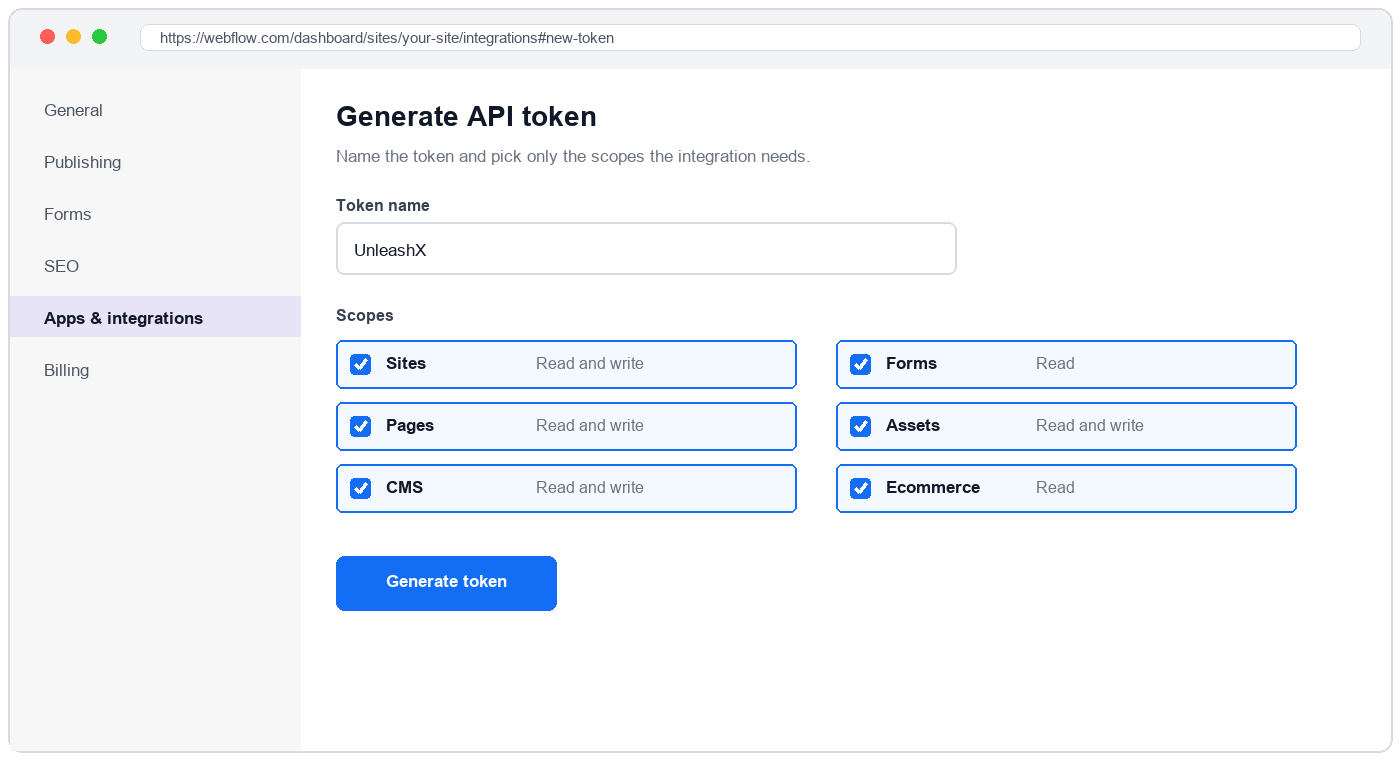
5
Copy the token
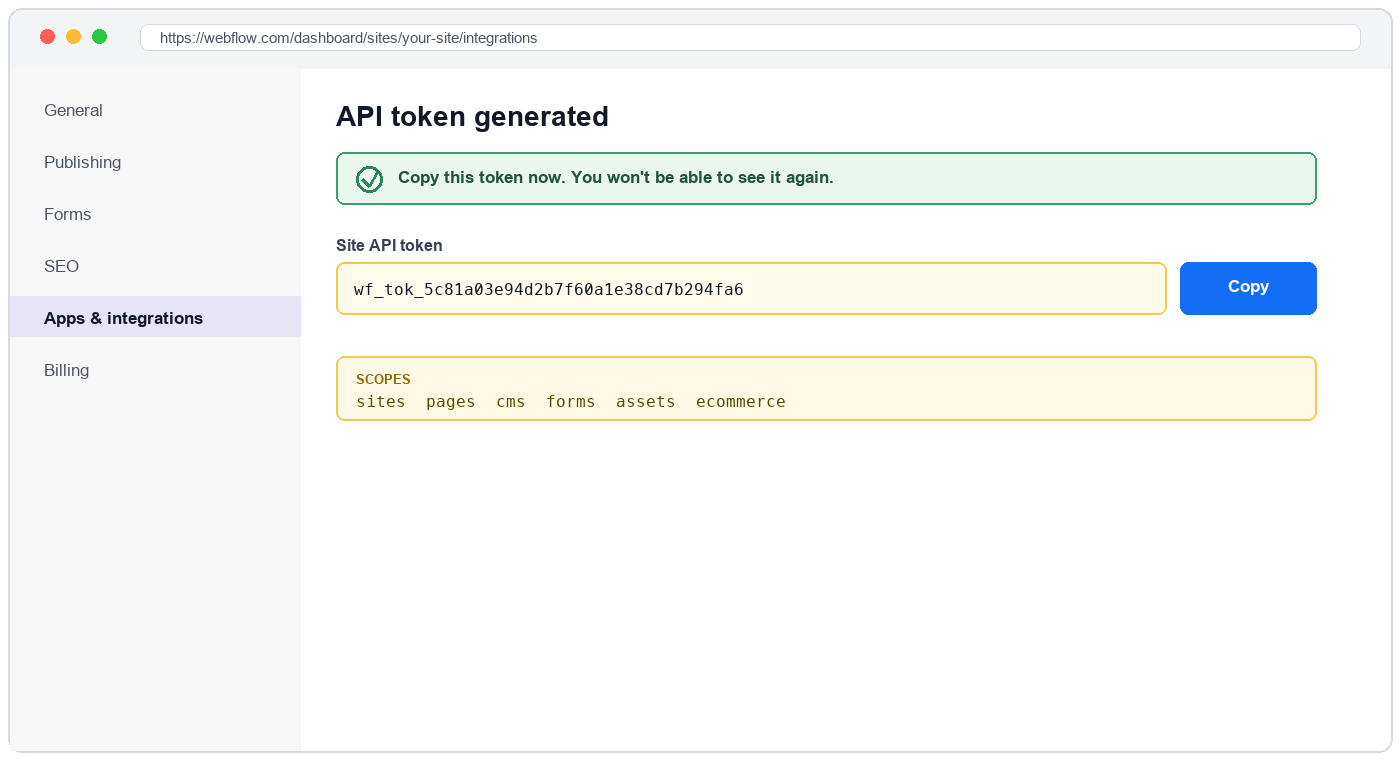
Scopes this token grants UnleashX
4. Connect on UnleashX
1
Open your agent
Sign in at https://www.tryunleashx.com and open the agent you want to connect.
2
Open Data Connectors
In the agent, go to Data Connectors and find Webflow.
3
Add your token
Click Connect / Add / Configure, paste the site API token, and give the connection an Account Name — useful when you connect more than one site.
4
Confirm
Save. The status will switch to a Connected badge.
Use Webflow in a Workflow
Once connected, you can add Webflow to any automation from the Workflows builder. Its triggers and tools appear in the Apps panel, marked with an MCP badge.1
Add a trigger node
Open Workflows → New Workflow. On the canvas, click + Add Trigger. In the Paths panel, open the Apps tab and select Webflow — its Triggers are listed underneath. Use the search box if you have many connectors.
2
Add an action node
Click the + below any node to add a step, then pick Webflow again — this time the panel lists its Actions.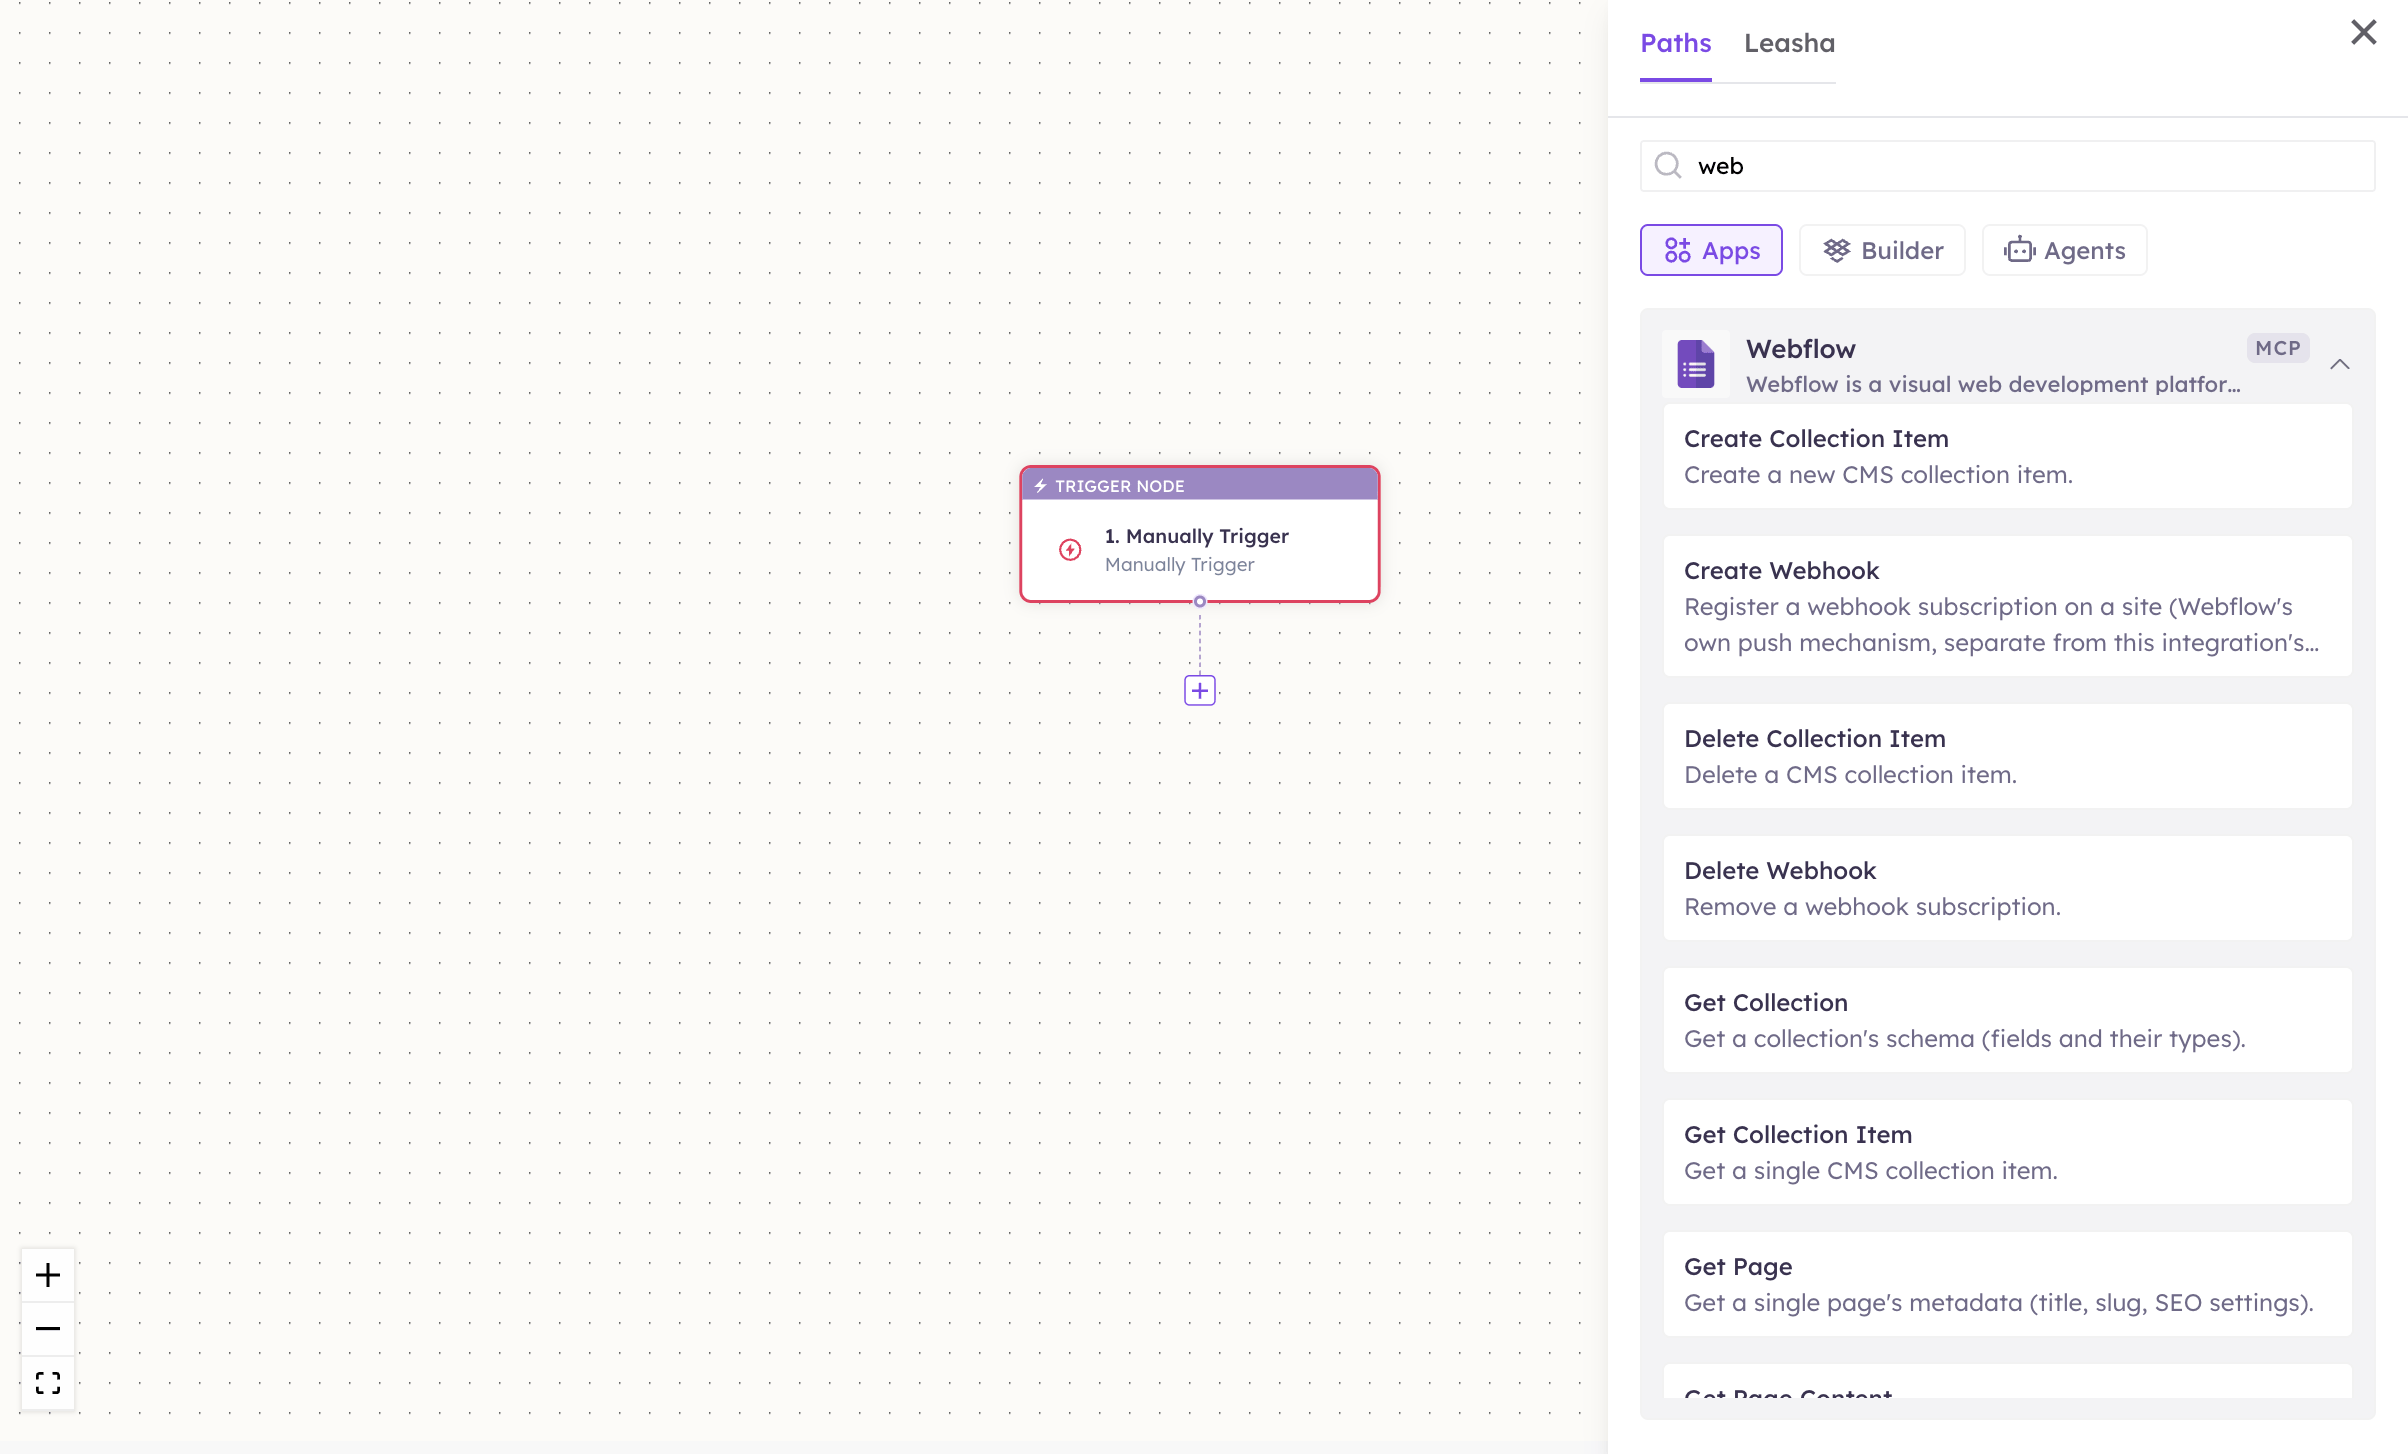
3
Configure the step
Fill in the fields for the trigger or action you picked. Required fields are marked with a red asterisk (*).
4
Add or select your account
Under Selected account, choose an already-connected account, or click Add Account to connect one now.
5
Save and test
Click Save. Use Test to verify the step, then toggle Publish when the workflow is ready.
The steps are the same for every connector. For the full workflow builder guide, see Using MCP in Workflows.
5. Available tools
Most tools need a site ID or collection ID. Start from List Sites and List Collections — every later step takes an ID those return. Names match the Workflows Apps panel, which lists them alphabetically; they’re grouped here by what they act on. The Tool ID is what the agent calls behind the scenes. Sites
Pages
CMS collections
A created or updated CMS item is staged, not live. Run Publish Collection Item (or Publish Site) to make it visible to visitors.
Assets
Upload Asset is a two-step handshake: it registers the file with Webflow and returns an S3 presigned-upload spec, and the file bytes are POSTed there next.
file_hash is the file’s MD5, which Webflow uses to deduplicate.
Webhooks
Triggers
These two triggers poll — they report what’s new since the last check. That’s separate from Create Webhook, which registers Webflow’s own push notification to a callback URL of your choosing. Use the triggers to start an UnleashX workflow; use webhooks to notify an external system.
6. Example usage
“Draft this week’s release notes as a CMS item in the Blog collection.” Runs List Collections → Get Collection (to see the field names) → Create Collection Item as a draft. “Publish everything staged in the Blog collection.” Runs List Collection Items → Publish Collection Item with the staged IDs. “When someone submits the contact form, create the lead in HubSpot and notify Slack.” A workflow starts on the On New Form Submission trigger and chains into your CRM and messaging connectors. “Fix the typo in the hero headline on the pricing page.” Runs List Pages → Get Page Content to find the node, then Update Page Content → Publish Site.7. Permissions & data access
UnleashX CAN:- Read sites, pages, collections, items, forms, submissions, assets, and products.
- Create, update, delete, and publish CMS items.
- Update page text nodes and publish the site.
- Register assets and manage webhook subscriptions.
- Edit the site’s design, layout, styles, or structure — that’s the Designer.
- Do anything outside the scopes you ticked on the token.
- Reach sites the token wasn’t generated for.
- Create or modify ecommerce products and orders (products are read-only here).
8. Troubleshooting
For general connector issues, see /mcp/integrations.
9. Frequently asked questions
Is my site content stored by UnleashX? No. Tools call the Webflow Data API live with your token and return the result. UnleashX keeps only the bookkeeping a polling trigger needs to know what it has already seen. Can the agent redesign my site? No. It works on content — CMS items, page text, assets, publishing. Layout and styling stay in the Designer. Can I connect more than one site? Yes. Generate a token per site and add each as its own connection, using Account Name to tell them apart. Do I need a webhook, or a trigger? Use a trigger to start an UnleashX workflow. Use Create Webhook when an external system needs Webflow to notify it directly. How do I rotate the token? Generate a new token in Site settings → Apps & integrations → API access, update it in UnleashX, then delete the old one.10. References
- Webflow Data API v2 reference: https://developers.webflow.com/data/reference
- Site API tokens: https://developers.webflow.com/data/reference/authentication
- Webflow CMS API: https://developers.webflow.com/data/reference/cms