

Hyperbrowser
In one line: Connect Hyperbrowser so your UnleashX agent can open web pages, scrape and crawl sites, take screenshots, and extract structured data — all in plain language.
1. Overview
Hyperbrowser is a cloud platform for running headless browsers at scale. It handles the hard parts of web automation — proxies, CAPTCHAs, sessions, and rendering — so you can scrape pages, crawl sites, and extract clean data without managing infrastructure. Once connected to UnleashX, your agent can fetch and read a web page, scrape its content as clean markdown or HTML, crawl a whole site, capture screenshots, and extract structured data using a schema. It runs against Hyperbrowser’s cloud browsers using your API key. Connecting Hyperbrowser to UnleashX gives your agent eyes on the live web. Instead of being limited to what it already knows, it can pull the current contents of any public page and turn it into data you can use in a conversation or workflow.2. What you’ll need
- A Hyperbrowser account.
- An API key from your Hyperbrowser dashboard (see Section 3).
- An UnleashX account with access to Data Connectors.
You paste an API key. UnleashX sends it to the Hyperbrowser API as an
x-api-key header.3. Get your credentials
Hyperbrowser MCP authenticates with an API key — a single secret string you generate once in the Hyperbrowser dashboard and paste into UnleashX. There’s no OAuth flow and nothing to install.Step-by-step
1
Sign in to Hyperbrowser
Go to app.hyperbrowser.ai and sign in. If you don’t have an account yet, sign up first — the free tier includes credits (the dashboard shows your balance, e.g. 34 of 5,000), which is plenty to test the connector.You’ll land on the Overview page.
2
Open Settings
In the left sidebar, scroll to the bottom and click Settings. It sits below Documentation and Discord, beneath the main nav items (Overview, Playground, VMs, Browsers, API Calls).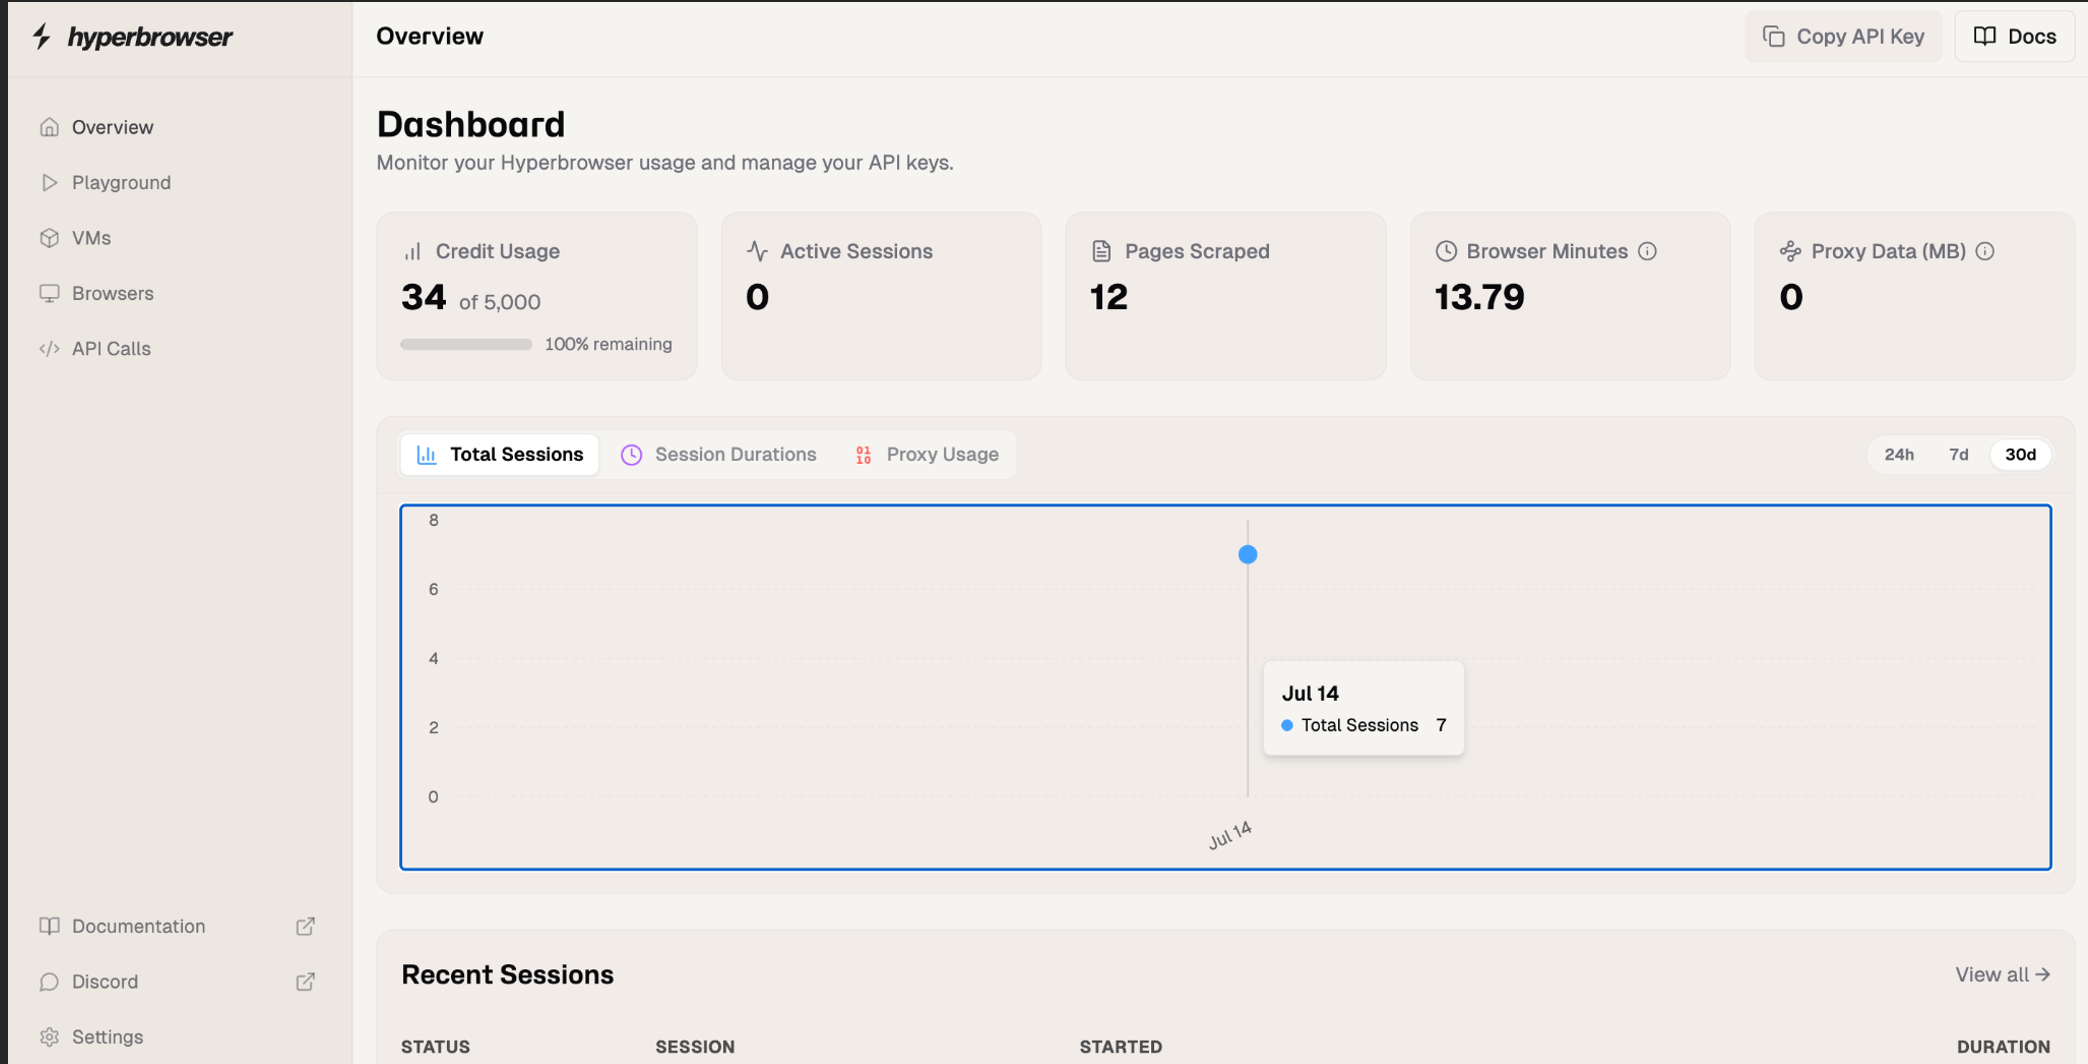
3
Open the API Keys tab
Settings opens with a row of tabs across the top: Account, API Keys, Billing, Static IPs, and Verification.Click API Keys. The page is titled “API Keys — Create and revoke keys for the Hyperbrowser API.” Any keys you’ve already created are listed here.
4
Click Generate key
Click the black Generate key button in the top-right of the API Keys page.
5
Name the key
Give it a name that tells you where it’s used — for example UnleashX. The name is only a label for you; it doesn’t affect what the key can do. A clear name matters later, when you need to know which key to revoke.
6
Copy the key immediately
Hyperbrowser displays the key once. Copy it right away and paste it somewhere safe (a password manager, or straight into the UnleashX connector).If you navigate away before copying, the key is gone for good — you can’t reveal it again. In that case, just delete it from the list and generate a new one.
7
Paste it into UnleashX
Head to Data Connectors → Hyperbrowser in UnleashX and paste the key (full walkthrough in Section 4). UnleashX validates it immediately, so you’ll know right away if it was copied correctly.
Good to know
Lost your key? There’s no way to view an existing key again. Delete the old one under Settings → API Keys, click Generate key to create a new one, then reconnect the connector in UnleashX with the new value.
Permissions this key grants UnleashX
4. Connect on UnleashX
1
Open your agent
Go to https://www.tryunleashx.com and open the agent you want to connect.
2
Open Data Connectors
Inside the agent, go to Data Connectors.
3
Find Hyperbrowser
Locate Hyperbrowser and click Connect (or Add / Configure).
4
Paste your API key
Paste your API key and click Connect.
5
Confirm success
UnleashX validates the key and the Hyperbrowser connector shows a Connected badge.
Use Hyperbrowser in a Workflow
Once connected, you can add Hyperbrowser to any automation from the Workflows builder. Its tools appear in the Apps panel, marked with an MCP badge.1
Add a trigger node
Open Workflows → New Workflow. On the canvas, click + Add Trigger. In the Paths panel, open the Apps tab and select Hyperbrowser — its Triggers are listed underneath. Use the search box if you have many connectors.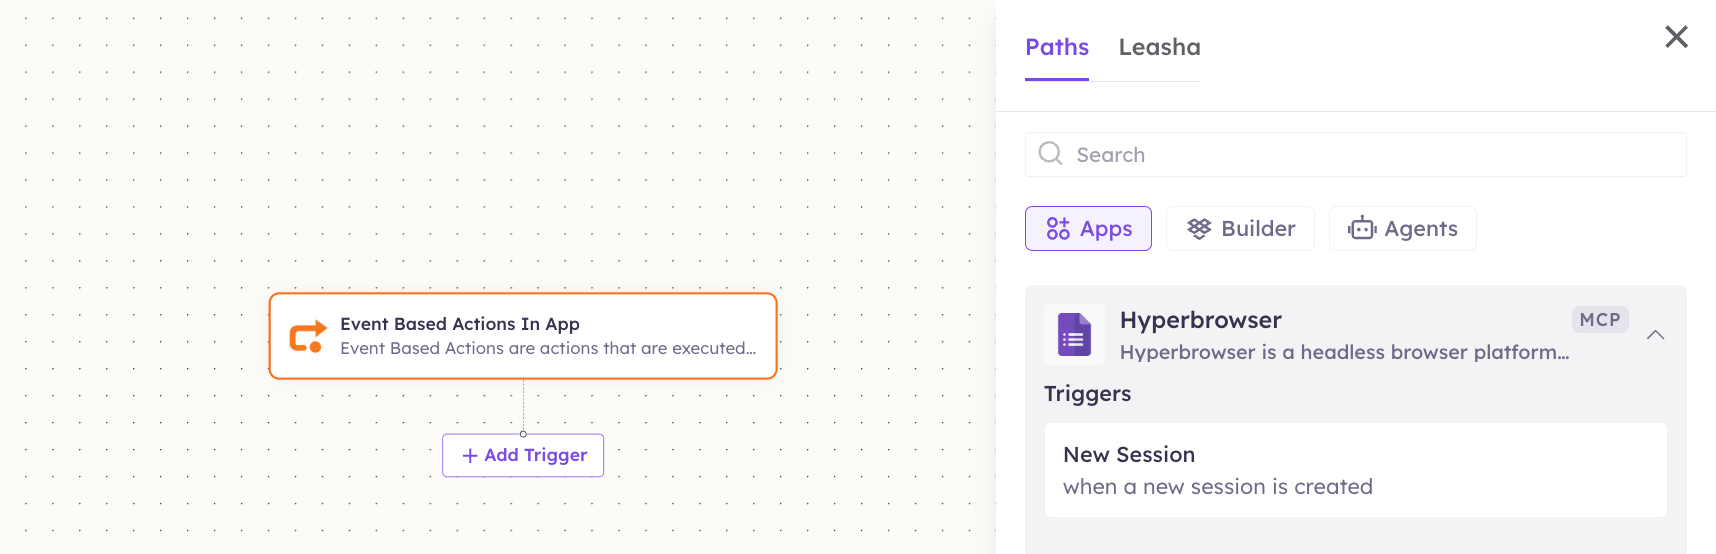
2
Add an action node
Click the + below any node to add a step, then pick Hyperbrowser again — this time the panel lists its Actions.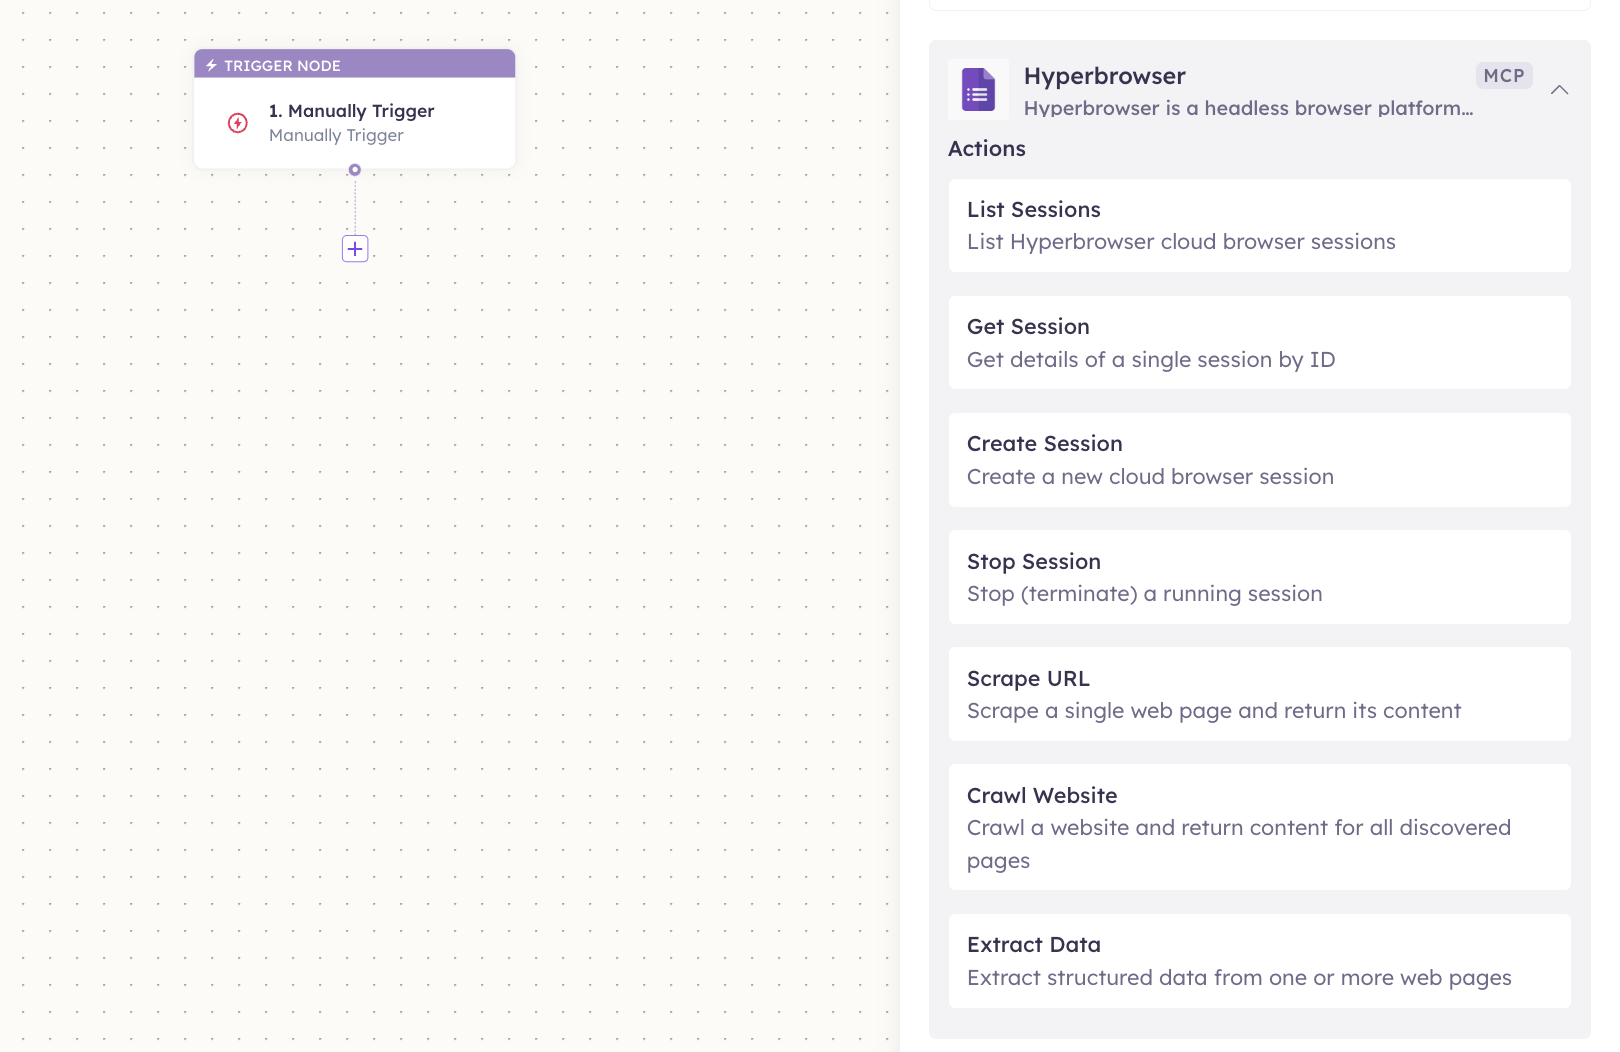
3
Configure the step
Fill in the fields for the trigger or action you picked. Required fields are marked with a red asterisk (*).
4
Add or select your account
Under Selected account, choose an already-connected account, or click Add Account to connect one now.
5
Save and test
Click Save. Use Test to verify the step, then toggle Publish when the workflow is ready.
The steps are the same for every connector. For the full workflow builder guide, see Using MCP in Workflows.
5. Available tools
These tools read external websites; they don’t change your own data. They do consume Hyperbrowser credits.
6. Example usage
“Scrape our competitor’s pricing page and tell me their plan tiers and prices.” → Runs Scrape Page on the URL, then reads the pricing tiers from the returned content. “Crawl the docs site and extract every page title and its URL.” → Runs Crawl Site from the docs root, then Extract Data with a schema for title + URL.7. Permissions & data access
UnleashX can:- Fetch, scrape, and crawl public web pages.
- Extract structured data and capture screenshots.
- Start, inspect, and stop cloud browser sessions.
- Access pages behind logins it doesn’t have credentials for.
- Bypass a site’s access controls or terms of use.
- Exceed your Hyperbrowser plan’s credit/rate limits.
8. Troubleshooting
For general MCP issues, see /mcp/integrations.
9. Frequently asked questions
Does UnleashX store scraped content? No. Content is fetched live per request and returned to your agent; UnleashX doesn’t keep a copy. Can it scrape sites that require login? Only if you provide a session with valid credentials. It won’t bypass authentication on its own. Will crawling cost me? Yes — scraping and crawling consume Hyperbrowser credits. Scope crawls to what you need. Is scraping allowed? Respect each site’s terms of service and robots rules. You’re responsible for how the agent uses the tool.10. References
- Hyperbrowser documentation: https://docs.hyperbrowser.ai/
- API reference: https://docs.hyperbrowser.ai/reference/api-reference
- Dashboard / API keys: https://app.hyperbrowser.ai/