

SurveyMonkey
In one line: Connect SurveyMonkey so your UnleashX agent can list your surveys, pull responses, and summarize results — all in plain language.
1. Overview
SurveyMonkey is a survey platform for collecting feedback at scale. Your account holds the surveys you’ve built, the collectors that distribute them, and every response respondents submit. Once connected to UnleashX, your agent can list your surveys, read a survey’s questions, pull responses through its collectors, and summarize the results. It works against your live SurveyMonkey account using an access token, so it acts with your own permissions. Connecting SurveyMonkey to UnleashX turns your surveys into a live feedback source. Instead of exporting results manually, you ask your agent to pull the latest responses or summarize what respondents said.2. What you’ll need
- A SurveyMonkey account (a paid plan is required for full API access to responses).
- An access token generated from an app in the SurveyMonkey Developer Portal (see Section 3).
- An UnleashX account with access to Data Connectors.
You paste an access token. UnleashX sends it to the SurveyMonkey API as a
Bearer credential.3. Get your credentials
SurveyMonkey works differently from most connectors: you don’t generate a bare token from your account settings. Instead you create an app in the Developer Portal, and that app comes with an access token already bound to your own SurveyMonkey account. You copy that token into UnleashX. The app is just a container for the credential — you never publish it or submit it for review.Step-by-step
1
Open the Developer Portal
Go to developer.surveymonkey.com and sign in with your SurveyMonkey account. The top navigation shows Home, My Apps, Docs, Status, and FAQ.
2
Go to My Apps
Click My Apps. This lists any apps you’ve already created.
3
Click Add a New App
Click the green Add a New App button in the top-right. The APP CREATION dialog opens.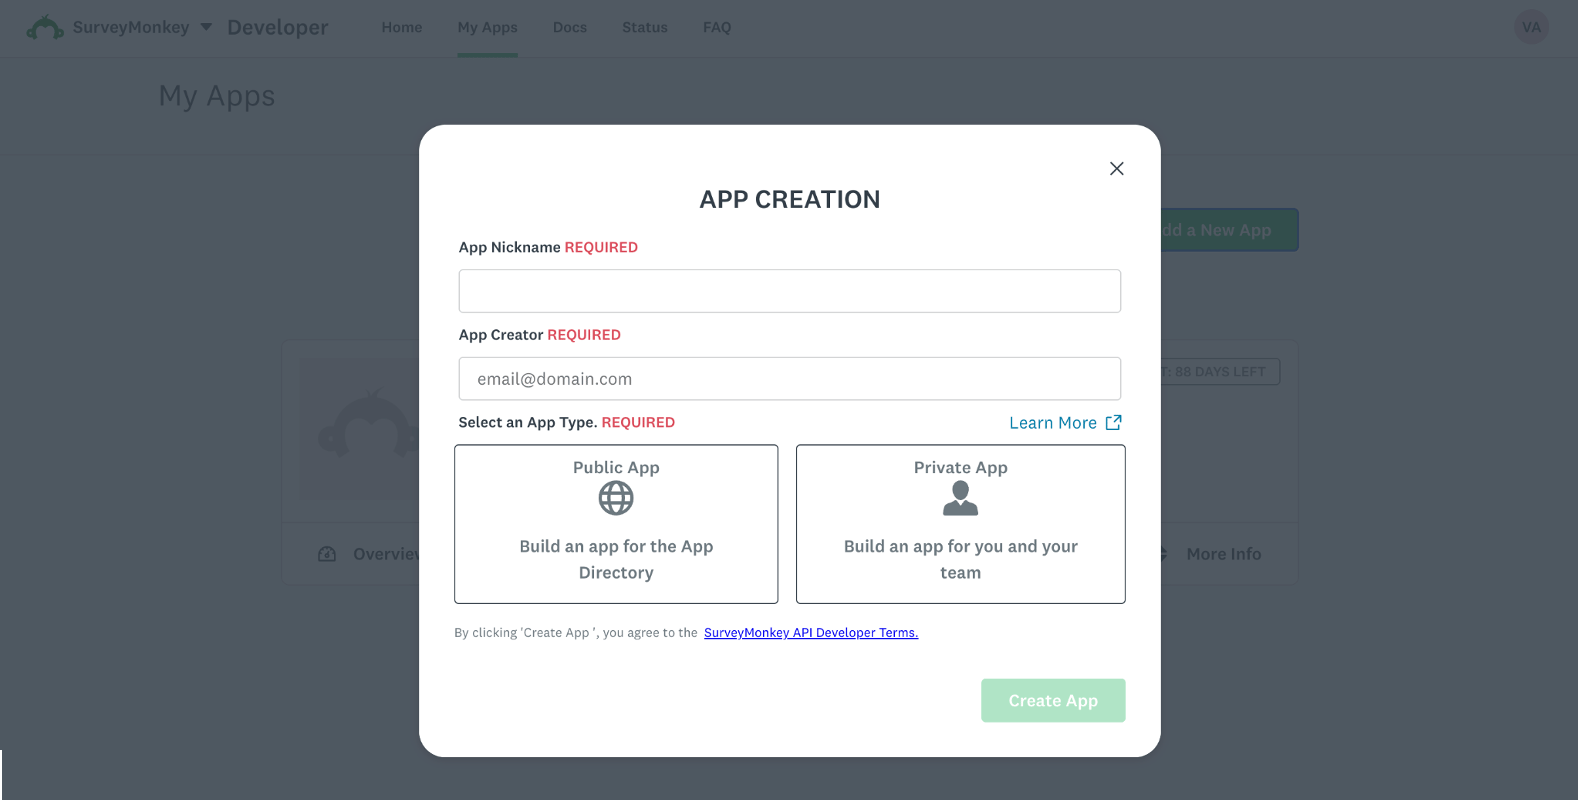
4
Fill in the app details
Three fields are required:
- App Nickname — a name for your own reference, e.g.
UnleashX. - App Creator — your email address.
- App Type — choose Private App (“Build an app for you and your team”).
5
Create the app
Click Create App. The button stays greyed out until all three required fields are filled. Creating the app means accepting the SurveyMonkey API Developer Terms, linked in the dialog.
6
Open the app's Settings
Once the app is created you’ll be returned to My Apps. Open your new app and click Settings.
7
Copy the access token
Scroll to the Credentials section. Alongside the Client ID and Secret you’ll find your Access Token — copy it.This token is already tied to your SurveyMonkey account, so there’s no separate OAuth step to run.
8
Paste it into UnleashX
Head to Data Connectors → SurveyMonkey in UnleashX and paste the token (full walkthrough in Section 4). UnleashX validates it on save.
Good to know
Response access depends on your plan. Reading responses through the API generally requires a paid SurveyMonkey plan. On lower tiers the connection succeeds but response endpoints return
403 — see Section 8.Permissions this token grants UnleashX
4. Connect on UnleashX
1
Open your agent
Go to https://www.tryunleashx.com and open the agent you want to connect.
2
Open Data Connectors
Inside the agent, go to Data Connectors.
3
Find SurveyMonkey
Locate SurveyMonkey and click Connect (or Add / Configure).
4
Paste your access token
Paste your access token and click Connect.
5
Confirm success
UnleashX validates the token and the SurveyMonkey connector shows a Connected badge.
Use SurveyMonkey in a Workflow
Once connected, you can add SurveyMonkey to any automation from the Workflows builder. Its triggers and tools appear in the Apps panel, marked with an MCP badge.1
Add a trigger node
Open Workflows → New Workflow. On the canvas, click + Add Trigger. In the Paths panel, open the Apps tab and select SurveyMonkey — its Triggers are listed underneath. Use the search box if you have many connectors.
2
Add an action node
Click the + below any node to add a step, then pick SurveyMonkey again — this time the panel lists its Actions.
3
Configure the step
Fill in the fields for the trigger or action you picked. Required fields are marked with a red asterisk (*).
4
Add or select your account
Under Selected account, choose an already-connected account, or click Add Account to connect one now.
5
Save and test
Click Save. Use Test to verify the step, then toggle Publish when the workflow is ready.
The steps are the same for every connector. For the full workflow builder guide, see Using MCP in Workflows.
5. Available tools
The SurveyMonkey connector is read-focused — it reads surveys, collectors, and responses rather than modifying them.
6. Example usage
“How many people finished our NPS survey, and what’s the overall sentiment?” → Runs List Responses (or Get Response Counts) for the survey, then summarizes the responses. “Pull the open-text answers from last week’s feedback survey and group the themes.” → Runs List Responses / Get Response for the survey and summarizes the free-text answers by theme.7. Permissions & data access
UnleashX can:- List and read your surveys, questions, collectors, and responses.
- Retrieve response counts and details for reporting.
- Modify or delete surveys or responses.
- Access surveys your account/plan can’t reach.
- Change your SurveyMonkey account or billing settings.
8. Troubleshooting
For general MCP issues, see /mcp/integrations.
9. Frequently asked questions
Is my survey data stored by UnleashX? No. UnleashX reads through the SurveyMonkey API live per request; it doesn’t keep a copy of your surveys or responses. Why can’t I read responses? Response access depends on your SurveyMonkey plan. Free/lower tiers restrict some API endpoints. Can the agent edit surveys? The connector is read-focused — it reads surveys and responses rather than creating or editing them.10. References
- SurveyMonkey API documentation: https://api.surveymonkey.com/v3/docs
- Developer Portal: https://developer.surveymonkey.com/
- Getting started / access tokens: https://developer.surveymonkey.com/api/v3/#getting-started