> ## Documentation Index
> Fetch the complete documentation index at: https://docs.unleashx.ai/llms.txt
> Use this file to discover all available pages before exploring further.
# Using MCP in Workflows
> Build a workflow in UnleashX, add a trigger and MCP app steps, branch with conditions, and publish — step by step.
# Using MCP in Workflows
## What is a Workflow?
A workflow is a sequence of connected steps that automates a process from start to finish. Instead of performing tasks manually, a workflow executes predefined actions automatically based on a trigger or event.
Think of a workflow as a digital process that moves information between different systems, makes decisions, and performs actions without human intervention.
For example, when a new lead is submitted through a form, a workflow can automatically save the lead in a CRM, notify the sales team, and schedule a follow-up task.
In UnleashX, every connected service appears in the workflow builder as an **app** marked with an **MCP** badge — so the same MCP servers you connect once become the building blocks of your automations.
***
## Why Use Workflows?
Workflows help organizations automate repetitive tasks, reduce manual effort, and ensure processes are executed consistently.
### Benefits of Workflows
* **Save Time** by automating repetitive tasks and reducing manual work.
* **Increase Efficiency** by connecting multiple tools and systems into a single automated process.
* **Reduce Errors** by eliminating manual data entry and repetitive actions.
* **Improve Consistency** by ensuring tasks are performed the same way every time.
* **Scale Operations** by handling large volumes of tasks without additional effort.
* **Enable Intelligent Automation** by combining business logic, AI capabilities, and external applications.
Whether it's managing leads, processing support requests, updating records, sending notifications, or coordinating tasks across multiple applications, workflows help teams streamline operations and focus on higher-value work.
***
## How to build one
This guide walks the full build, end to end, exactly as it appears in UnleashX:
Create a new workflow.
Choose what starts the flow.
Set up each trigger type.
Add actions and branch the flow.
Go live.
***
## 1. Open Workflows
Sign in at [https://www.tryunleashx.com](https://www.tryunleashx.com). In the left sidebar under **BUILD**, click **Workflows**.
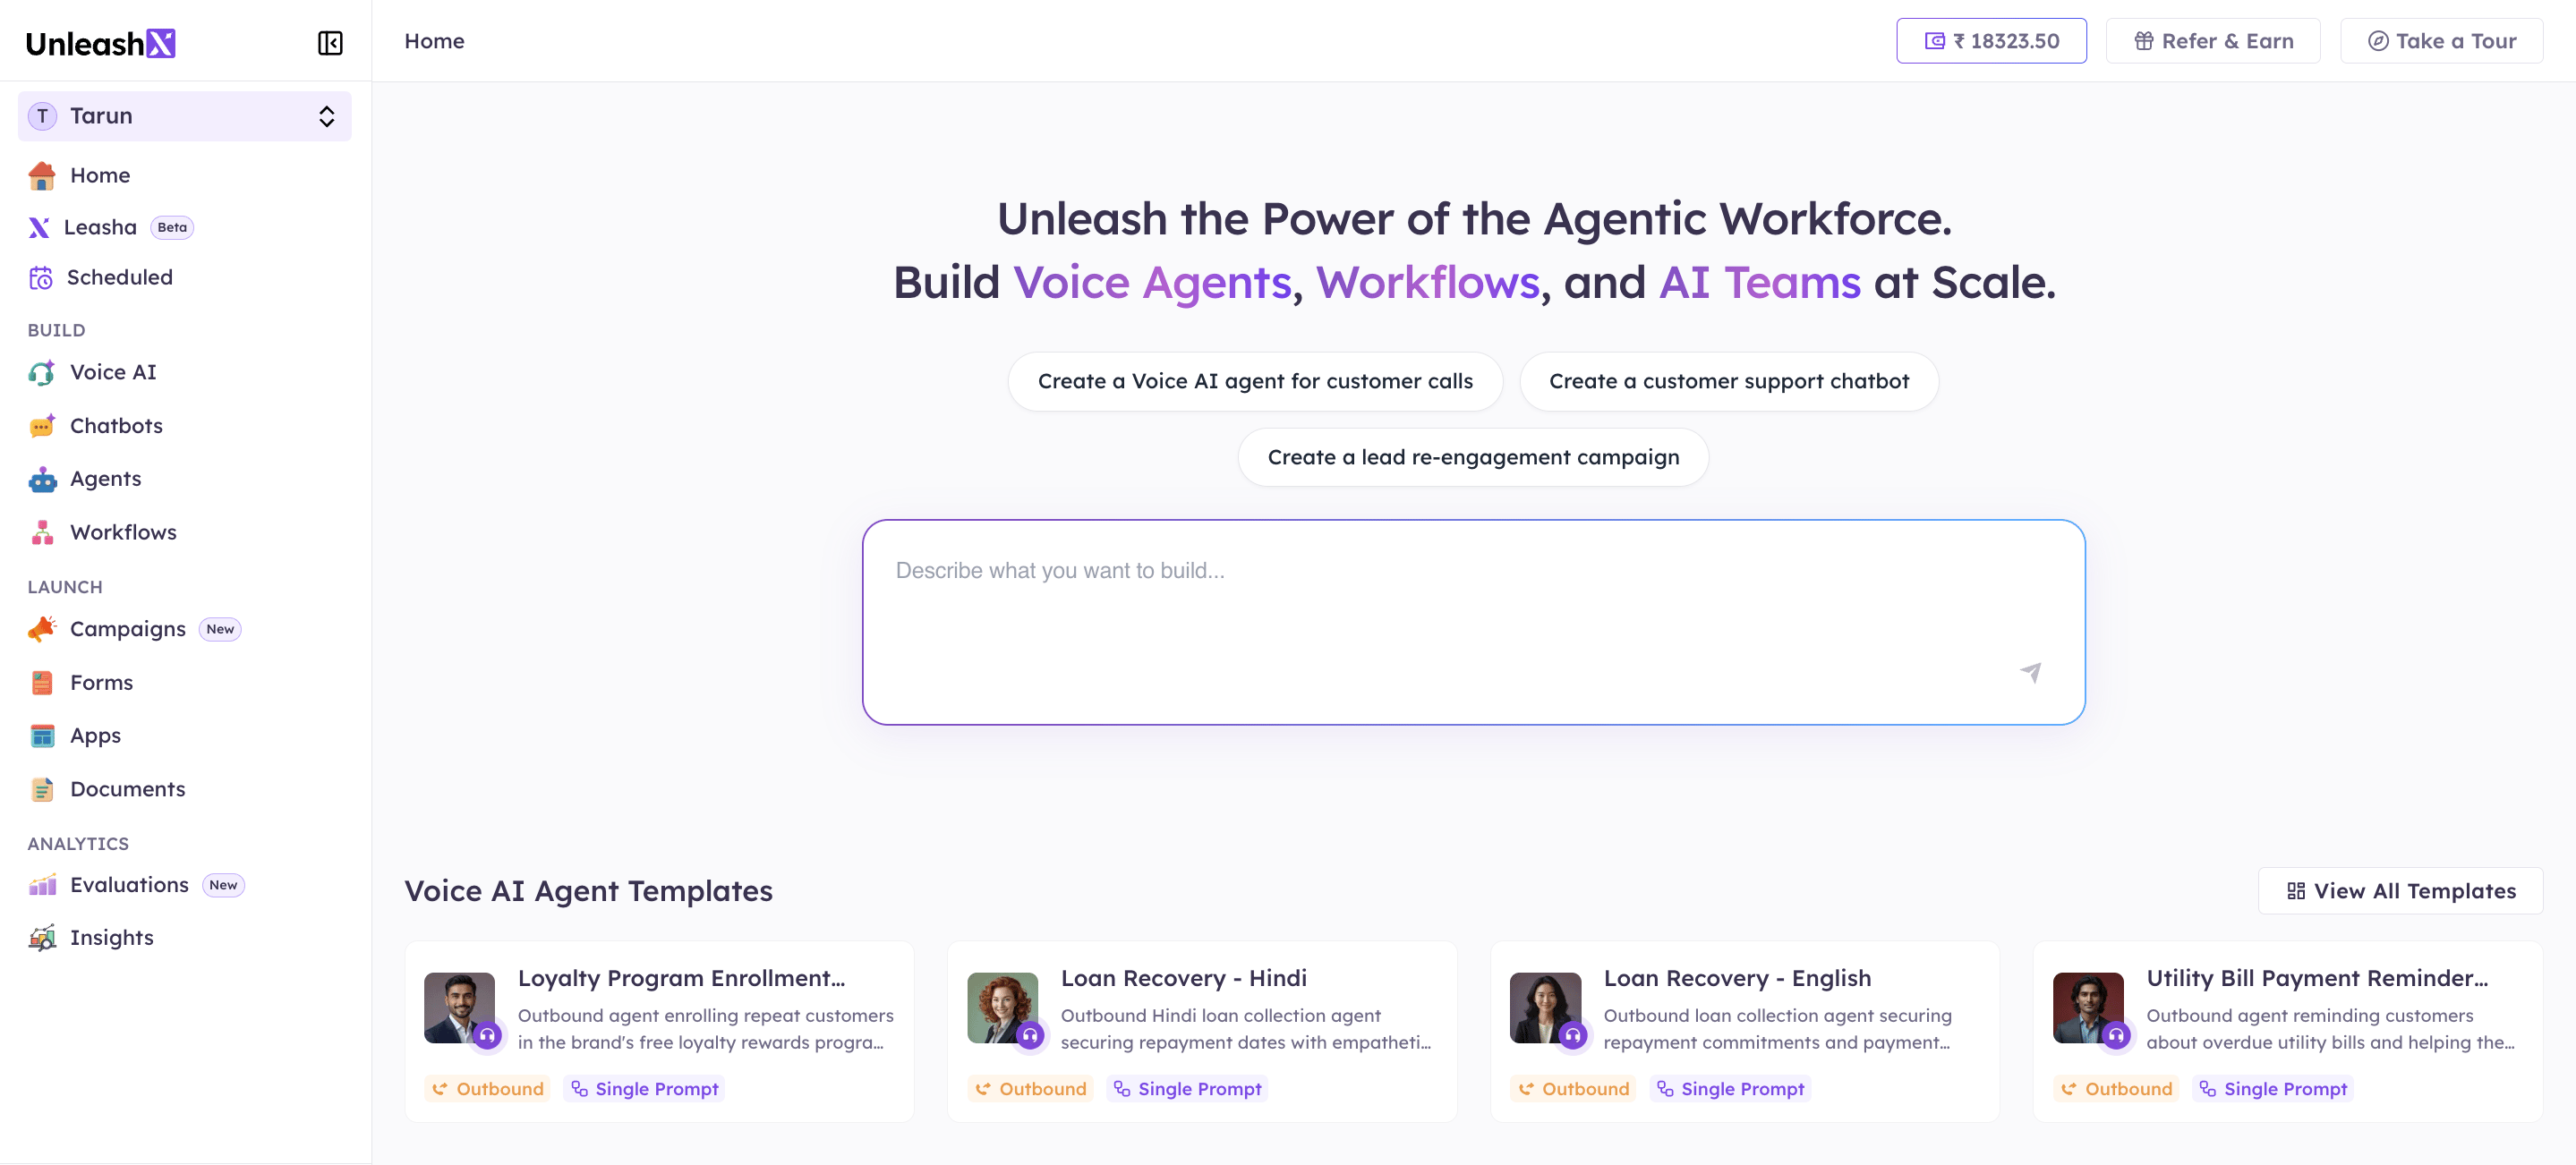 On the Workflows list, click **+ New Workflow** in the top-right. (You can also filter by date or search existing workflows here, and switch to **Execution History** to see past runs.)
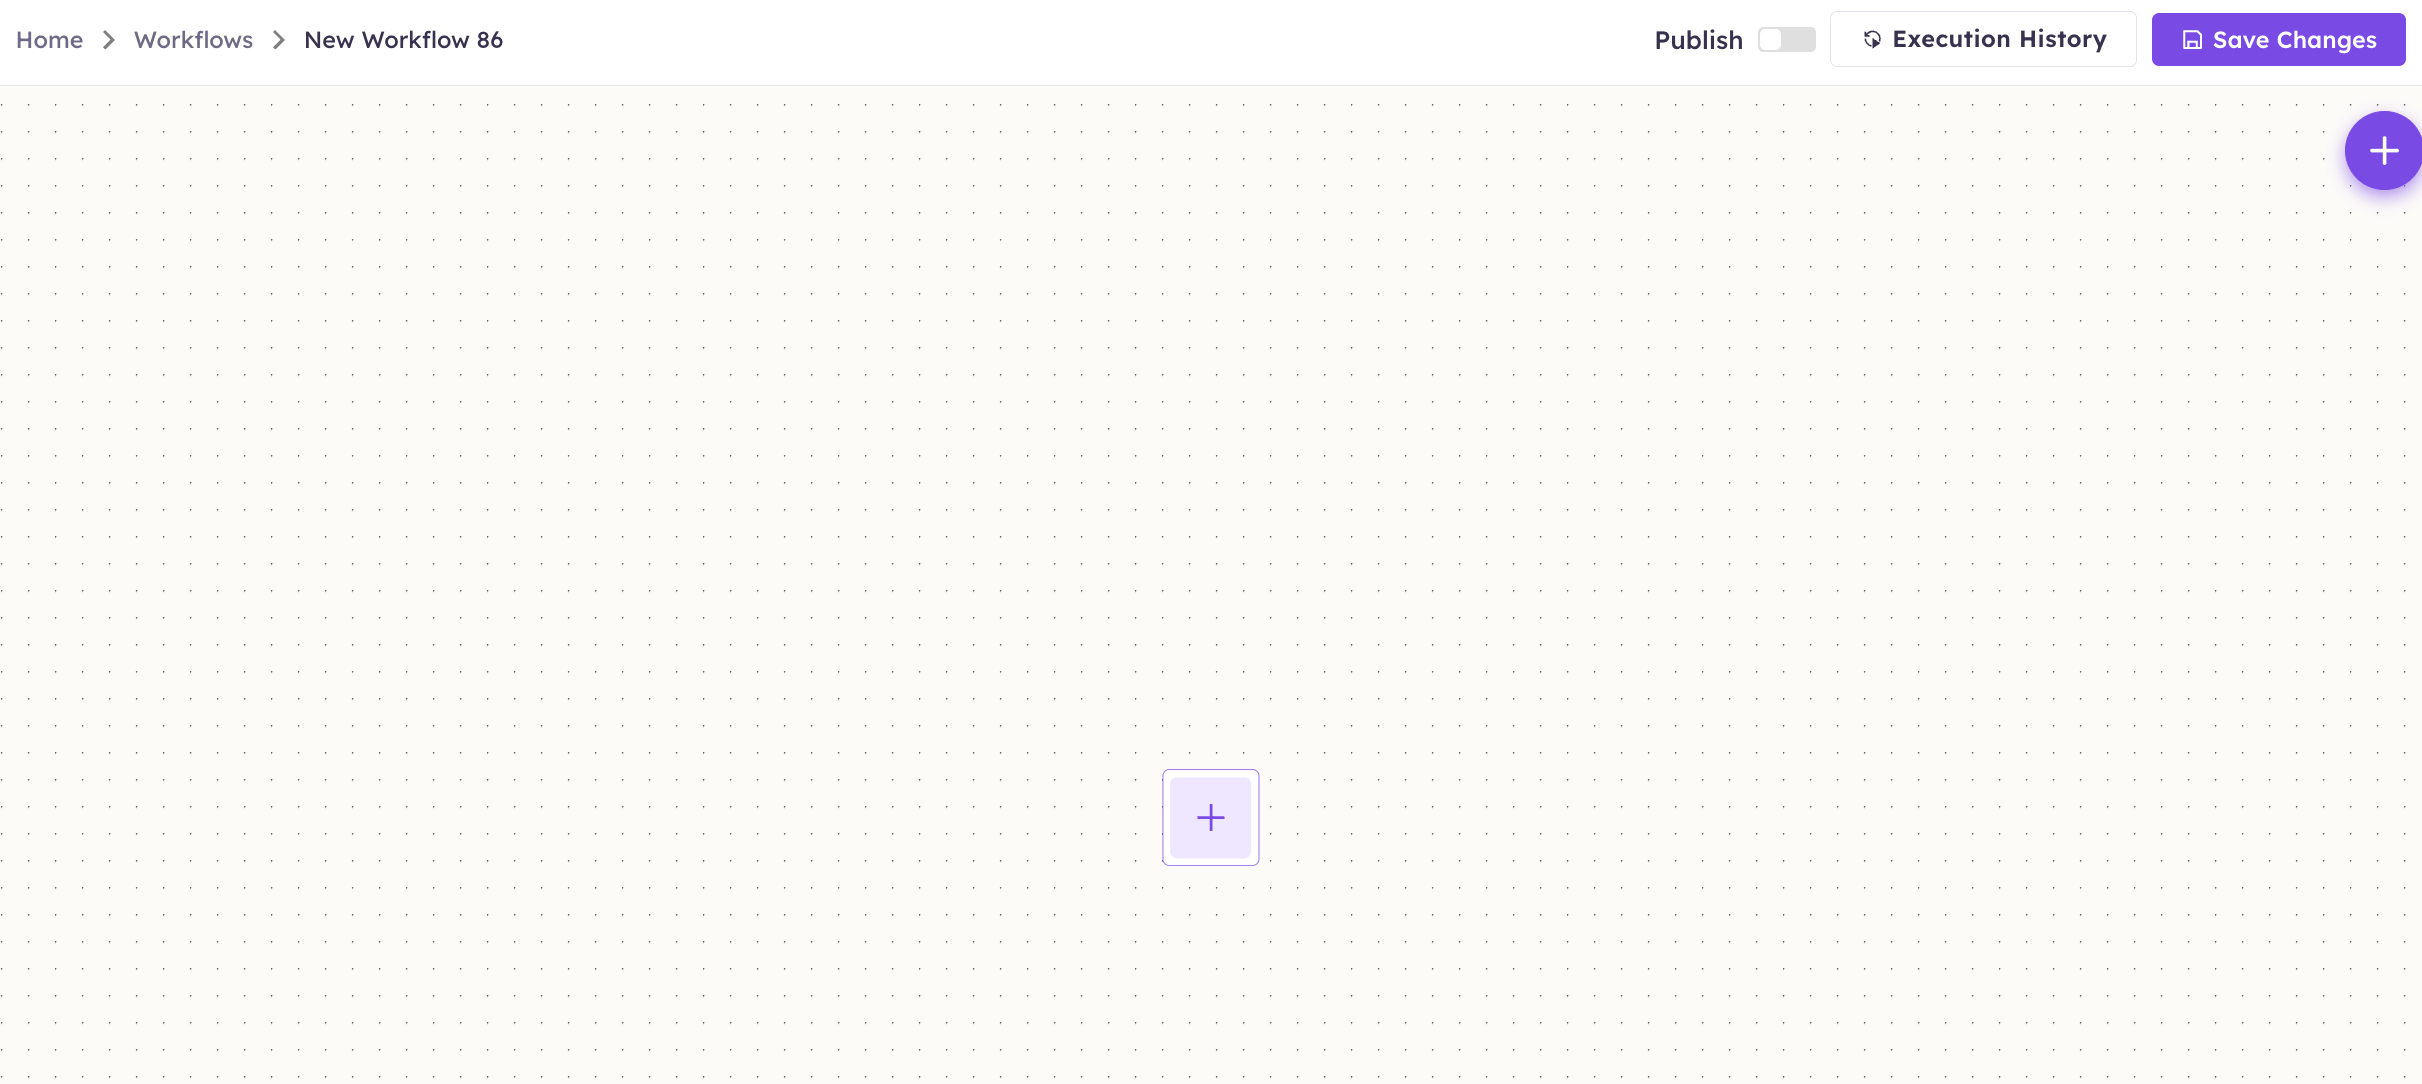
 A blank workflow opens (named **New Workflow …** in the breadcrumb). The dotted area is your canvas; the **+** in the middle is where you add your first step. The **Publish** toggle and **Save Changes** button are in the top-right.
 ***
## 2. Add a trigger
A **trigger** is the event that starts your workflow.
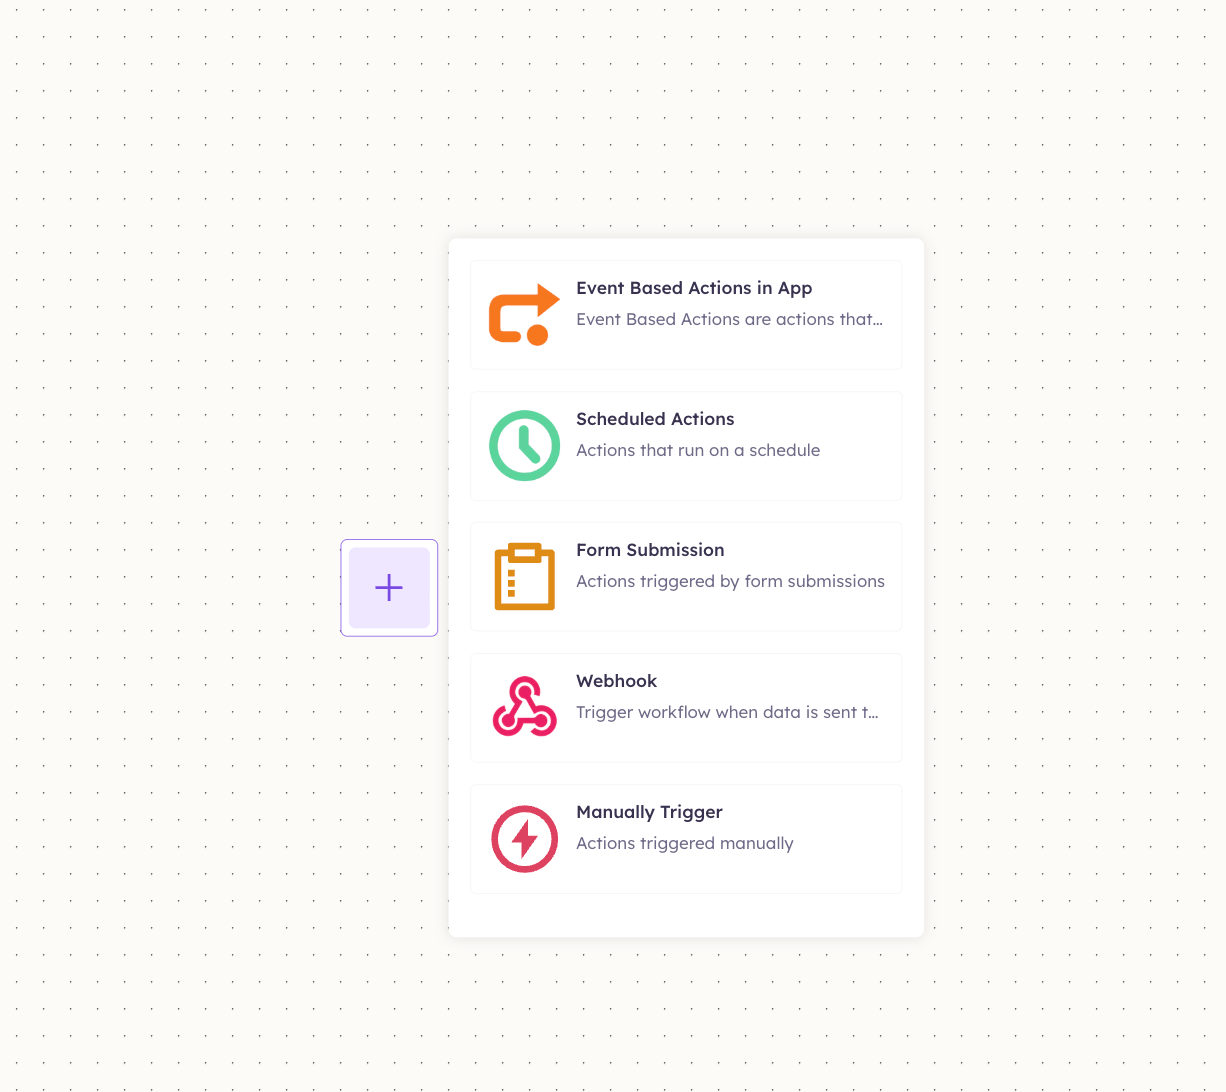
Click the **+** node. A menu of trigger types appears:
| Trigger type | Starts the workflow when… |
| ------------------------------ | ---------------------------------------------------------------- |
| **Event Based Actions in App** | something happens in a connected app (e.g. a new row in a sheet) |
| **Scheduled Actions** | a schedule fires (e.g. every morning) |
| **Form Submission** | a UnleashX form is submitted |
| **Webhook** | data is sent to a webhook URL |
| **Manually Trigger** | you run it by hand |
***
## 2. Add a trigger
A **trigger** is the event that starts your workflow.
Click the **+** node. A menu of trigger types appears:
| Trigger type | Starts the workflow when… |
| ------------------------------ | ---------------------------------------------------------------- |
| **Event Based Actions in App** | something happens in a connected app (e.g. a new row in a sheet) |
| **Scheduled Actions** | a schedule fires (e.g. every morning) |
| **Form Submission** | a UnleashX form is submitted |
| **Webhook** | data is sent to a webhook URL |
| **Manually Trigger** | you run it by hand |
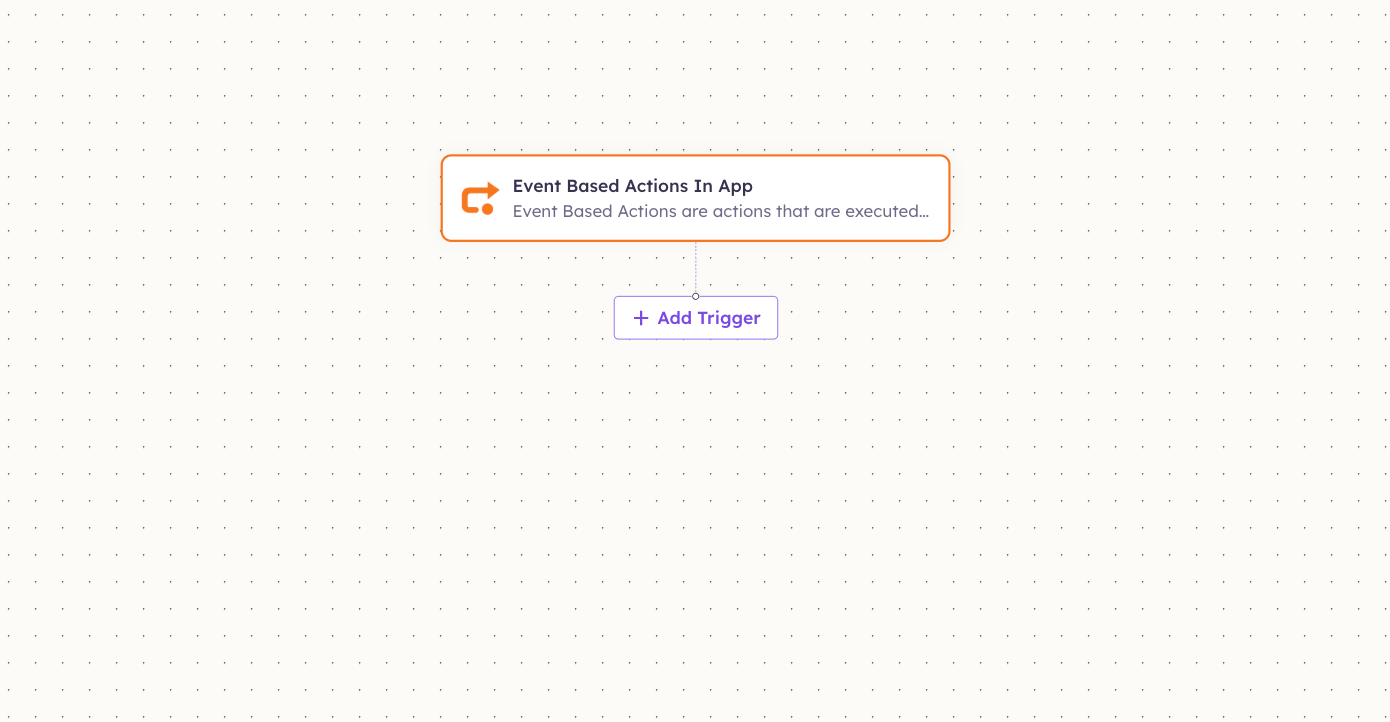
 Choose the type that fits your use case — [Section 3](#3-trigger-types-in-detail) sets up each one. For example, **Event Based Actions in App** adds the node with a **+ Add Trigger** button beneath it, ready to attach an MCP app.
 ***
## 3. Trigger types in detail
Whichever trigger you pick, the rest of the build (steps, conditions, publish) is the same. Here's how to set up each of the five types.
### Event Based Actions in App (MCP apps)
Start the workflow from something happening in a connected app — for example, a new row in Google Sheets.
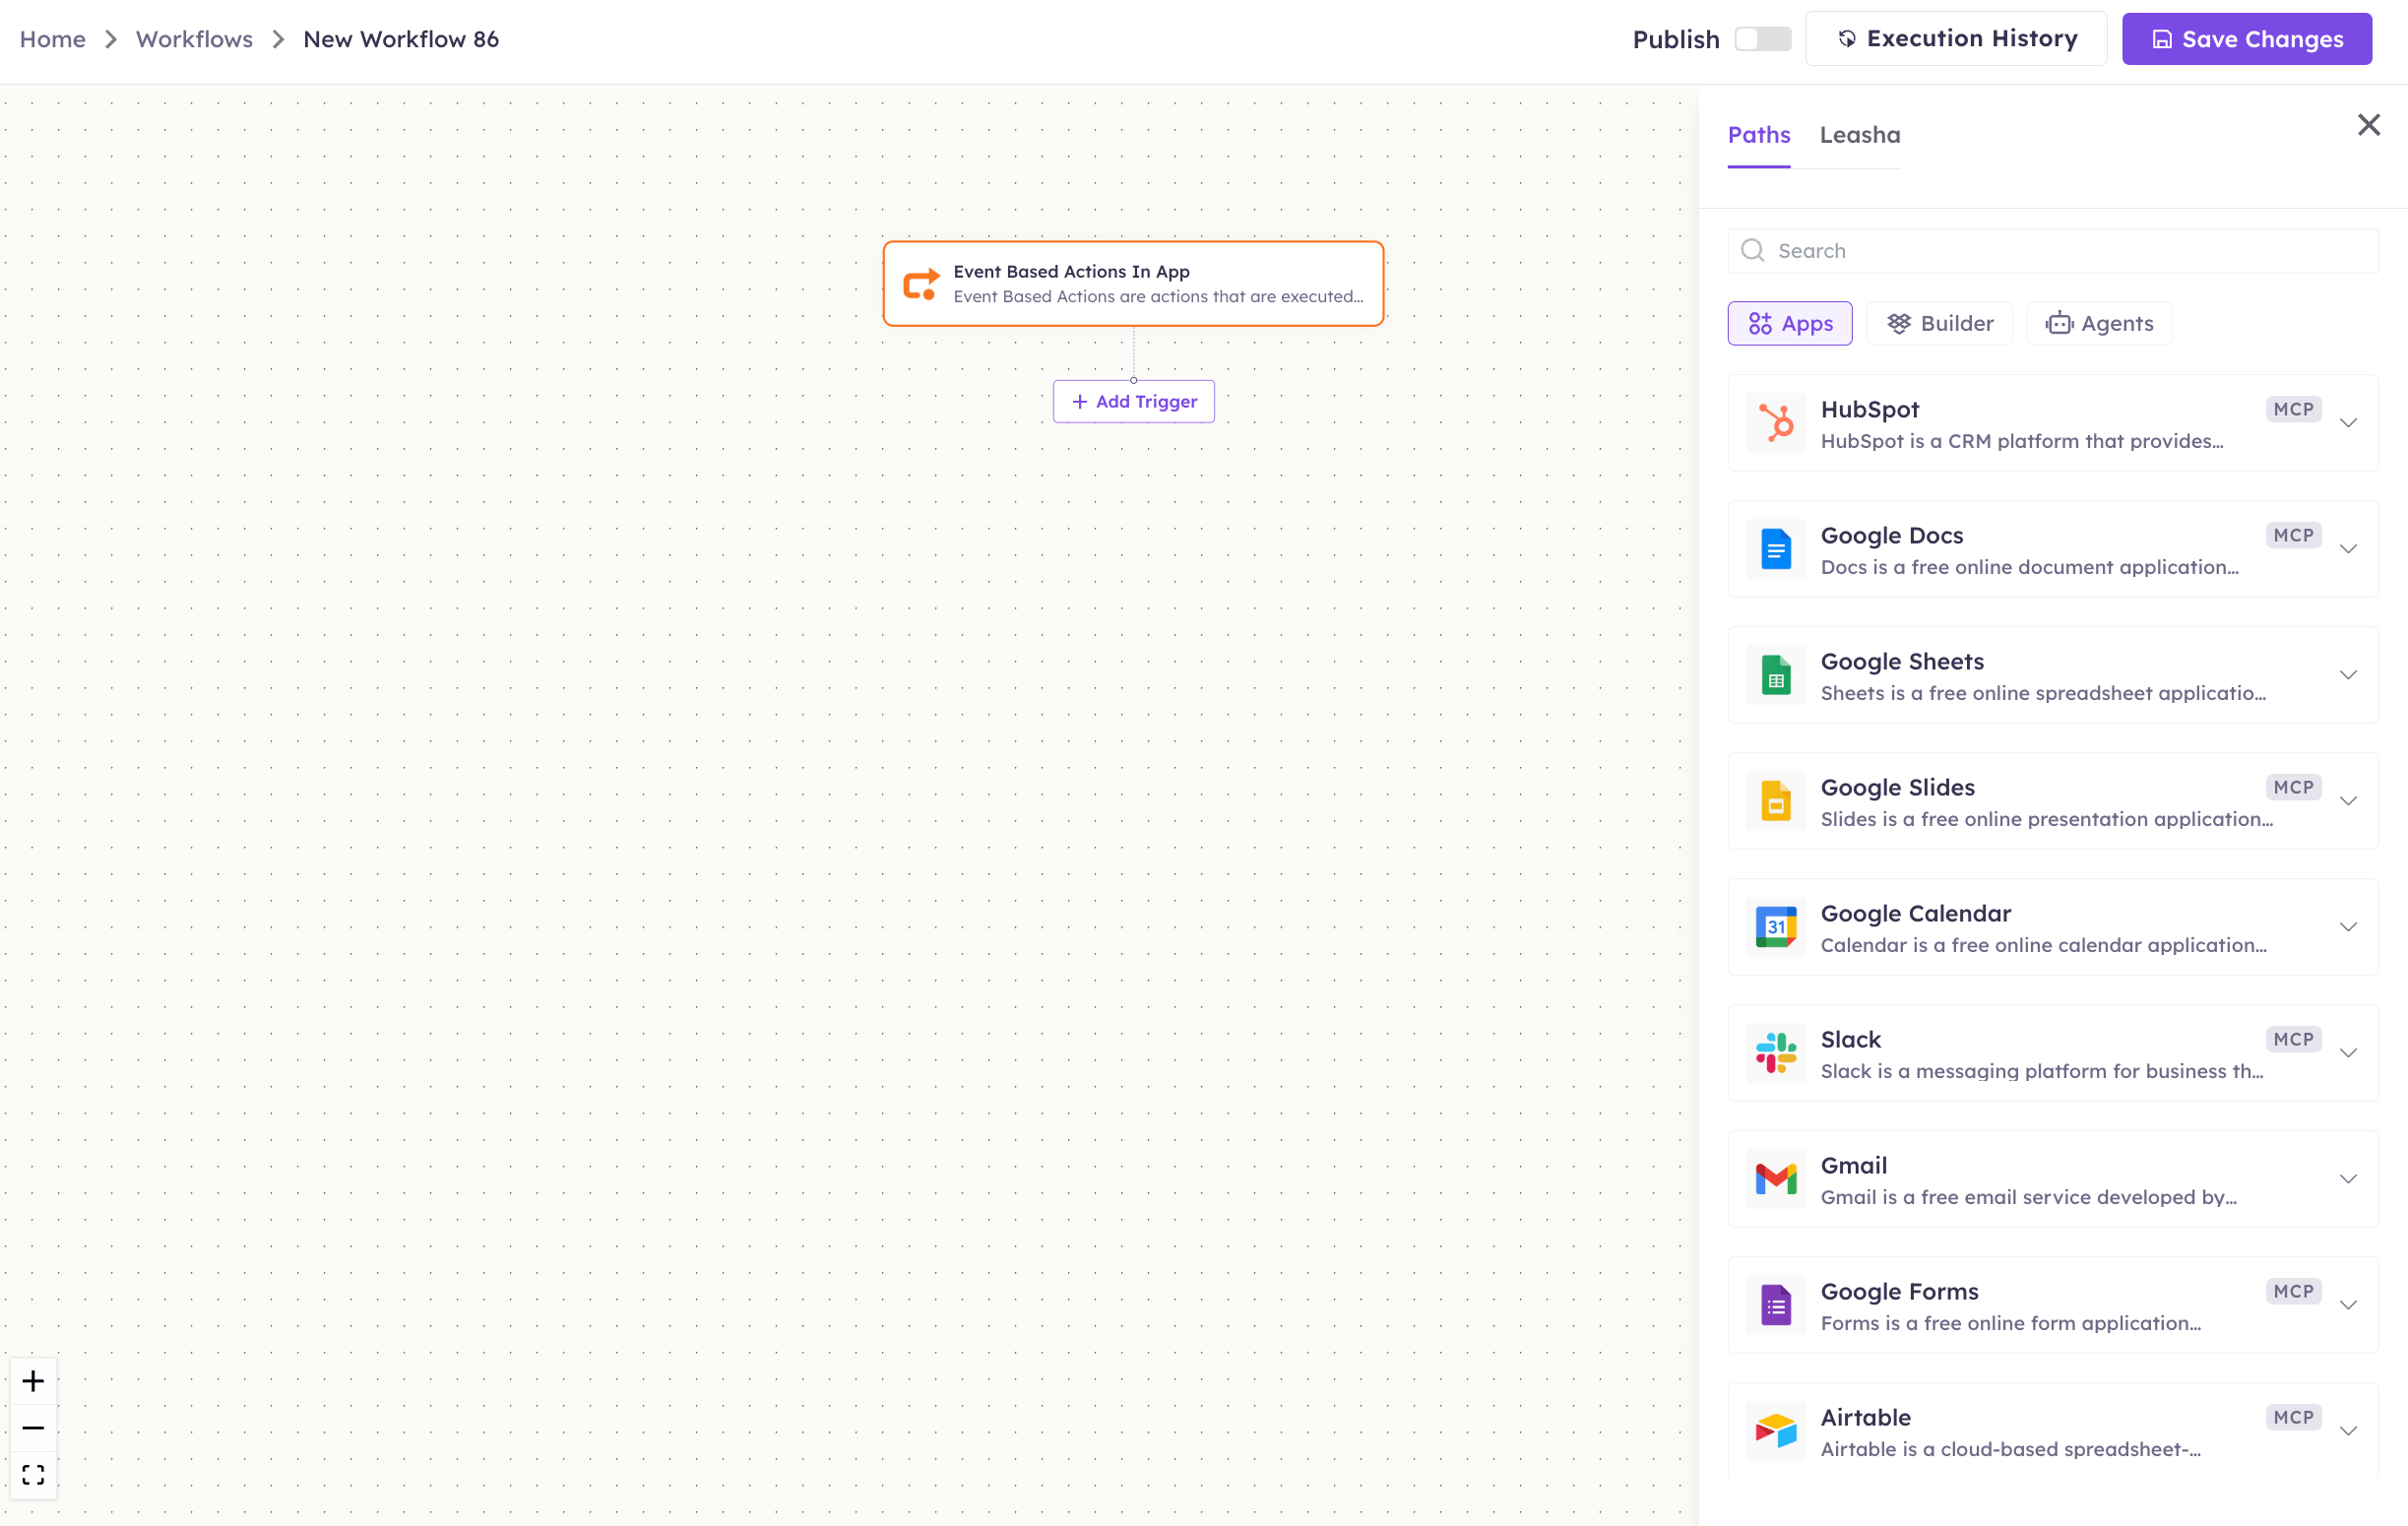
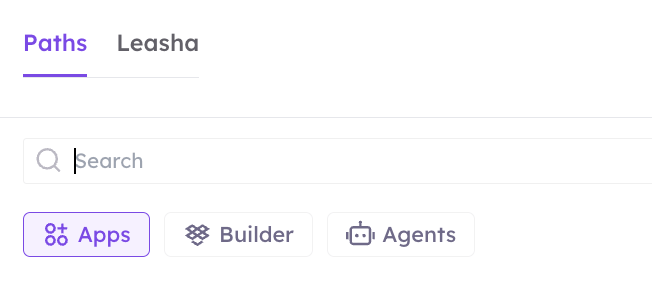
Click **+ Add Trigger**. The **Paths** panel opens on the right with three tabs — **Apps**, **Builder**, **Agents**. On **Apps**, you'll see every connected service; MCP servers carry an **MCP** badge (HubSpot, Google Sheets, Google Calendar, Slack, Gmail, Airtable, and more).
***
## 3. Trigger types in detail
Whichever trigger you pick, the rest of the build (steps, conditions, publish) is the same. Here's how to set up each of the five types.
### Event Based Actions in App (MCP apps)
Start the workflow from something happening in a connected app — for example, a new row in Google Sheets.
Click **+ Add Trigger**. The **Paths** panel opens on the right with three tabs — **Apps**, **Builder**, **Agents**. On **Apps**, you'll see every connected service; MCP servers carry an **MCP** badge (HubSpot, Google Sheets, Google Calendar, Slack, Gmail, Airtable, and more).
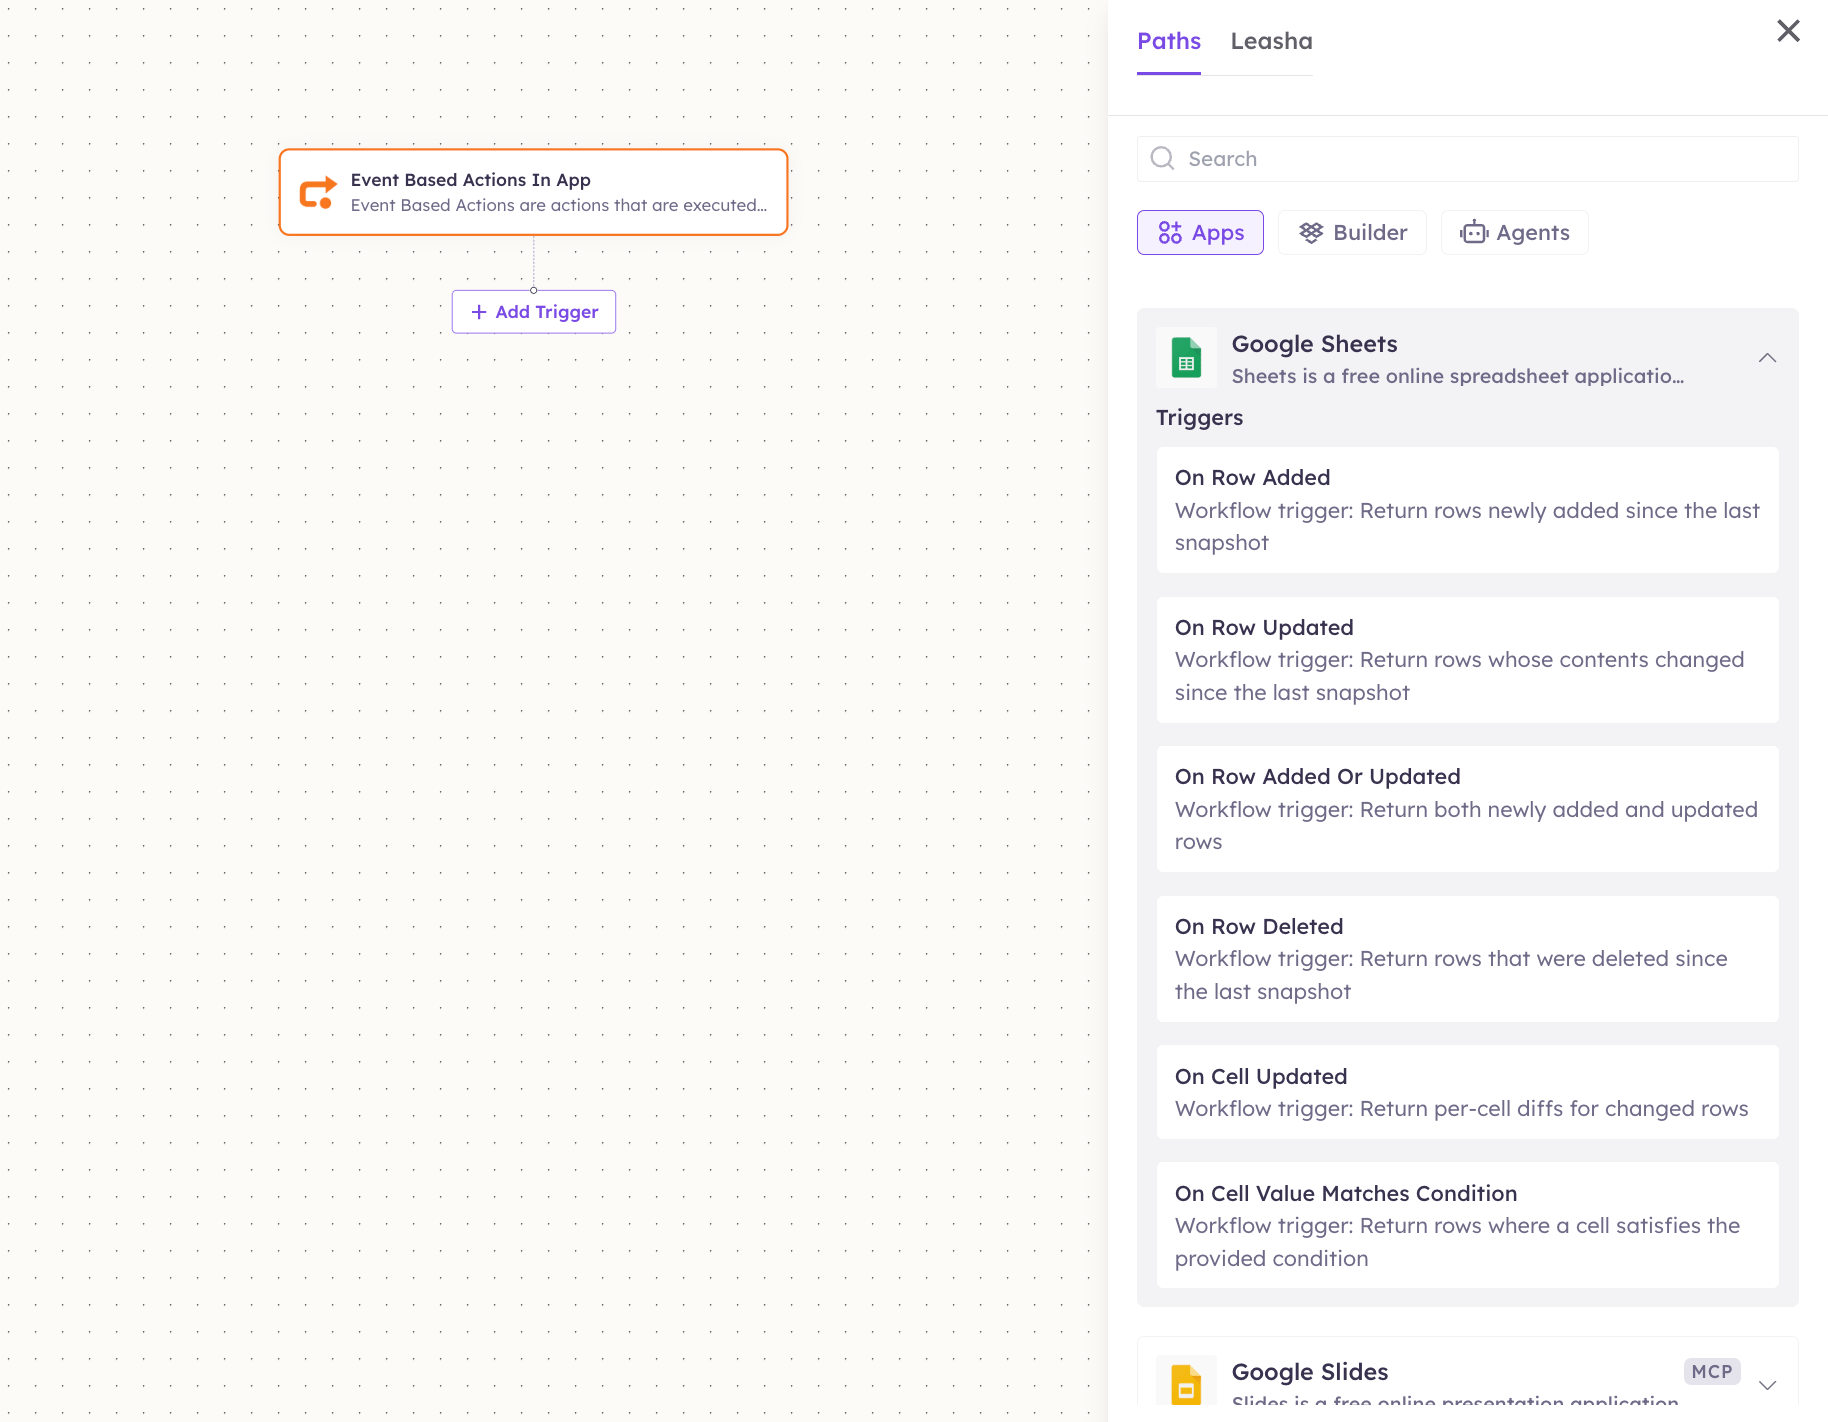
 Click an app to expand its **Triggers**. For **Google Sheets**, for example, you can start on **On Row Added**, **On Row Updated**, **On Row Added Or Updated**, **On Row Deleted**, **On Cell Updated**, or **On Cell Value Matches Condition**. Pick the one you want.
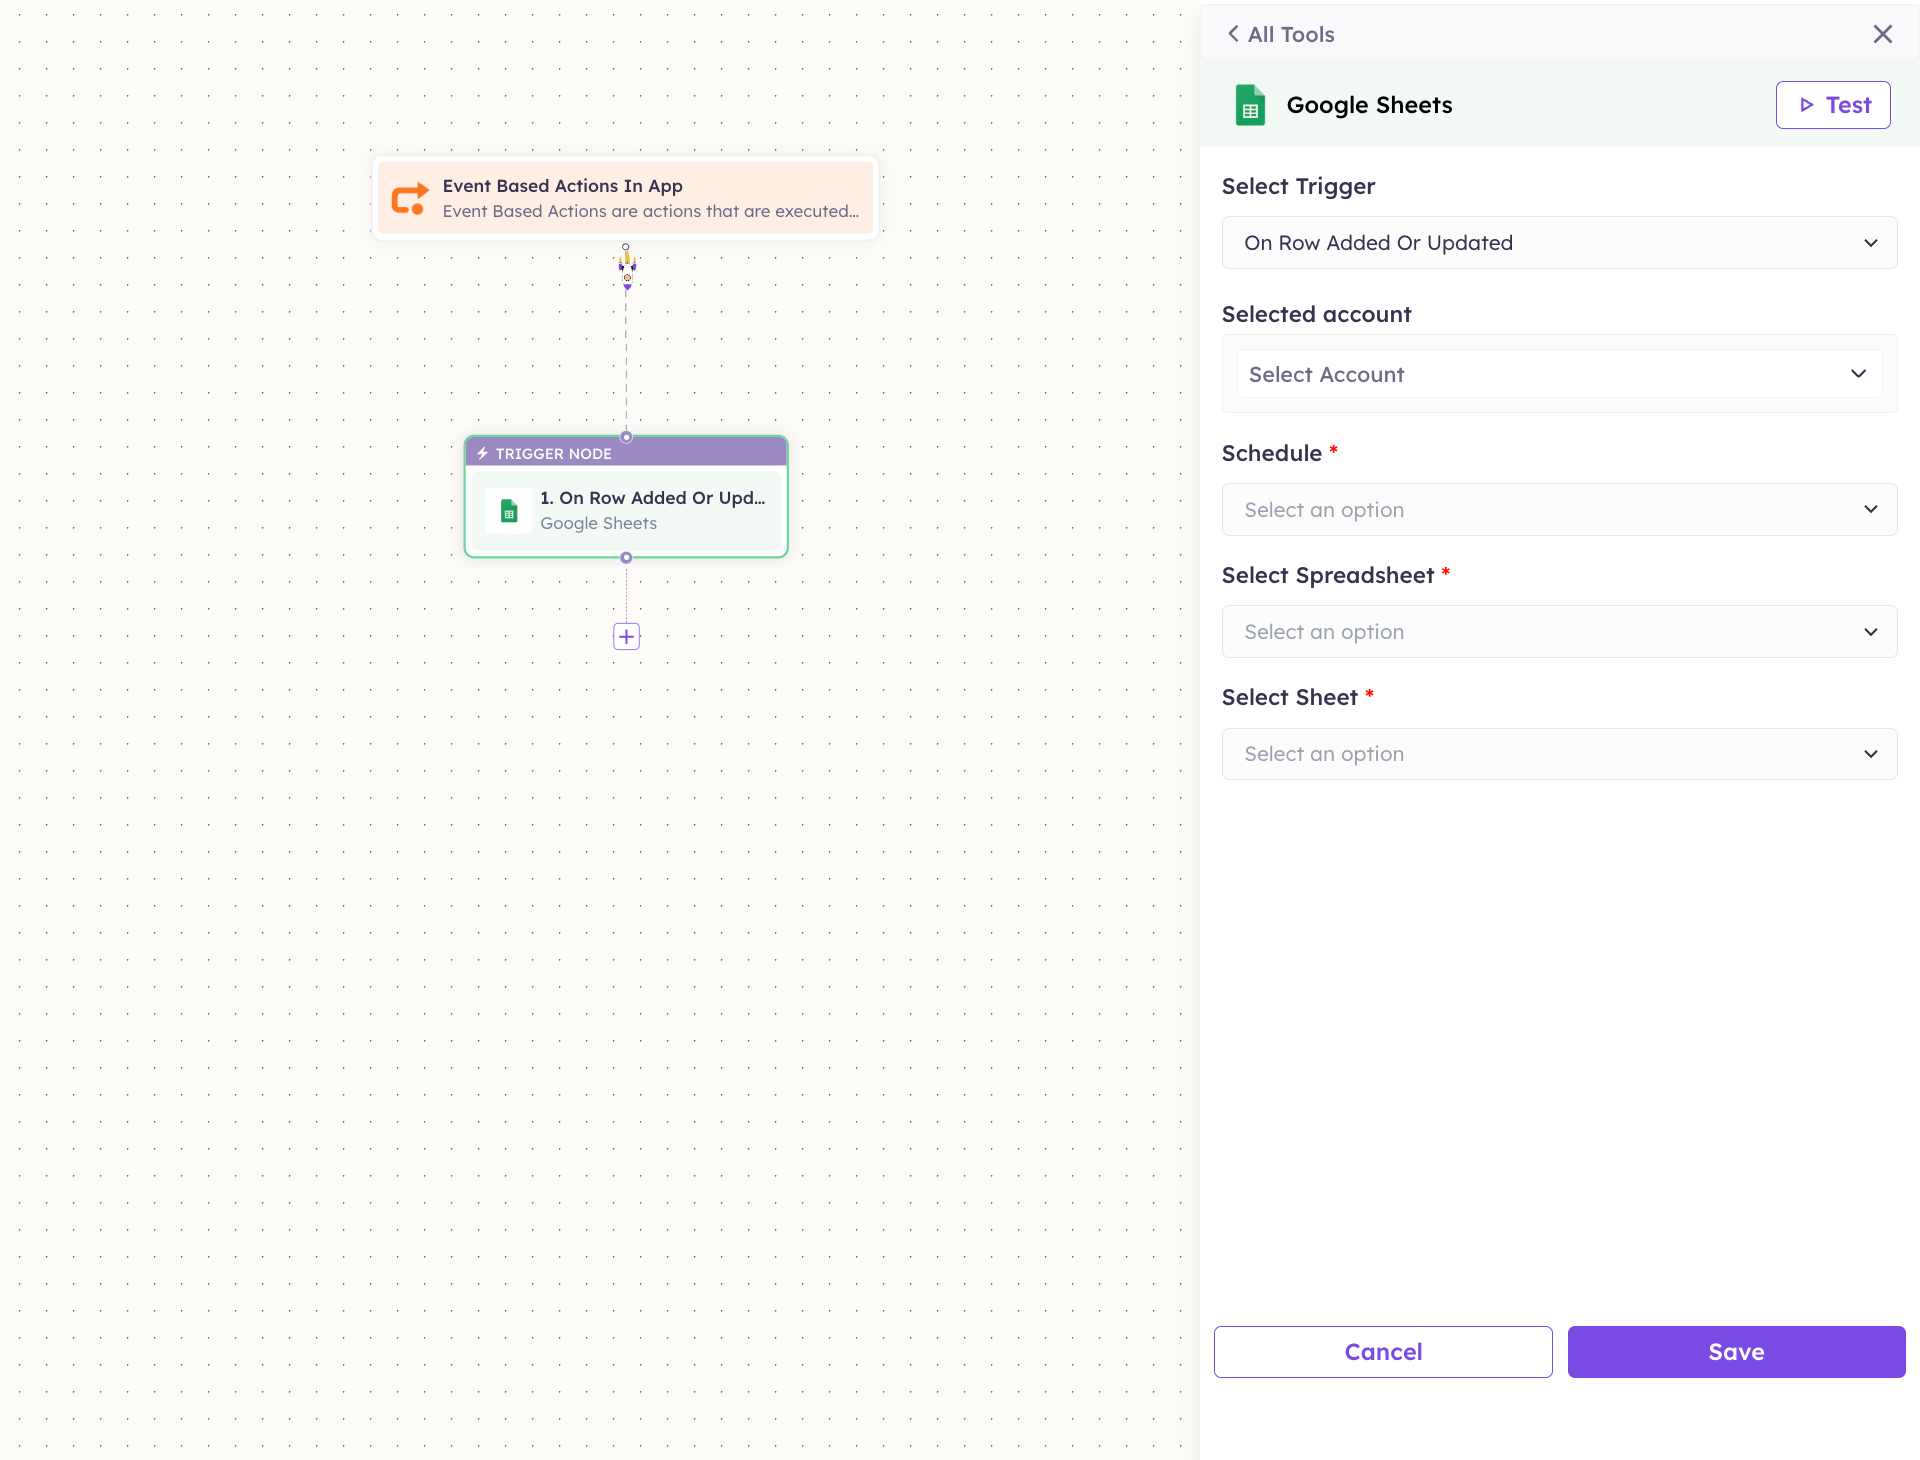
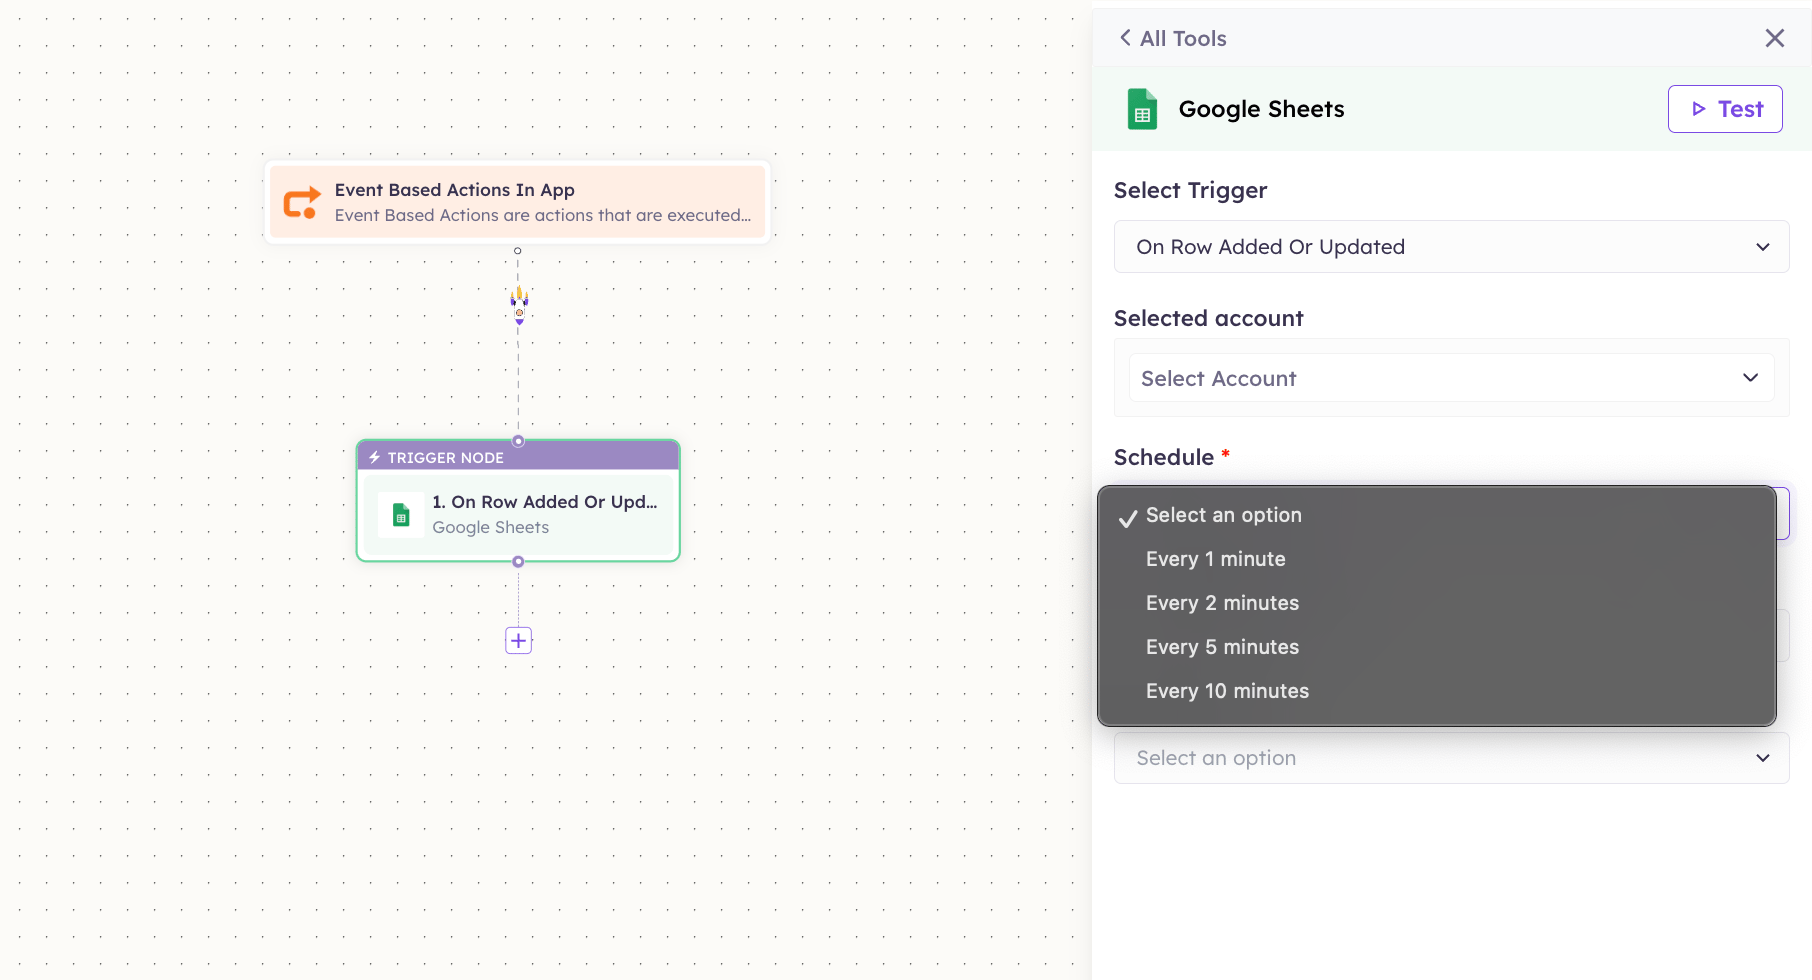
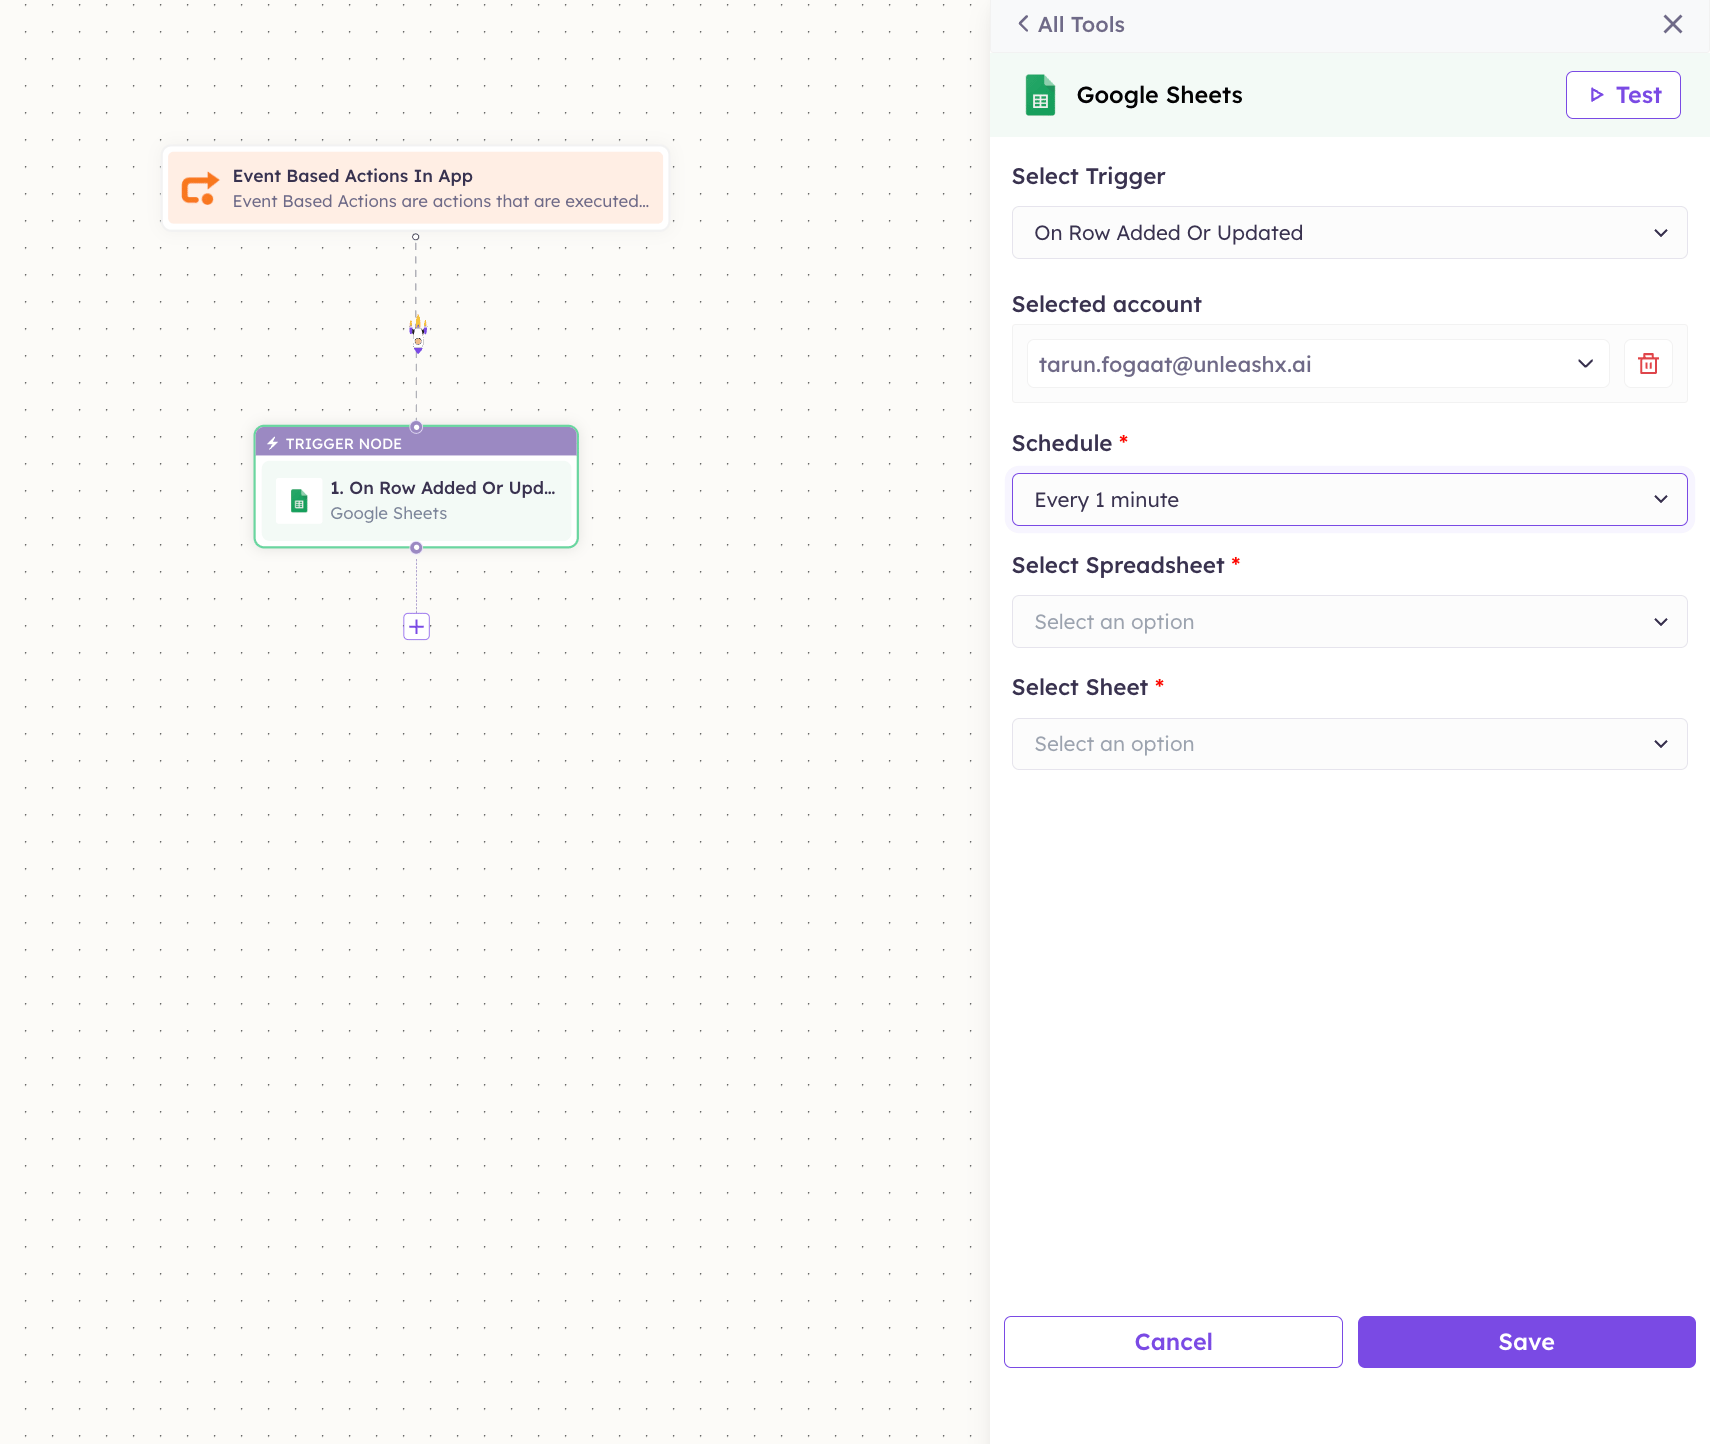
 A configuration panel opens (with a **Test** button), and a **Trigger Node** is placed on the canvas. Fill in the fields:
| Field | What to choose |
| ---------------------- | -------------------------------------------------------------------------------------- |
| **Select Trigger** | The trigger event, e.g. *On Row Added Or Updated*. |
| **Selected account** | The connected account to use. Pick yours, or click **Add Account** to connect one. |
| **Schedule** | How often UnleashX checks for the event — *Every 1 minute*, *2*, *5*, or *10 minutes*. |
| **Select Spreadsheet** | The spreadsheet to watch. |
| **Select Sheet** | The specific tab within it. |
A configuration panel opens (with a **Test** button), and a **Trigger Node** is placed on the canvas. Fill in the fields:
| Field | What to choose |
| ---------------------- | -------------------------------------------------------------------------------------- |
| **Select Trigger** | The trigger event, e.g. *On Row Added Or Updated*. |
| **Selected account** | The connected account to use. Pick yours, or click **Add Account** to connect one. |
| **Schedule** | How often UnleashX checks for the event — *Every 1 minute*, *2*, *5*, or *10 minutes*. |
| **Select Spreadsheet** | The spreadsheet to watch. |
| **Select Sheet** | The specific tab within it. |
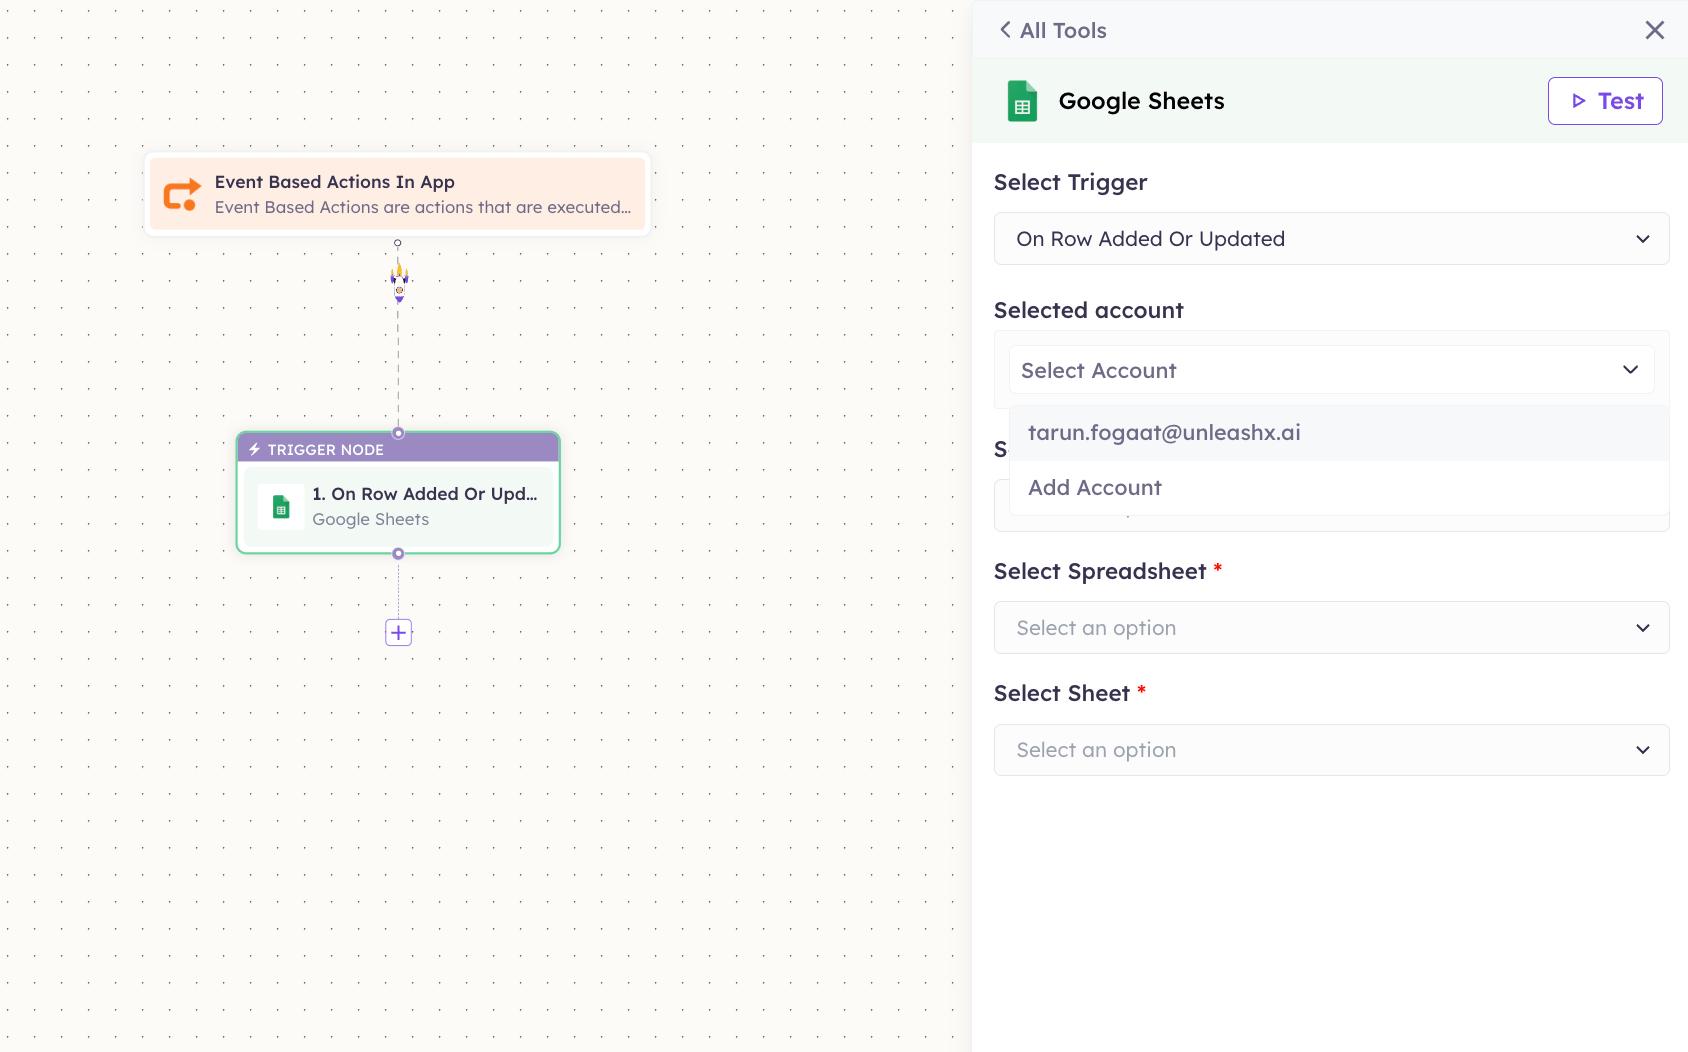
 Open **Selected account** and choose the connected account (e.g. `tarun.fogaat@unleashx.ai`). Don't see it? Click **Add Account** to connect one — this is the same OAuth connection described in the [MCP Integrations](/mcp/integrations) catalog.
 Open **Schedule** and choose how often to check — for near-real-time, pick **Every 1 minute**.
 With the account, schedule, spreadsheet, and sheet selected, click **Save**. Your trigger node is ready.
 The **Schedule** controls how frequently UnleashX polls the app for the event. A shorter interval reacts faster but runs more often — pick the slowest interval that still feels responsive for your use case.
### Scheduled Actions (time-based)
Choose **Scheduled Actions** to run the workflow on a clock instead of an app event — daily reports, periodic syncs, reminders.
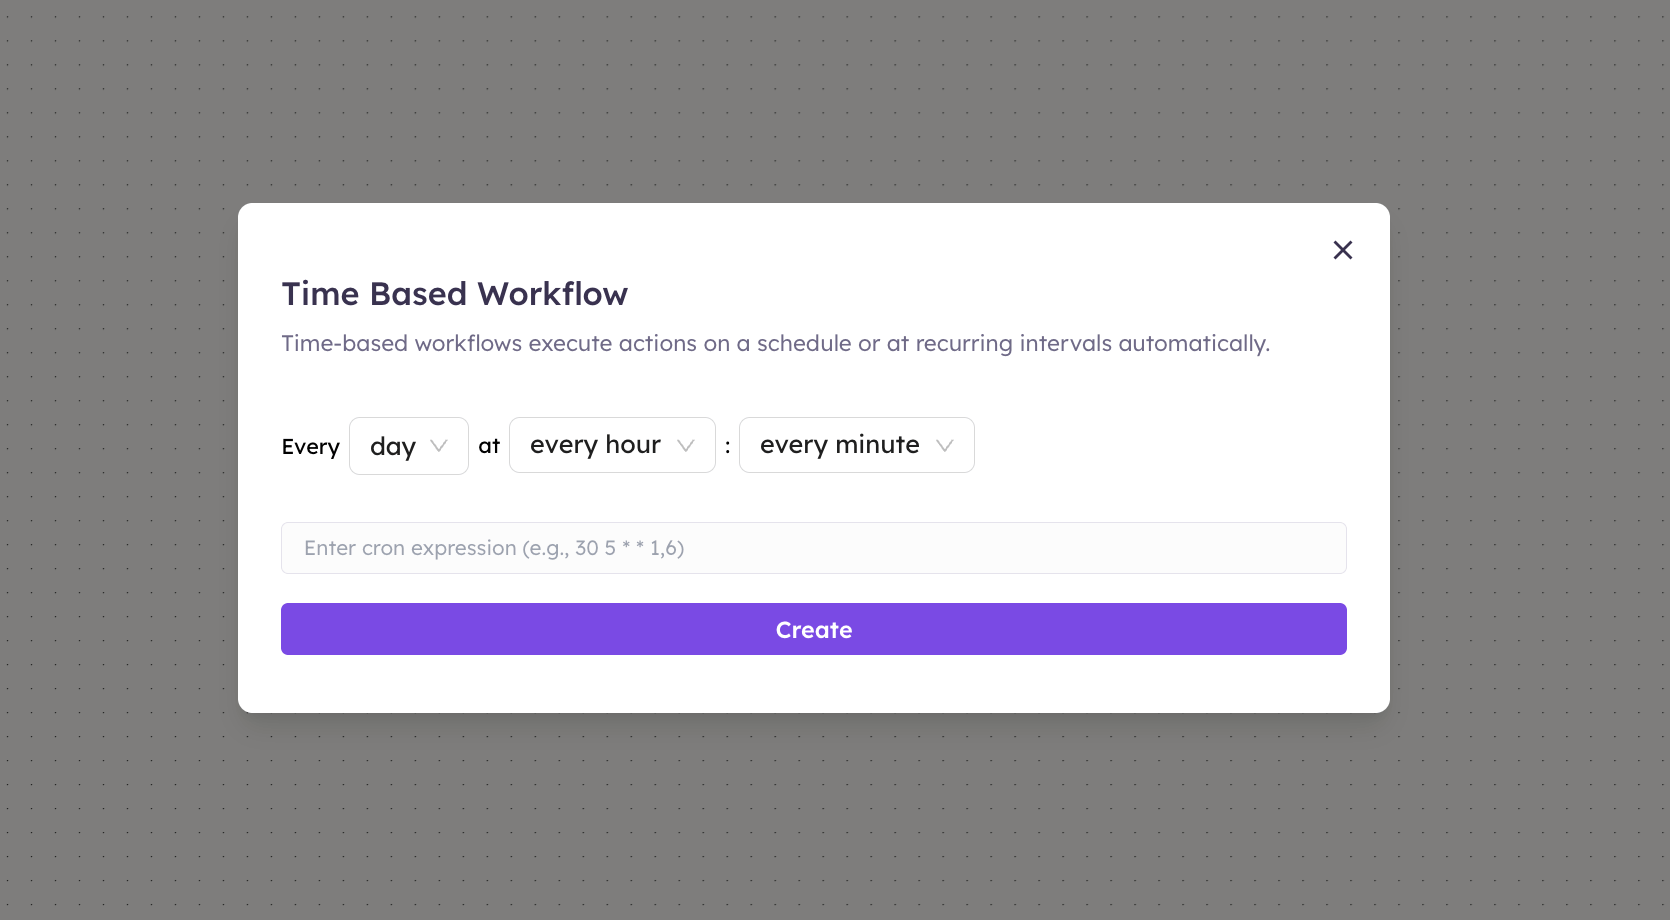
Choosing it opens the **Time Based Workflow** dialog. Set the schedule one of two ways:
* **With the dropdowns:** *Every* `day` *at* `every hour` : `every minute`. Narrow each dropdown to pick a specific day, hour, and minute (e.g. *Every day at 09 : 00*).
* **With a cron expression:** type one in the box for full control, e.g. `30 5 * * 1,6` (5:30 AM on Mon and Sat). The format is `minute hour day-of-month month day-of-week`.
Click **Create**. The workflow now runs automatically on that schedule.
The **Schedule** controls how frequently UnleashX polls the app for the event. A shorter interval reacts faster but runs more often — pick the slowest interval that still feels responsive for your use case.
### Scheduled Actions (time-based)
Choose **Scheduled Actions** to run the workflow on a clock instead of an app event — daily reports, periodic syncs, reminders.
Choosing it opens the **Time Based Workflow** dialog. Set the schedule one of two ways:
* **With the dropdowns:** *Every* `day` *at* `every hour` : `every minute`. Narrow each dropdown to pick a specific day, hour, and minute (e.g. *Every day at 09 : 00*).
* **With a cron expression:** type one in the box for full control, e.g. `30 5 * * 1,6` (5:30 AM on Mon and Sat). The format is `minute hour day-of-month month day-of-week`.
Click **Create**. The workflow now runs automatically on that schedule.
 Not sure about cron? Use the dropdowns — they cover most schedules. Reach for a cron expression only when you need something the dropdowns can't express (e.g. "only on weekdays").
### Form Submission
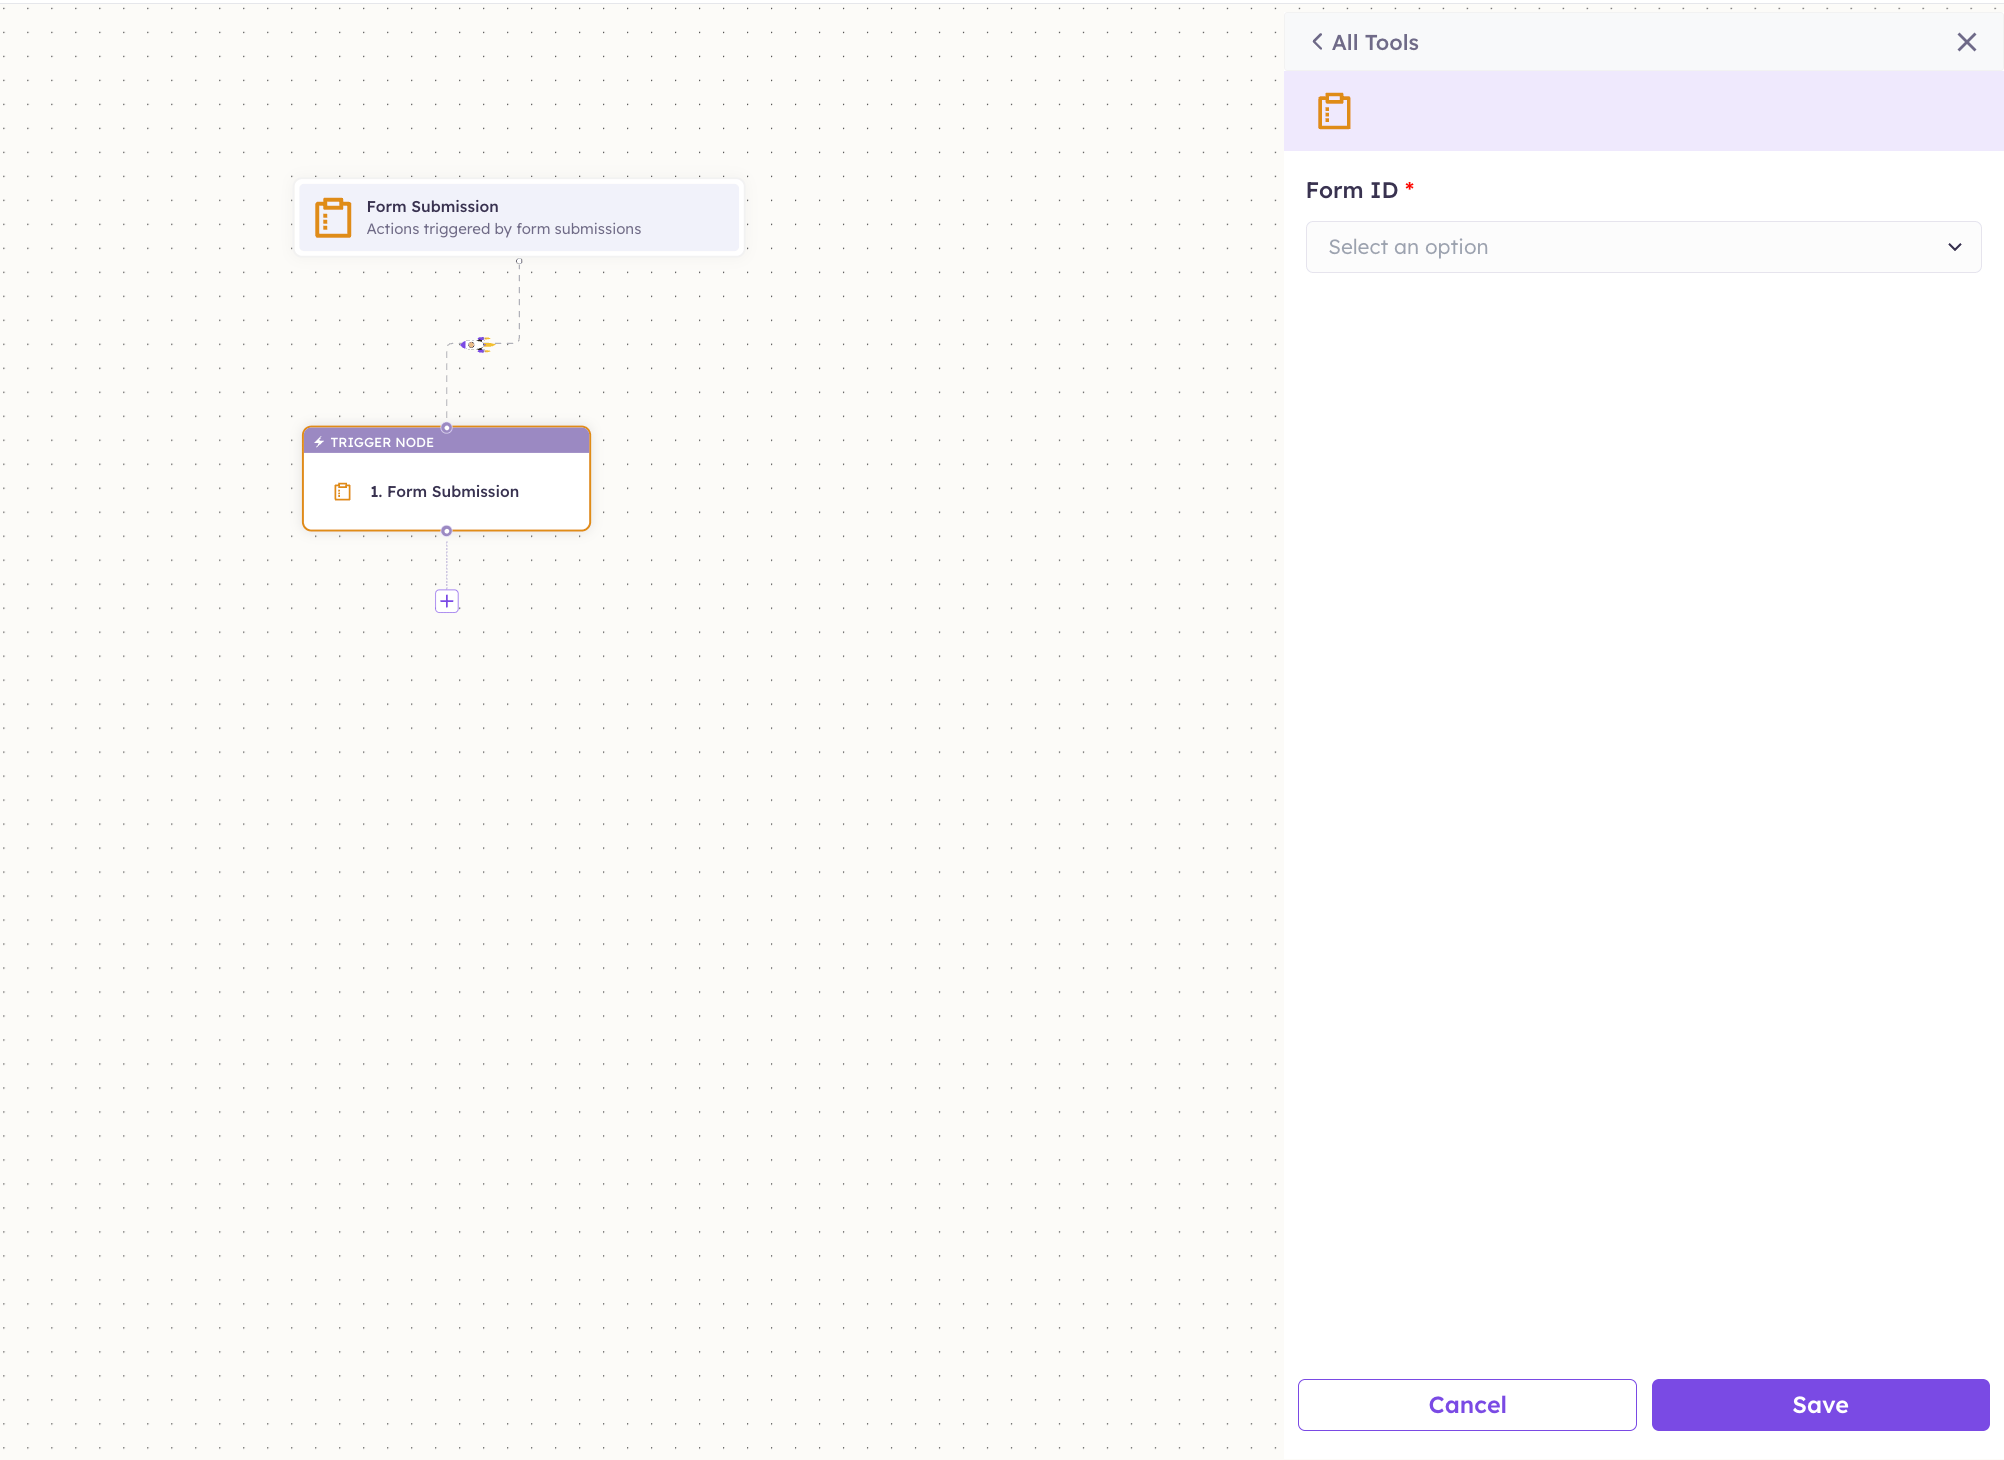
Choose **Form Submission** to run the workflow whenever a UnleashX **Form** is submitted — ideal for lead capture or intake.
In the panel, open **Form ID** and select the form to watch. From then on, every submission of that form starts the workflow, and the submitted fields are available to later steps (e.g. map the submitter's email into a **Send Email** action).
Not sure about cron? Use the dropdowns — they cover most schedules. Reach for a cron expression only when you need something the dropdowns can't express (e.g. "only on weekdays").
### Form Submission
Choose **Form Submission** to run the workflow whenever a UnleashX **Form** is submitted — ideal for lead capture or intake.
In the panel, open **Form ID** and select the form to watch. From then on, every submission of that form starts the workflow, and the submitted fields are available to later steps (e.g. map the submitter's email into a **Send Email** action).
 ### Webhook
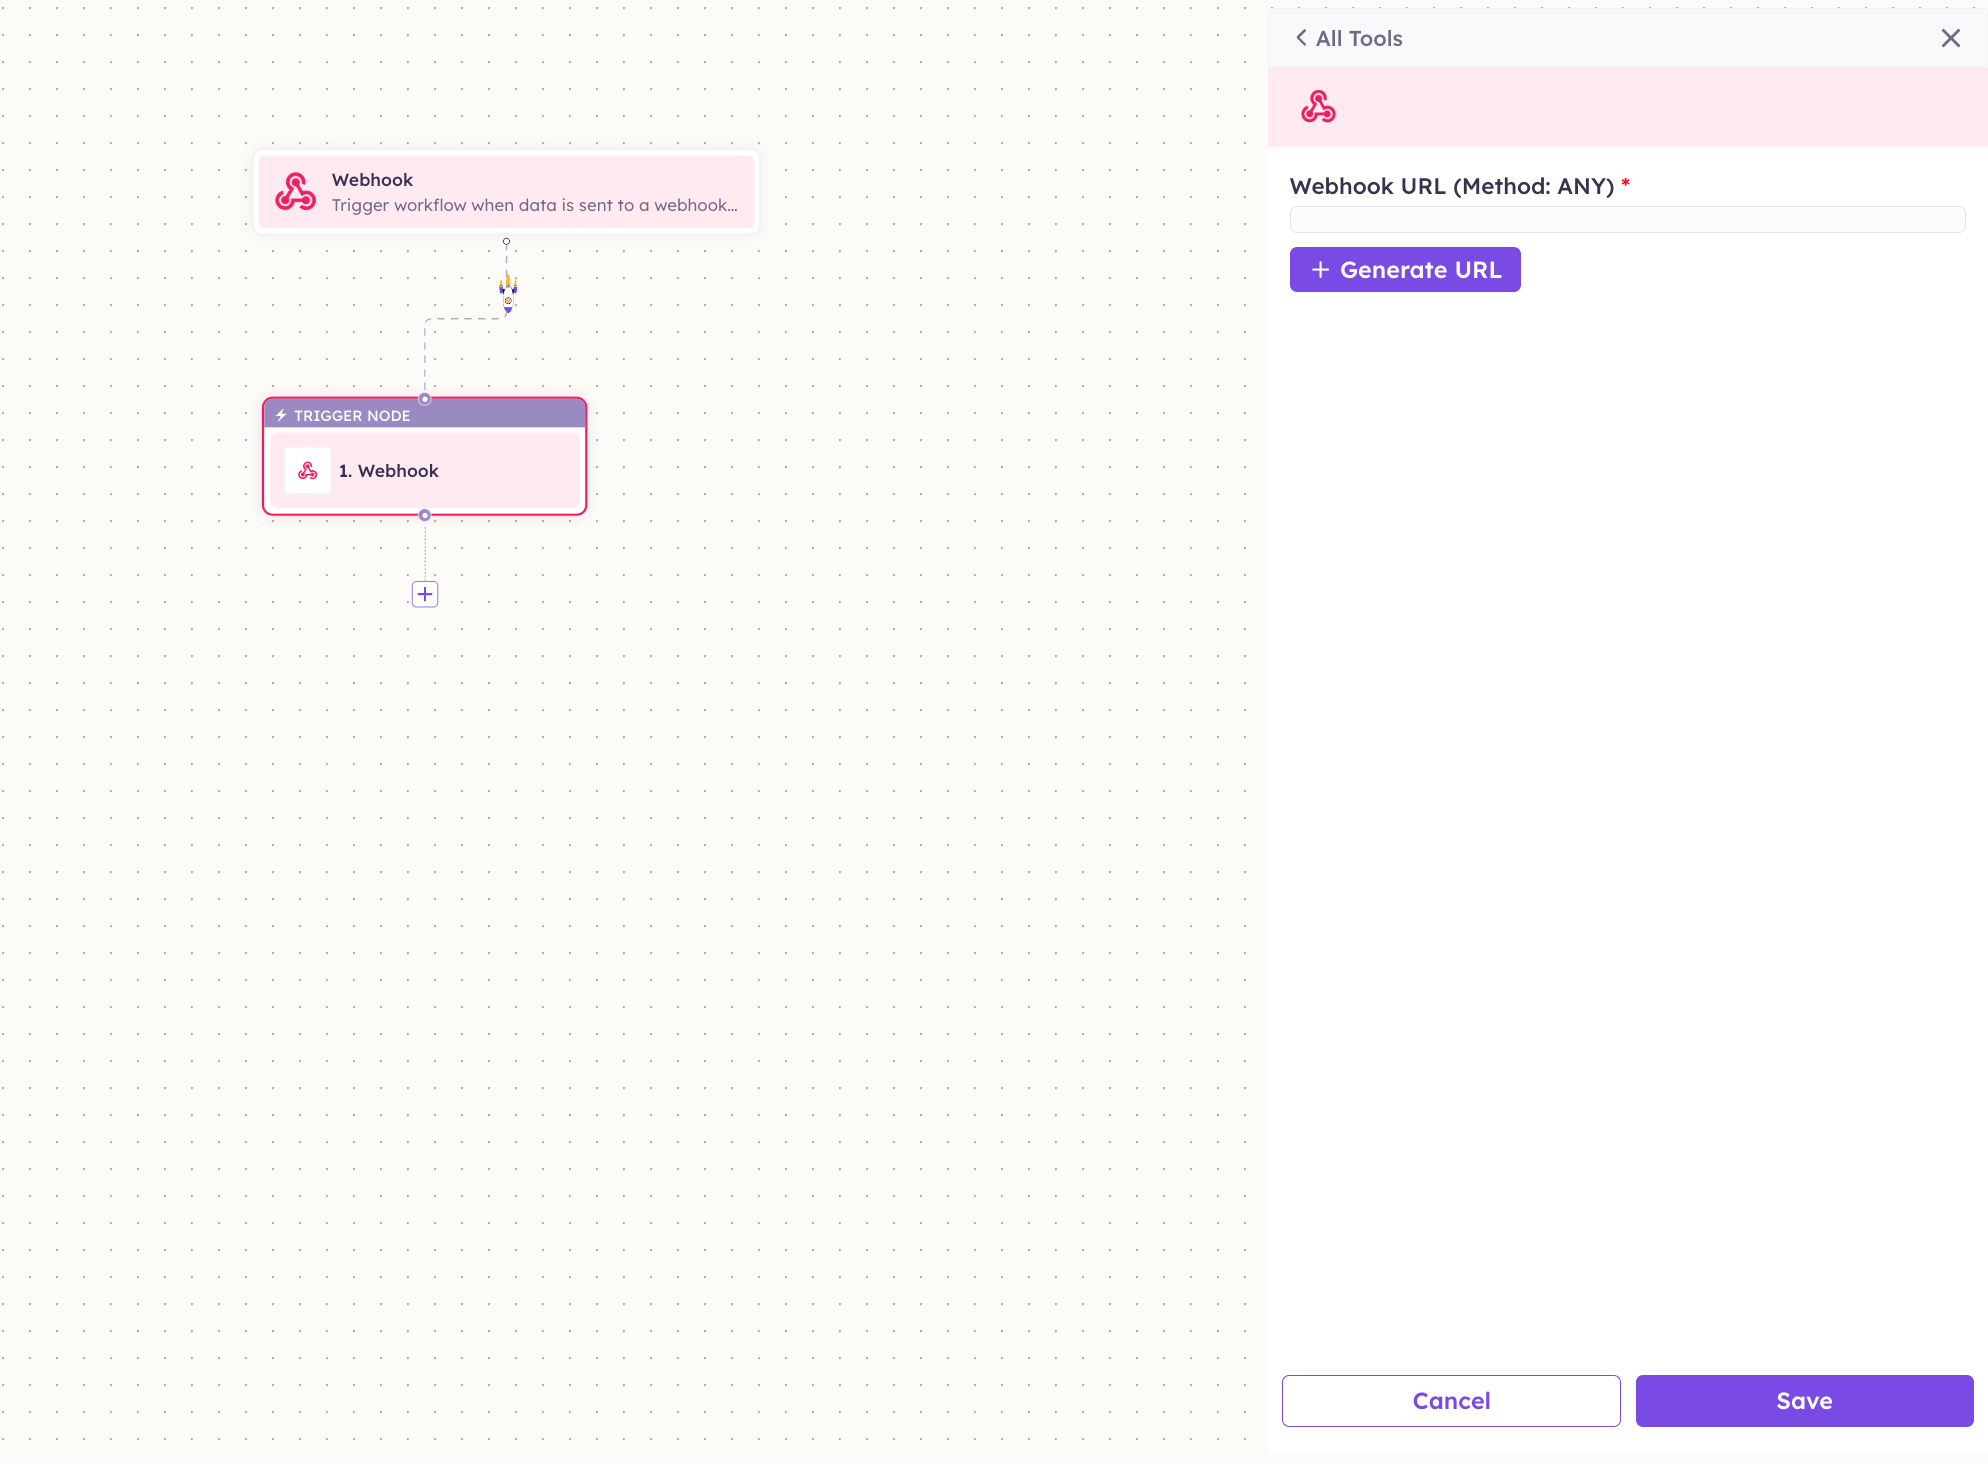
Choose **Webhook** to start the workflow when any external system sends data to a URL — the most flexible way to connect third-party tools.
In the panel, click **+ Generate URL**. UnleashX creates a unique endpoint for this workflow, for example:
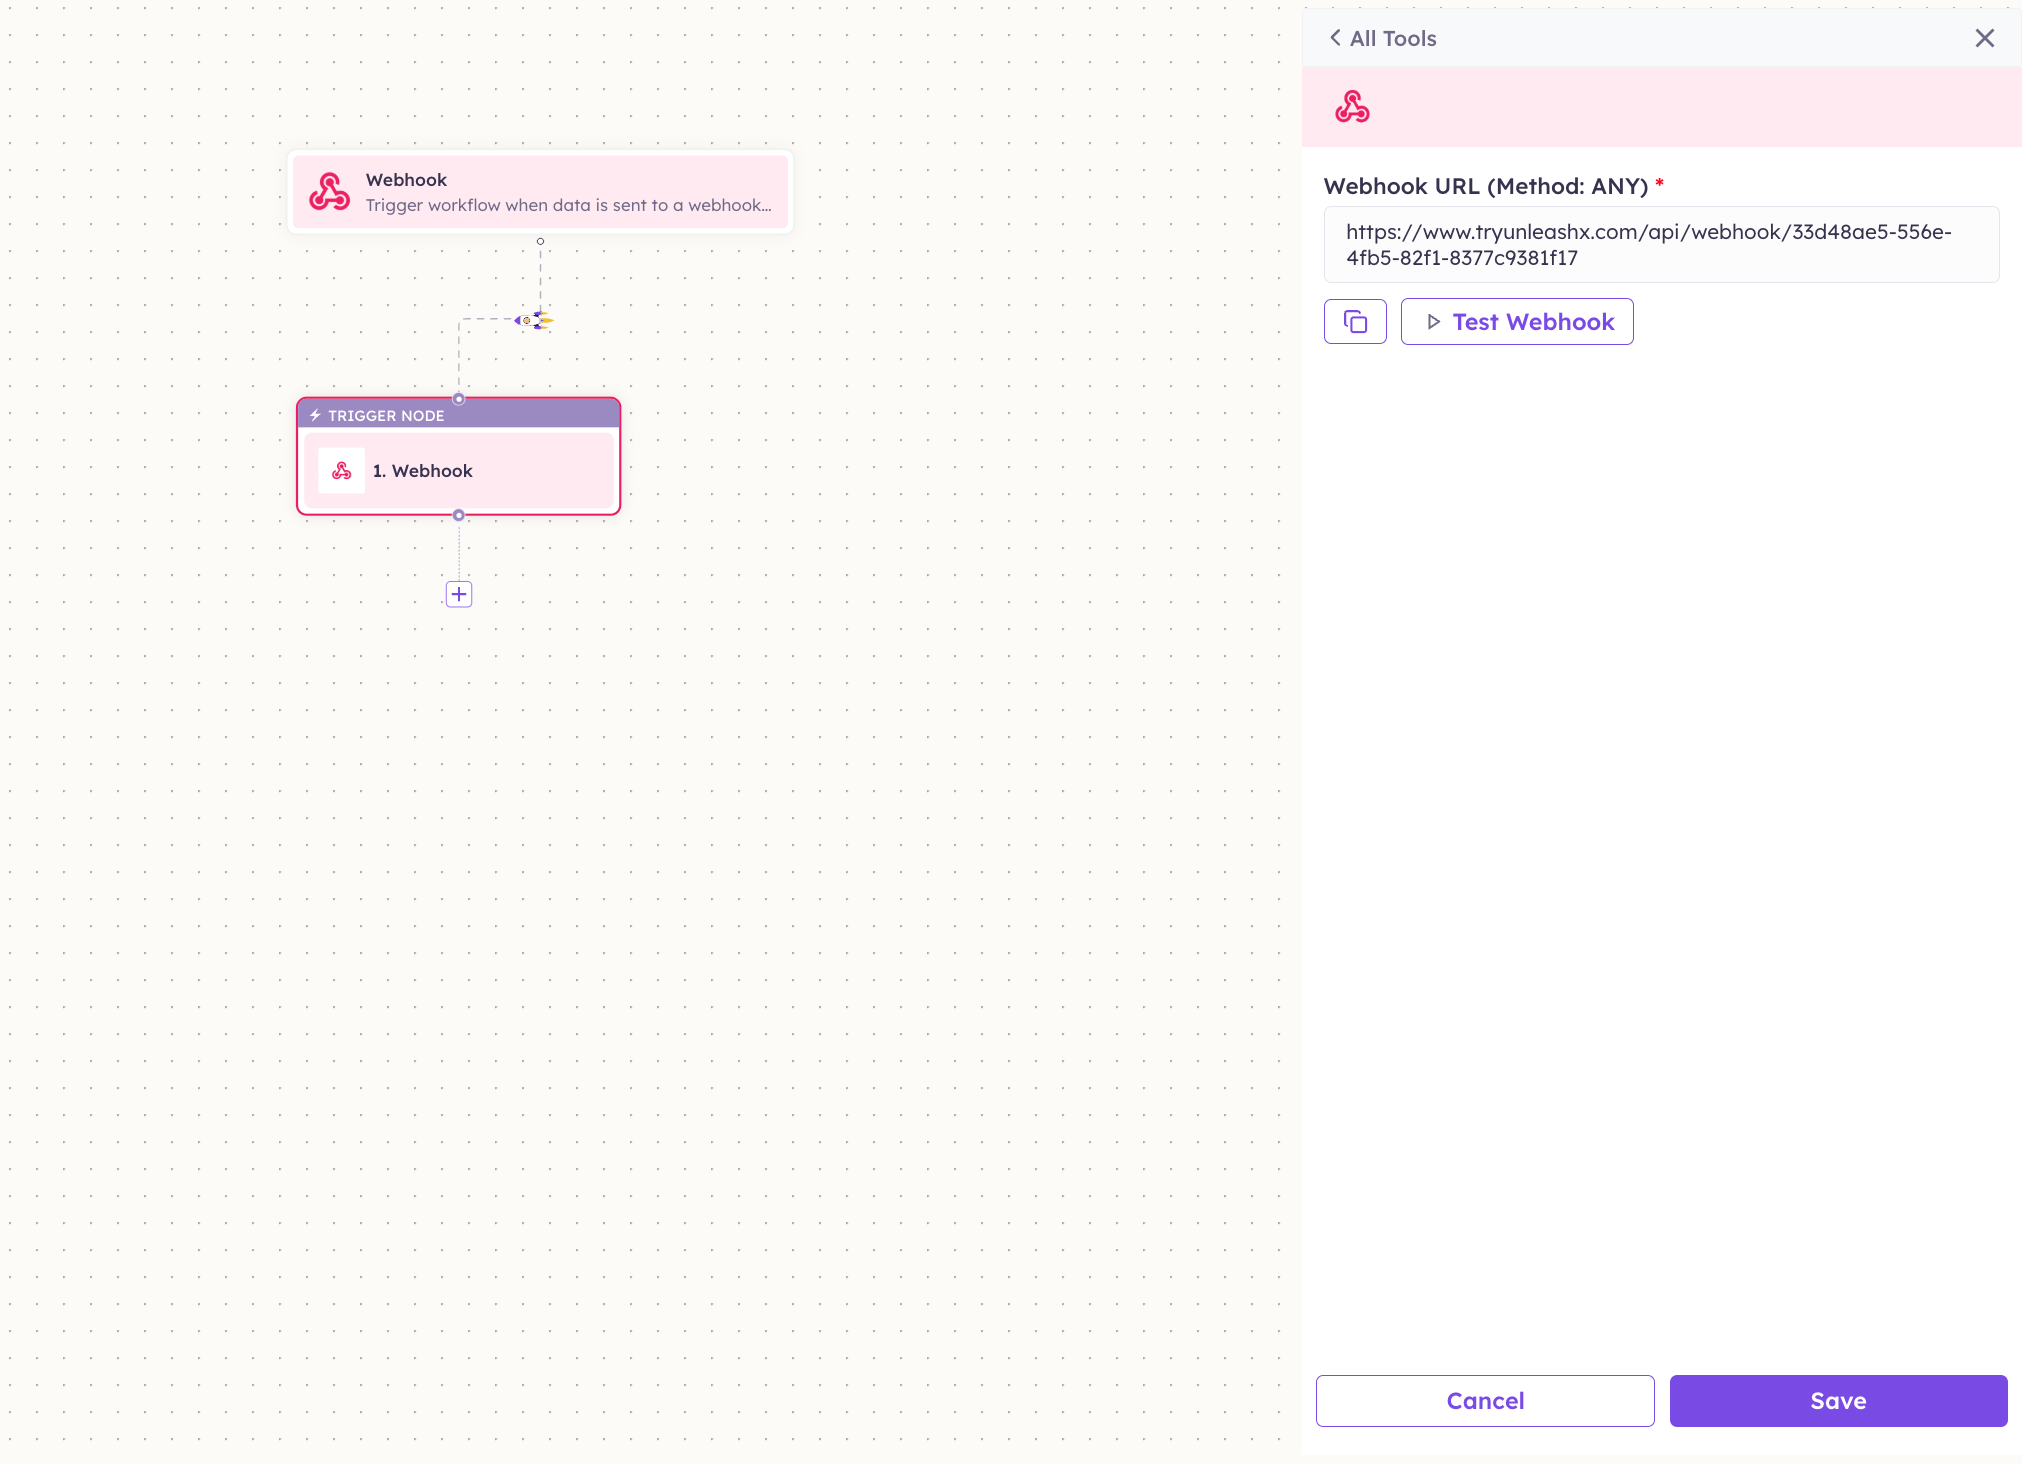
`https://www.tryunleashx.com/api/webhook/33d48ae5-556e-4fb5-82f1-8377c9381f17`
The method is **ANY**, so the sender can use GET, POST, etc.
### Webhook
Choose **Webhook** to start the workflow when any external system sends data to a URL — the most flexible way to connect third-party tools.
In the panel, click **+ Generate URL**. UnleashX creates a unique endpoint for this workflow, for example:
`https://www.tryunleashx.com/api/webhook/33d48ae5-556e-4fb5-82f1-8377c9381f17`
The method is **ANY**, so the sender can use GET, POST, etc.
 Click the **copy** icon and paste the URL into the external tool/service that should trigger this workflow (your app, a third-party automation, a payment provider's webhook settings, etc.). When that system sends a request to the URL, the workflow runs and the **request payload becomes available to later steps** — so you can pull fields out of it and act on them.
Click **Test Webhook** to send a sample call and confirm the workflow receives the data. Then **Save**.
Click the **copy** icon and paste the URL into the external tool/service that should trigger this workflow (your app, a third-party automation, a payment provider's webhook settings, etc.). When that system sends a request to the URL, the workflow runs and the **request payload becomes available to later steps** — so you can pull fields out of it and act on them.
Click **Test Webhook** to send a sample call and confirm the workflow receives the data. Then **Save**.
 Treat the webhook URL like a secret — anyone who has it can trigger this workflow. If it leaks, generate a new one and update the sender.
### Manually Trigger
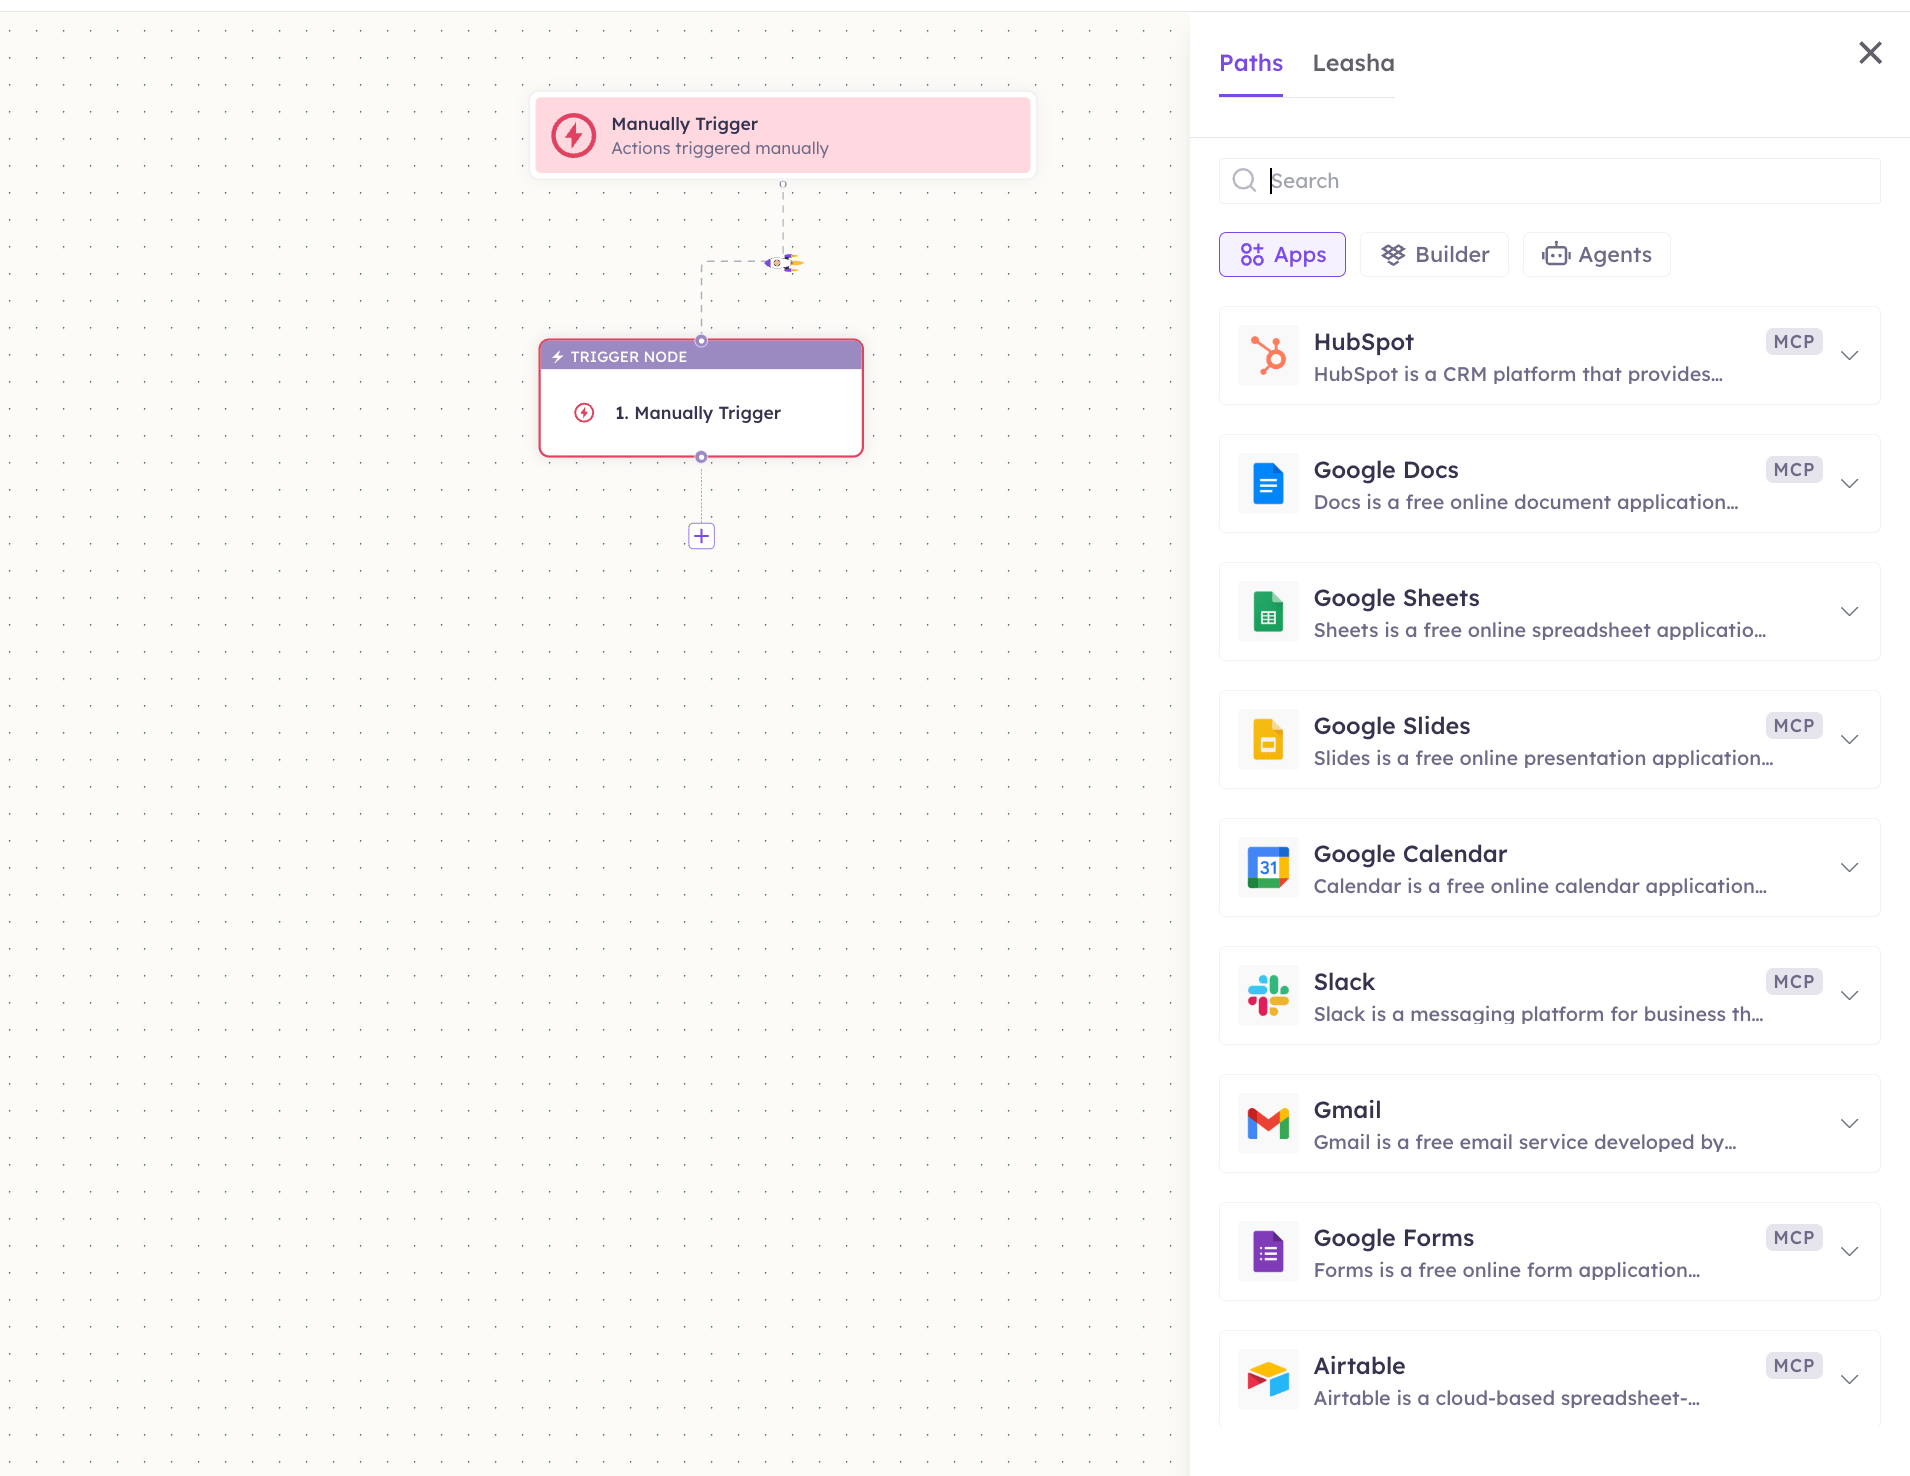
Choose **Manually Trigger** to run the workflow on demand — handy for one-off jobs and while you're testing.
It adds a **Manually Trigger** node with no configuration; just add your steps after it (from **Apps**, **Builder**, or **Agents**). The workflow runs only when you start it by hand.
Treat the webhook URL like a secret — anyone who has it can trigger this workflow. If it leaks, generate a new one and update the sender.
### Manually Trigger
Choose **Manually Trigger** to run the workflow on demand — handy for one-off jobs and while you're testing.
It adds a **Manually Trigger** node with no configuration; just add your steps after it (from **Apps**, **Builder**, or **Agents**). The workflow runs only when you start it by hand.
 ***
## 4. Add steps and conditions
With a trigger in place, click the **+** below the trigger node to add the next step. The panel's tabs give you three kinds of step:
| Tab | What's inside | Use it for |
| ----------- | ------------------------------------------------------------------------------ | ----------------------------------------------------------------- |
| **Apps** | Connected MCP apps and their actions | Do something in a tool — add a row, send a message, create a deal |
| **Builder** | Flow Control, HTTP Request, Regex, Data Source Helper, OpenAI Helper, and more | Logic, conditions, calling any API, transforming data |
| **Agents** | Your UnleashX agents | Hand a step to an agent |
***
## 4. Add steps and conditions
With a trigger in place, click the **+** below the trigger node to add the next step. The panel's tabs give you three kinds of step:
| Tab | What's inside | Use it for |
| ----------- | ------------------------------------------------------------------------------ | ----------------------------------------------------------------- |
| **Apps** | Connected MCP apps and their actions | Do something in a tool — add a row, send a message, create a deal |
| **Builder** | Flow Control, HTTP Request, Regex, Data Source Helper, OpenAI Helper, and more | Logic, conditions, calling any API, transforming data |
| **Agents** | Your UnleashX agents | Hand a step to an agent |
 ### Add an action (MCP app)
On the **Apps** tab, pick a connected app and choose an **action** (for example **Add Row** in Google Sheets, or **Send Message** in WhatsApp). Map its inputs using values from earlier steps, then **Save**. A single workflow can mix actions from several different MCP apps.
### Add a condition
Conditions live under the **Builder** tab.
Click the **+**, switch to the **Builder** tab, and open **Flow Control**.
### Add an action (MCP app)
On the **Apps** tab, pick a connected app and choose an **action** (for example **Add Row** in Google Sheets, or **Send Message** in WhatsApp). Map its inputs using values from earlier steps, then **Save**. A single workflow can mix actions from several different MCP apps.
### Add a condition
Conditions live under the **Builder** tab.
Click the **+**, switch to the **Builder** tab, and open **Flow Control**.
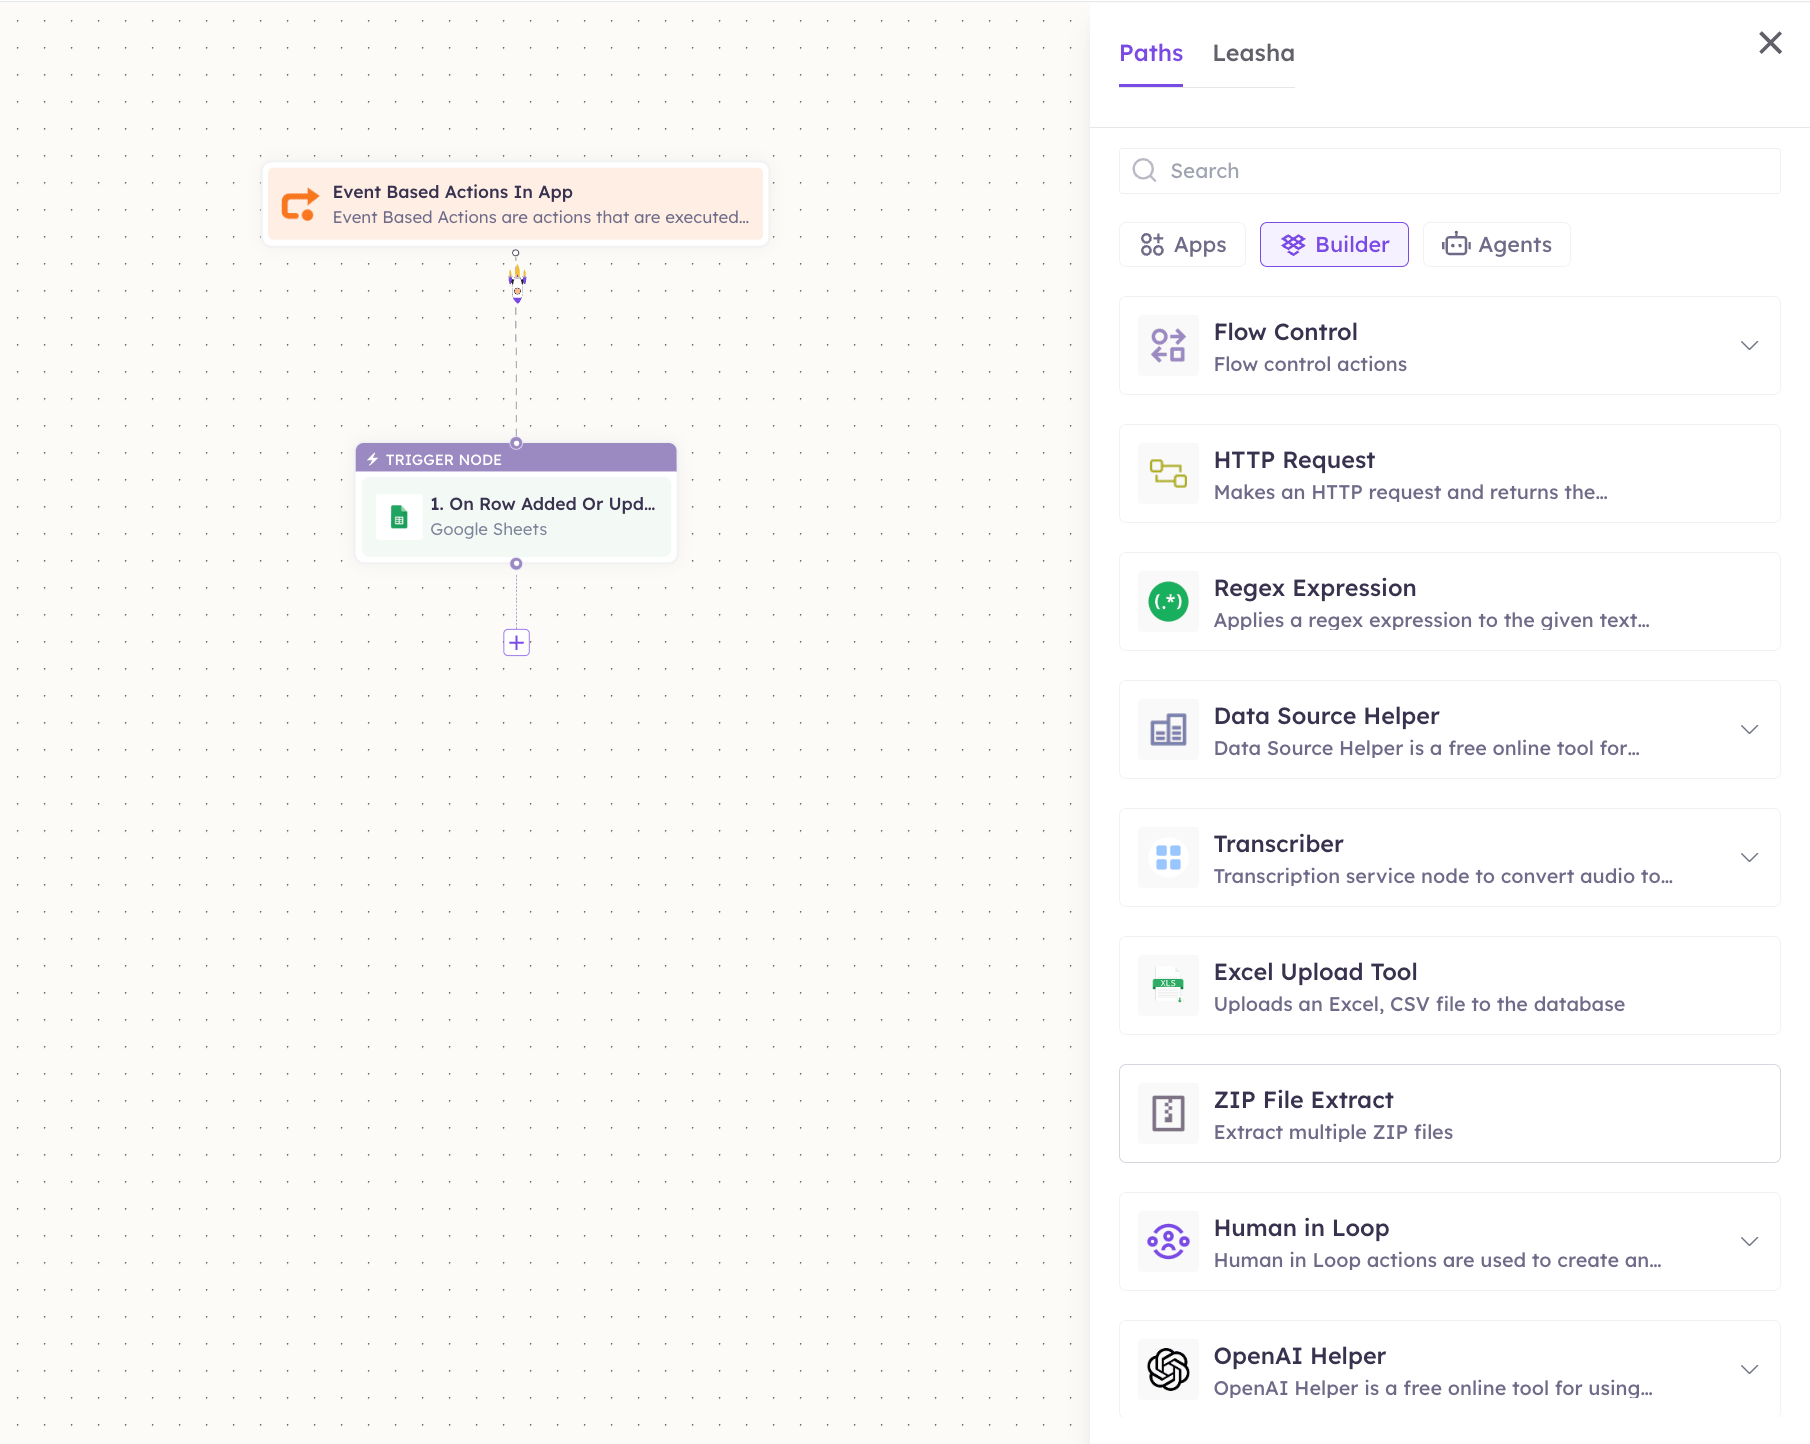 Flow Control gives you:
| Action | What it does |
| -------------- | ------------------------------------ |
| **Input** | Add more input fields to the flow |
| **If/Else** | Branch the flow based on a condition |
| **Loop** | Repeat steps over a list of items |
| **Delay** | Pause the flow for a set time |
| **Go To Node** | Jump to another node in the flow |
For a condition, pick **If/Else**.
Flow Control gives you:
| Action | What it does |
| -------------- | ------------------------------------ |
| **Input** | Add more input fields to the flow |
| **If/Else** | Branch the flow based on a condition |
| **Loop** | Repeat steps over a list of items |
| **Delay** | Pause the flow for a set time |
| **Go To Node** | Jump to another node in the flow |
For a condition, pick **If/Else**.
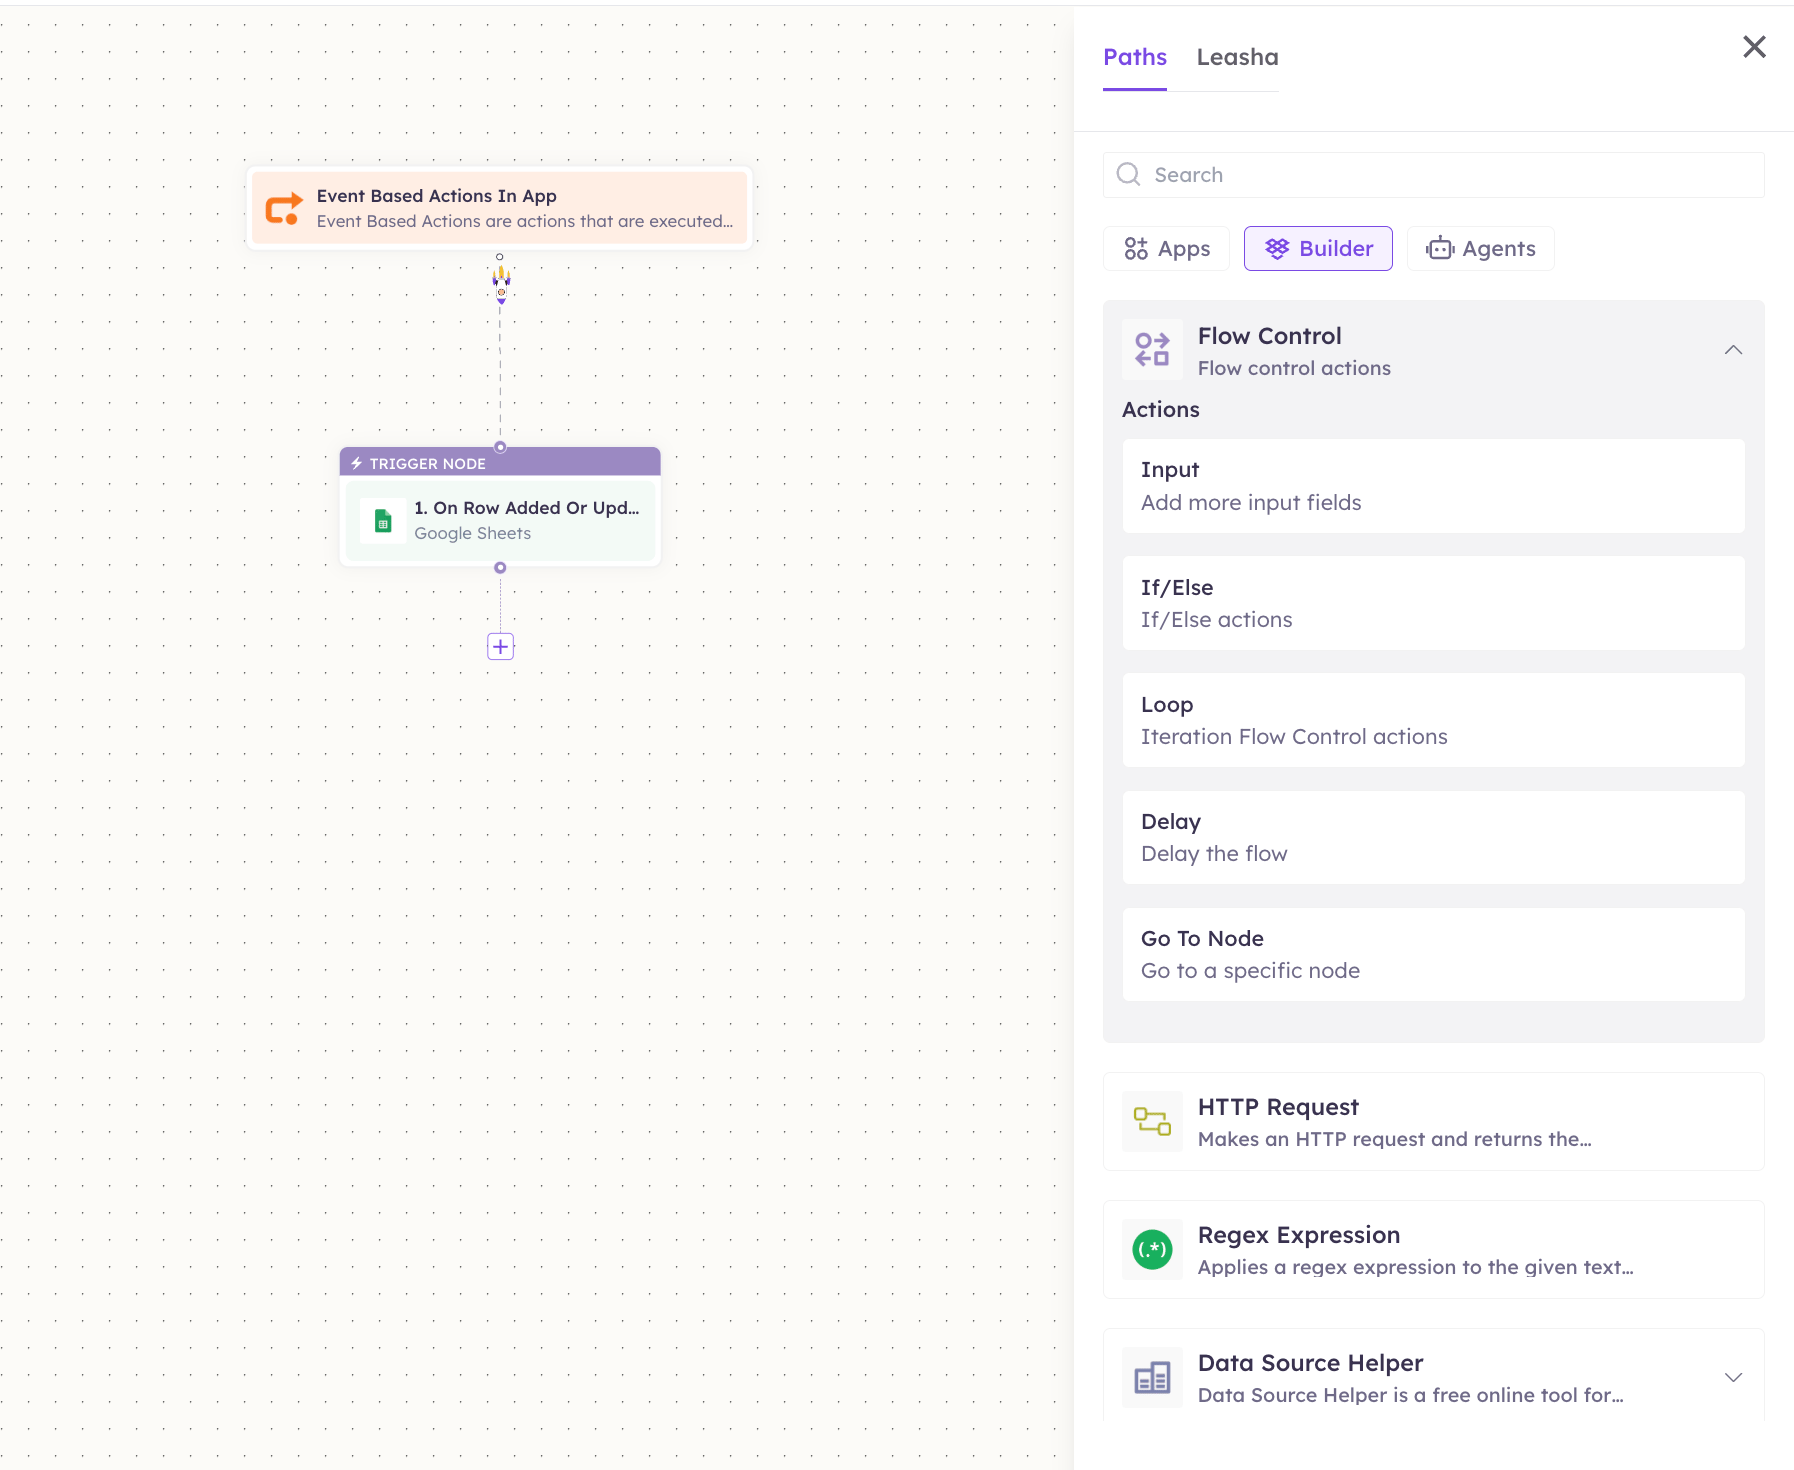 In **If/Else**, build a rule from a value (usually the output of an earlier step), an operator, and a comparison value — for example *order status equals "shipped"*. Connect the **If** path and the **Else** path to the steps that should run for each outcome.
Put the step that produces the data **before** the **If/Else** that checks it. A condition can only read values that already exist earlier in the run.
### Call any API (HTTP Request)
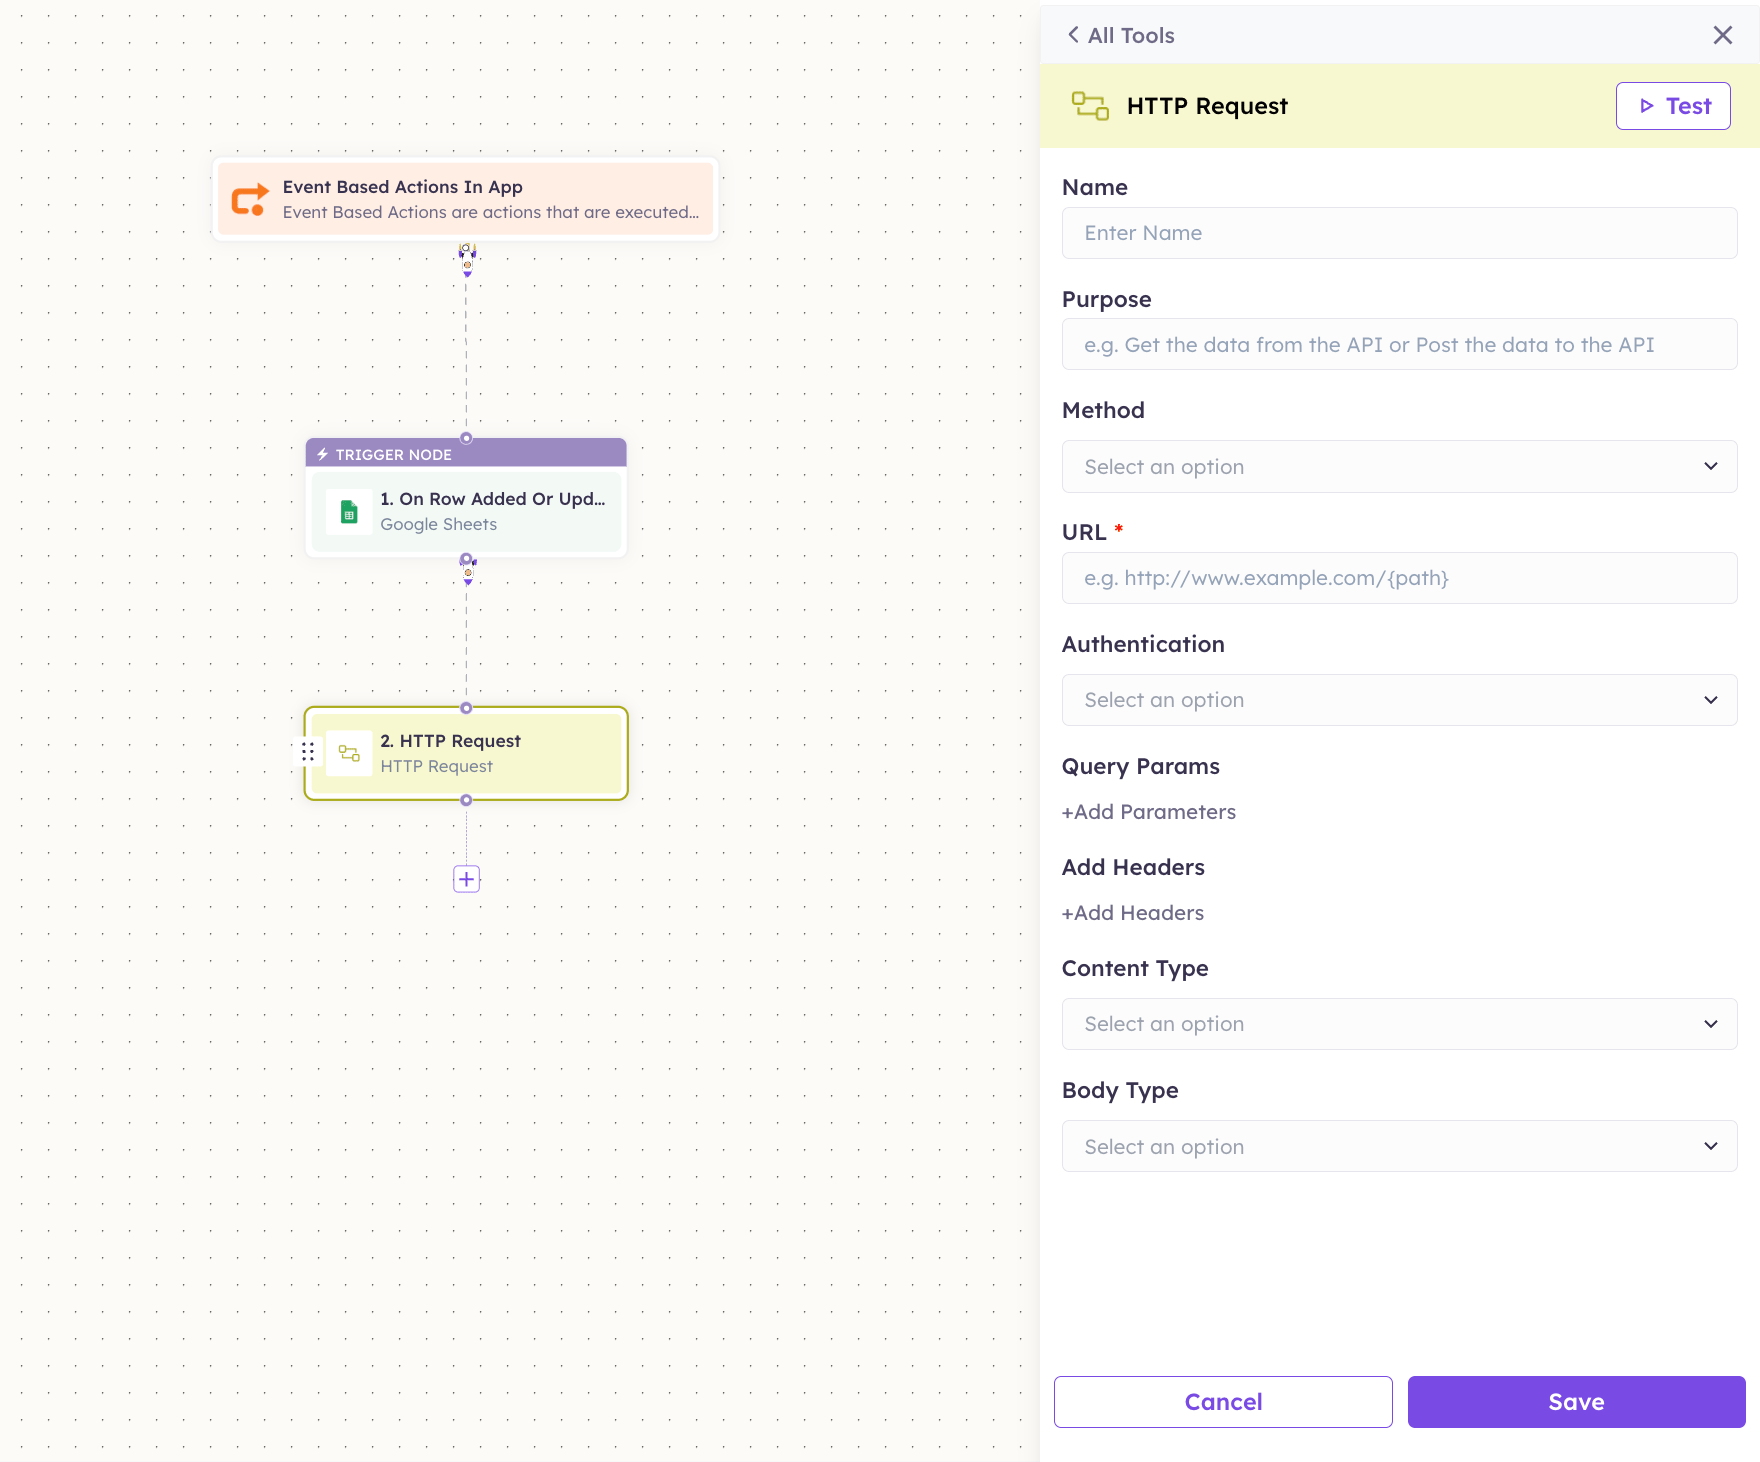
Need something that isn't a built-in app action? Use **Builder → HTTP Request** to call any REST API. Fill in **Name**, **Purpose**, **Method**, **URL**, **Authentication**, optional **Query Params** / **Headers**, **Content Type**, and **Body Type**, then **Save**.
In **If/Else**, build a rule from a value (usually the output of an earlier step), an operator, and a comparison value — for example *order status equals "shipped"*. Connect the **If** path and the **Else** path to the steps that should run for each outcome.
Put the step that produces the data **before** the **If/Else** that checks it. A condition can only read values that already exist earlier in the run.
### Call any API (HTTP Request)
Need something that isn't a built-in app action? Use **Builder → HTTP Request** to call any REST API. Fill in **Name**, **Purpose**, **Method**, **URL**, **Authentication**, optional **Query Params** / **Headers**, **Content Type**, and **Body Type**, then **Save**.
 ***
## 5. Save and publish
Click **Save Changes** (top-right) as you build. Use a node's **Test** button to run just that step and check its output.
When you're ready, switch the **Publish** toggle on. The workflow now runs automatically whenever its trigger fires.
Open **Execution History** (top-right, or from the Workflows list) to see each run, its steps, and their outputs — handy for confirming everything behaves as expected.
***
## Putting it together — an example
A simple end-to-end flow using one trigger, one condition, and one action:
```text theme={null}
Trigger: Google Sheets — On Row Added Or Updated (every 1 minute)
│
▼
If/Else: row Status equals "New"
├─ If ─▶ Slack — Send Message: "New lead: {{row.Name}} ({{row.Phone}})"
└─ Else ─▶ (end — nothing to do)
```
When a new row lands in the sheet, the workflow checks its status and, if it's new, posts the lead to Slack — no manual steps.
***
## Tips & troubleshooting
* **An app isn't in the Apps tab?** It isn't connected yet. Connect it first (see [MCP Integrations](/mcp/integrations)), then it appears with an **MCP** badge.
* **"Add Account" instead of your account?** The app is connected for the workspace but this account isn't linked — click **Add Account** and complete the sign-in.
* **A step fails with `401`/`403`?** The account's access expired or lacks permission — reconnect it and re-approve its scopes.
* **A trigger never fires?** Check the **Schedule** is set and the right **spreadsheet/sheet** (or equivalent) is selected, then confirm the change you expect actually matches the trigger (e.g. a *new* row for **On Row Added**).
* **Build incrementally:** add one node, **Test** it, then add the next. It's far easier to debug a 2-node flow than a finished one.
***
## Next steps
* Browse every connectable app in the [MCP Integrations](/mcp/integrations) catalog.
* New to MCP? Start with the [Introduction](/mcp/introduction).
* Connect a server (e.g. [Google Sheets](/mcp/google-sheets), [Slack](/mcp/slack)) and build the example above.
***
## 5. Save and publish
Click **Save Changes** (top-right) as you build. Use a node's **Test** button to run just that step and check its output.
When you're ready, switch the **Publish** toggle on. The workflow now runs automatically whenever its trigger fires.
Open **Execution History** (top-right, or from the Workflows list) to see each run, its steps, and their outputs — handy for confirming everything behaves as expected.
***
## Putting it together — an example
A simple end-to-end flow using one trigger, one condition, and one action:
```text theme={null}
Trigger: Google Sheets — On Row Added Or Updated (every 1 minute)
│
▼
If/Else: row Status equals "New"
├─ If ─▶ Slack — Send Message: "New lead: {{row.Name}} ({{row.Phone}})"
└─ Else ─▶ (end — nothing to do)
```
When a new row lands in the sheet, the workflow checks its status and, if it's new, posts the lead to Slack — no manual steps.
***
## Tips & troubleshooting
* **An app isn't in the Apps tab?** It isn't connected yet. Connect it first (see [MCP Integrations](/mcp/integrations)), then it appears with an **MCP** badge.
* **"Add Account" instead of your account?** The app is connected for the workspace but this account isn't linked — click **Add Account** and complete the sign-in.
* **A step fails with `401`/`403`?** The account's access expired or lacks permission — reconnect it and re-approve its scopes.
* **A trigger never fires?** Check the **Schedule** is set and the right **spreadsheet/sheet** (or equivalent) is selected, then confirm the change you expect actually matches the trigger (e.g. a *new* row for **On Row Added**).
* **Build incrementally:** add one node, **Test** it, then add the next. It's far easier to debug a 2-node flow than a finished one.
***
## Next steps
* Browse every connectable app in the [MCP Integrations](/mcp/integrations) catalog.
* New to MCP? Start with the [Introduction](/mcp/introduction).
* Connect a server (e.g. [Google Sheets](/mcp/google-sheets), [Slack](/mcp/slack)) and build the example above.