> ## Documentation Index
> Fetch the complete documentation index at: https://docs.unleashx.ai/llms.txt
> Use this file to discover all available pages before exploring further.
# WordPress
> Let your UnleashX agent publish and edit WordPress posts, categories, users, and featured images.
# WordPress
> **In one line:** Connect WordPress so your UnleashX agent can create and update posts, manage categories and users, set featured images, and even generate AI cover art.
| | |
| ------------------ | --------------------------------------------------------------------------------------------------- |
| **Category** | CMS |
| **Authentication** | Application Password |
| **Setup time** | \~6 minutes |
| **Difficulty** | Medium |
| **Best for** | Content teams and site owners who want to draft, publish, and organize WordPress content hands-free |
## 1. Overview
WordPress is the world's most popular content management system, used to run blogs, marketing sites, and online publications. Content is organized into posts, grouped by categories, and managed by users with different roles.
Once connected, your UnleashX agent can create and edit posts, search existing content, manage categories and users, attach featured images, and generate AI cover images — all through the WordPress REST API. That lets you turn an idea or briefing into a published (or drafted) post without logging into wp-admin.
Connecting WordPress to UnleashX is useful for content marketers and site managers who want to speed up publishing, keep categories tidy, and handle routine site administration through conversation.
## 2. What you'll need
* A self-hosted WordPress site (or one where you control the REST API) reachable over HTTPS.
* Your site's **base URL** (e.g. `https://yourblog.com`).
* A WordPress user account with a role that can do what you need (Author/Editor to post; Administrator to manage users).
* An **Application Password** for that account.
Application Passwords require WordPress 5.6+ and an HTTPS site. If you don't see the option, an administrator may have disabled it, or your hosting may need it enabled. Managing other users requires an **Administrator** account.
## 3. Get your credentials
WordPress uses an **Application Password** with the REST API over Basic auth.
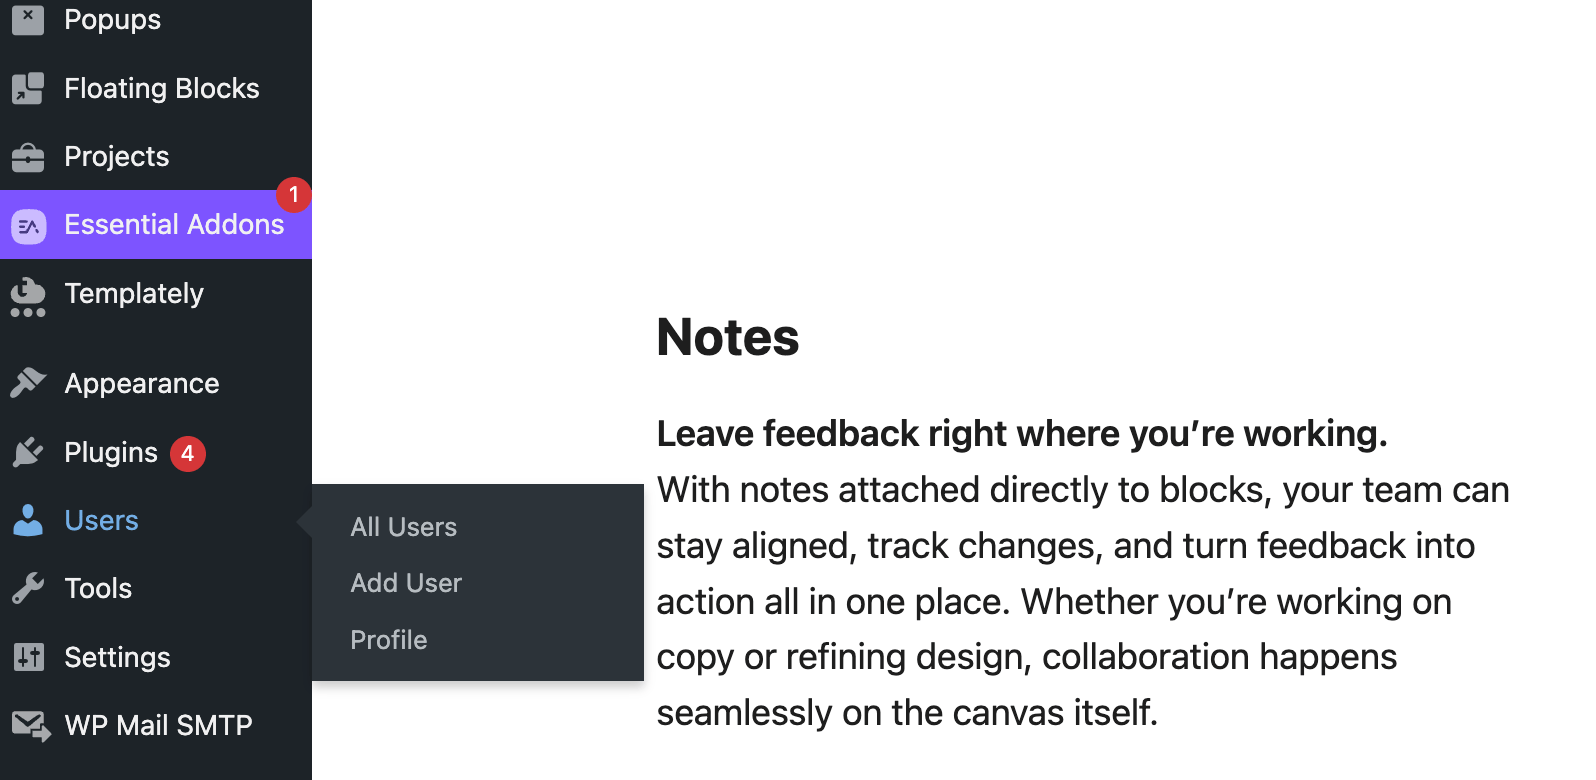
Sign in to your site's admin (`https://yoursite.com/wp-admin`). In the left sidebar, go to **Users**, then open **Profile** (your own account).
 On the profile page, scroll past **Account Management** to the **Application Passwords** section.
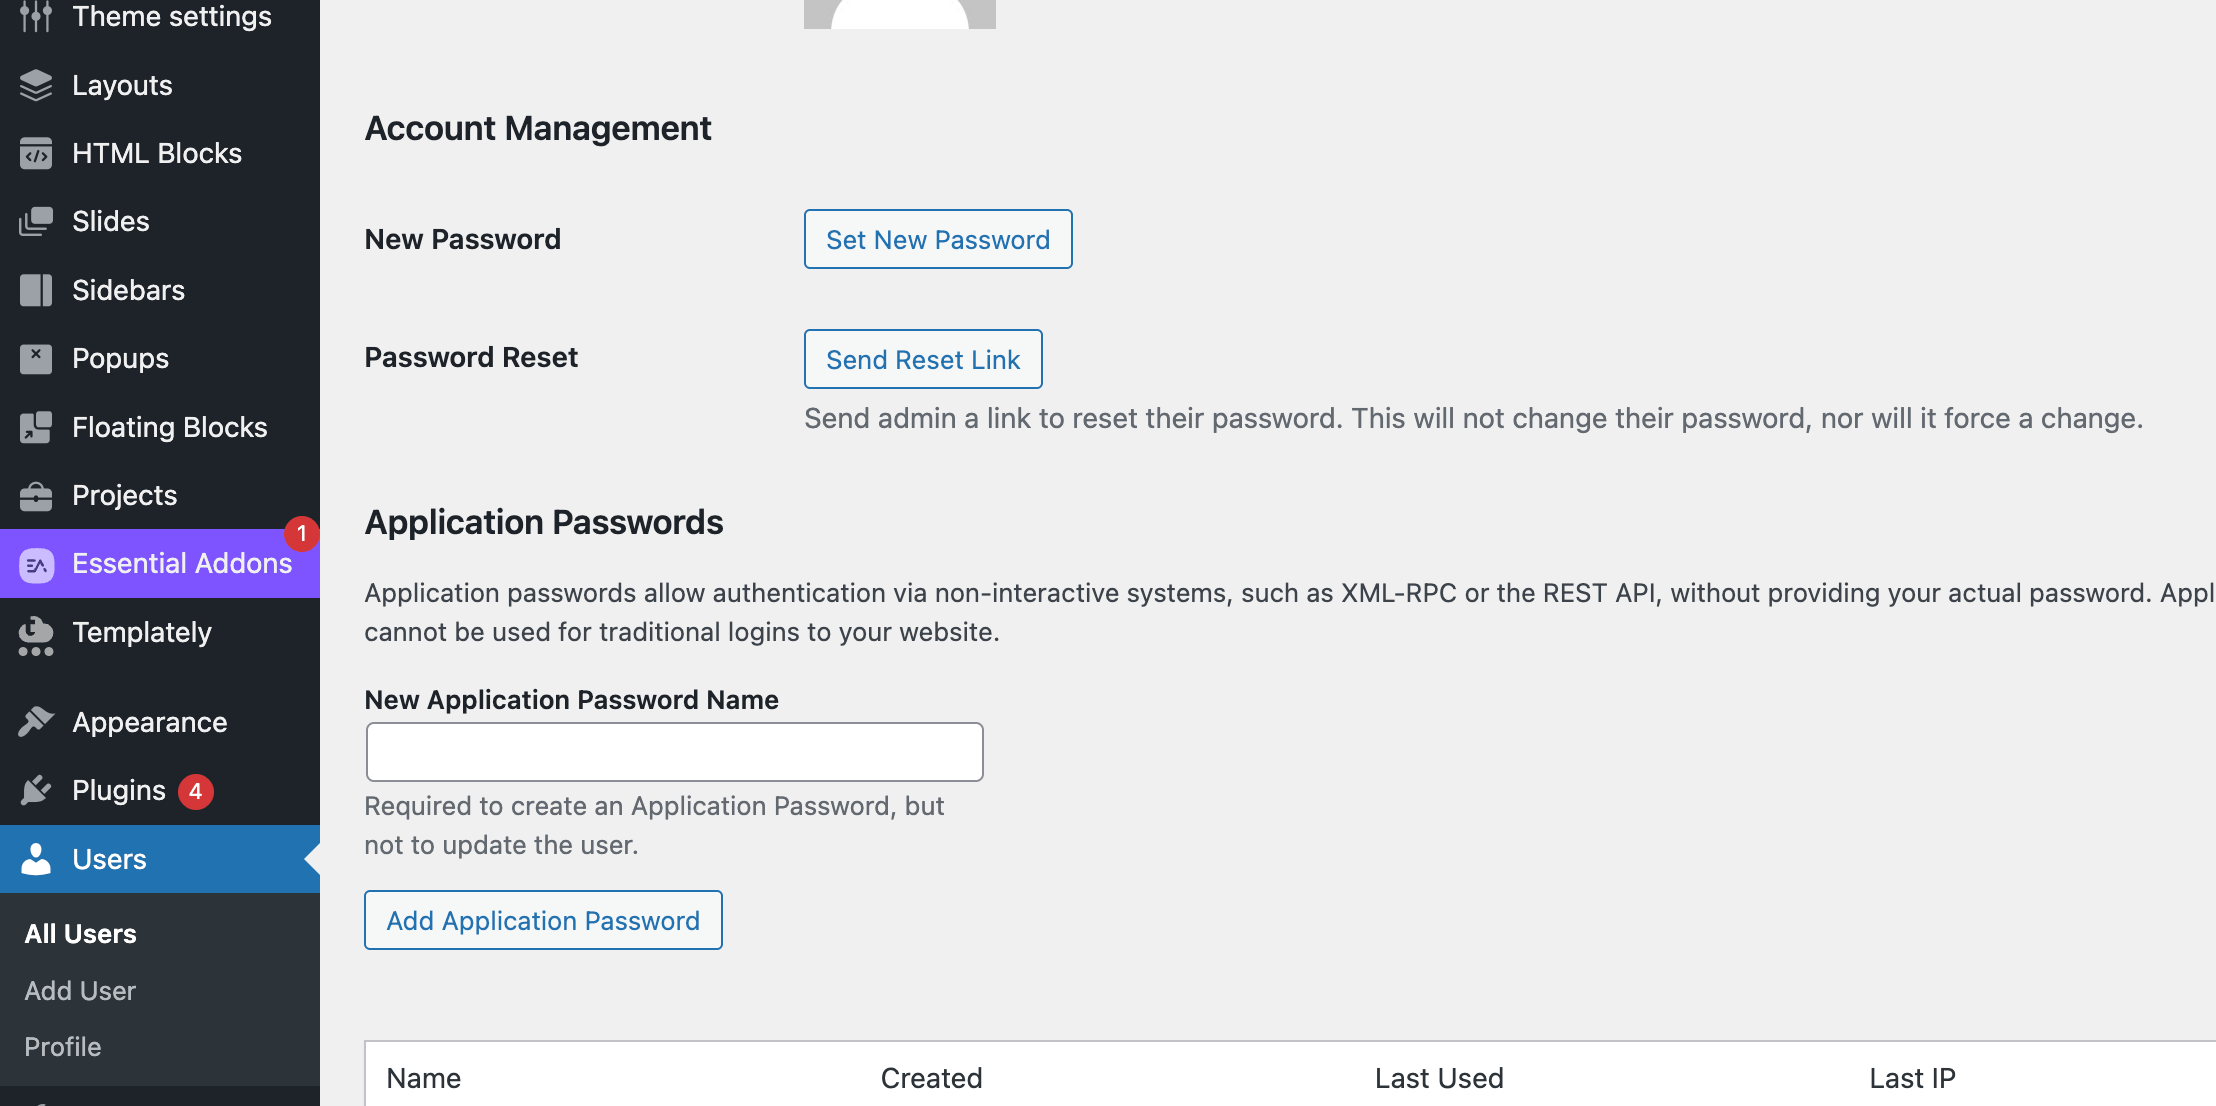 In the **New Application Password Name** field, type a name you'll recognize — for example, `UnleashX`.
Click **Add Application Password**. WordPress generates a password that looks like `xxxx xxxx xxxx xxxx xxxx xxxx`.
The Application Password is shown only once. Copy it now — if you lose it, revoke it and create a new one. You can paste it with or without the spaces; UnleashX accepts either.
You'll need three things to connect: your WordPress **username**, this **Application Password**, and your **site URL** (e.g. `https://yoursite.com`).
Don't see an **Application Passwords** section? It's built into WordPress 5.6+ but is hidden on sites served over plain HTTP or where a security plugin has disabled it. Use HTTPS, or enable Application Passwords, then refresh the profile page.
**What the credentials can access**
| Scope / Access | Why UnleashX needs it |
| ----------------------- | ----------------------------------------------------- |
| Read & write Posts | To create, update, fetch, search, and delete posts |
| Read & write Categories | To create, update, and organize content categories |
| Read & write Users | To create, update, and manage site users (Admin only) |
| Manage Media | To upload images and set featured images on posts |
An Application Password inherits the role of the user it belongs to. To manage users you must create it on an **Administrator** account; for posting only, an Author/Editor account is enough.
## 4. Connect on UnleashX
Go to [https://www.tryunleashx.com](https://www.tryunleashx.com) and open the agent you want to connect.
In the agent, go to **Data Connectors**.
Locate **WordPress** in the list and click **Connect** / **Add** / **Configure**. A form opens with four fields.
| Field | What to enter |
| ------------------- | ------------------------------------------------------------------------------------------------------------------------------------------------------------------------------------------------------ |
| **WP Site URL** | Your site's address, e.g. `https://yoursite.com` (no `/wp-admin`). |
| **WP Username** | The WordPress account you were signed in as when you created the Application Password — e.g. `admin`. The Application Password belongs to this user, so the username here **must match** that account. |
| **Account Name** | A label for this connection inside UnleashX — usually your name or a name for the site (e.g. "Marketing blog"). This is just for you; it doesn't affect WordPress. |
| **WP App Password** | The Application Password you copied in Section 3 (`xxxx xxxx xxxx xxxx xxxx xxxx`). |
UnleashX combines **WP Username** + **WP App Password** as HTTP Basic auth against your site's REST API.
Click **Add Tool**. When the status shows a **Connected** badge, your agent can start working with WordPress.
The **WP Username** must be the exact account the Application Password was generated under. If an admin created the password while signed in as `admin`, enter `admin` here — not your display name or email. A mismatch causes a `401 Unauthorized` even when the password is correct.
### Use WordPress in a Workflow
Once connected, you can add **WordPress** to any automation from the **Workflows** builder. Its triggers and tools appear in the Apps panel, marked with an **MCP** badge.
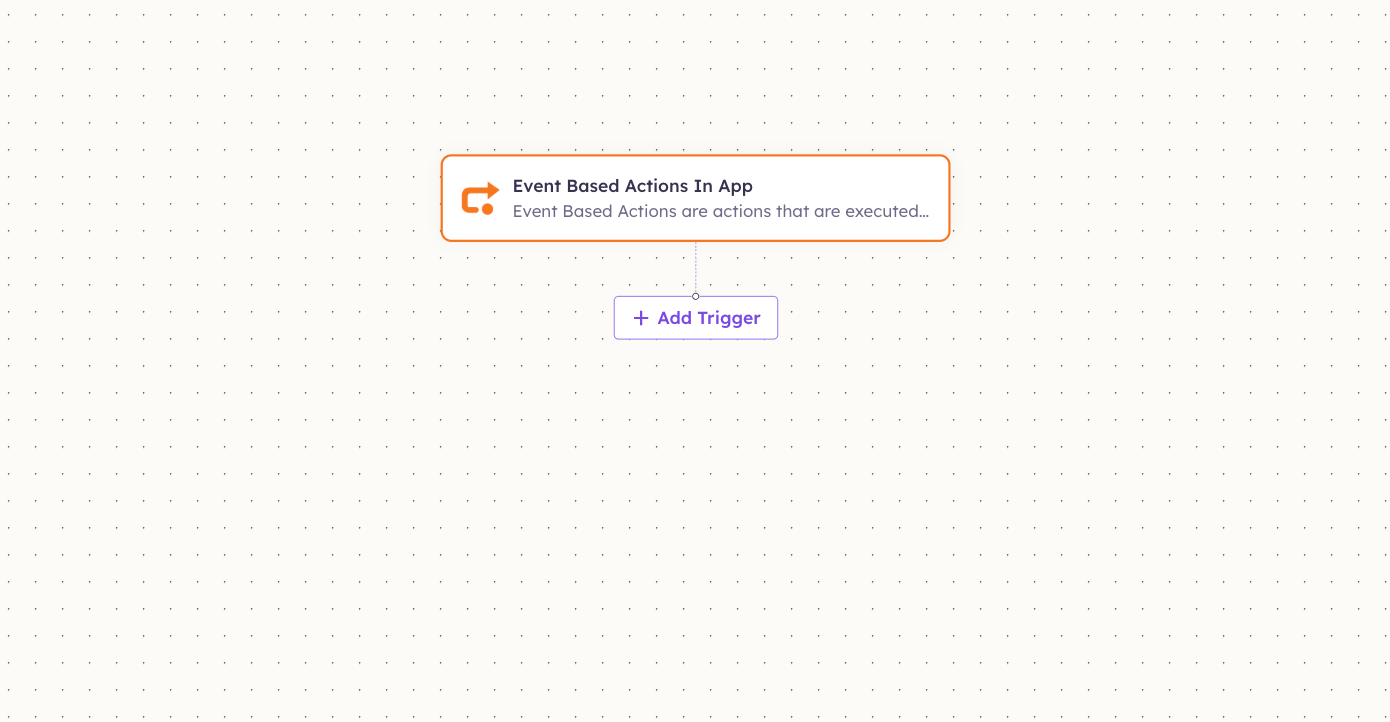
Open **Workflows → New Workflow**. On the canvas, click **+ Add Trigger** (or the **+** below any node) to add a step.
In the **New Application Password Name** field, type a name you'll recognize — for example, `UnleashX`.
Click **Add Application Password**. WordPress generates a password that looks like `xxxx xxxx xxxx xxxx xxxx xxxx`.
The Application Password is shown only once. Copy it now — if you lose it, revoke it and create a new one. You can paste it with or without the spaces; UnleashX accepts either.
You'll need three things to connect: your WordPress **username**, this **Application Password**, and your **site URL** (e.g. `https://yoursite.com`).
Don't see an **Application Passwords** section? It's built into WordPress 5.6+ but is hidden on sites served over plain HTTP or where a security plugin has disabled it. Use HTTPS, or enable Application Passwords, then refresh the profile page.
**What the credentials can access**
| Scope / Access | Why UnleashX needs it |
| ----------------------- | ----------------------------------------------------- |
| Read & write Posts | To create, update, fetch, search, and delete posts |
| Read & write Categories | To create, update, and organize content categories |
| Read & write Users | To create, update, and manage site users (Admin only) |
| Manage Media | To upload images and set featured images on posts |
An Application Password inherits the role of the user it belongs to. To manage users you must create it on an **Administrator** account; for posting only, an Author/Editor account is enough.
## 4. Connect on UnleashX
Go to [https://www.tryunleashx.com](https://www.tryunleashx.com) and open the agent you want to connect.
In the agent, go to **Data Connectors**.
Locate **WordPress** in the list and click **Connect** / **Add** / **Configure**. A form opens with four fields.
| Field | What to enter |
| ------------------- | ------------------------------------------------------------------------------------------------------------------------------------------------------------------------------------------------------ |
| **WP Site URL** | Your site's address, e.g. `https://yoursite.com` (no `/wp-admin`). |
| **WP Username** | The WordPress account you were signed in as when you created the Application Password — e.g. `admin`. The Application Password belongs to this user, so the username here **must match** that account. |
| **Account Name** | A label for this connection inside UnleashX — usually your name or a name for the site (e.g. "Marketing blog"). This is just for you; it doesn't affect WordPress. |
| **WP App Password** | The Application Password you copied in Section 3 (`xxxx xxxx xxxx xxxx xxxx xxxx`). |
UnleashX combines **WP Username** + **WP App Password** as HTTP Basic auth against your site's REST API.
Click **Add Tool**. When the status shows a **Connected** badge, your agent can start working with WordPress.
The **WP Username** must be the exact account the Application Password was generated under. If an admin created the password while signed in as `admin`, enter `admin` here — not your display name or email. A mismatch causes a `401 Unauthorized` even when the password is correct.
### Use WordPress in a Workflow
Once connected, you can add **WordPress** to any automation from the **Workflows** builder. Its triggers and tools appear in the Apps panel, marked with an **MCP** badge.
Open **Workflows → New Workflow**. On the canvas, click **+ Add Trigger** (or the **+** below any node) to add a step.
 In the **Paths** panel, open the **Apps** tab and select **WordPress**. Use the search box if you have many connectors.
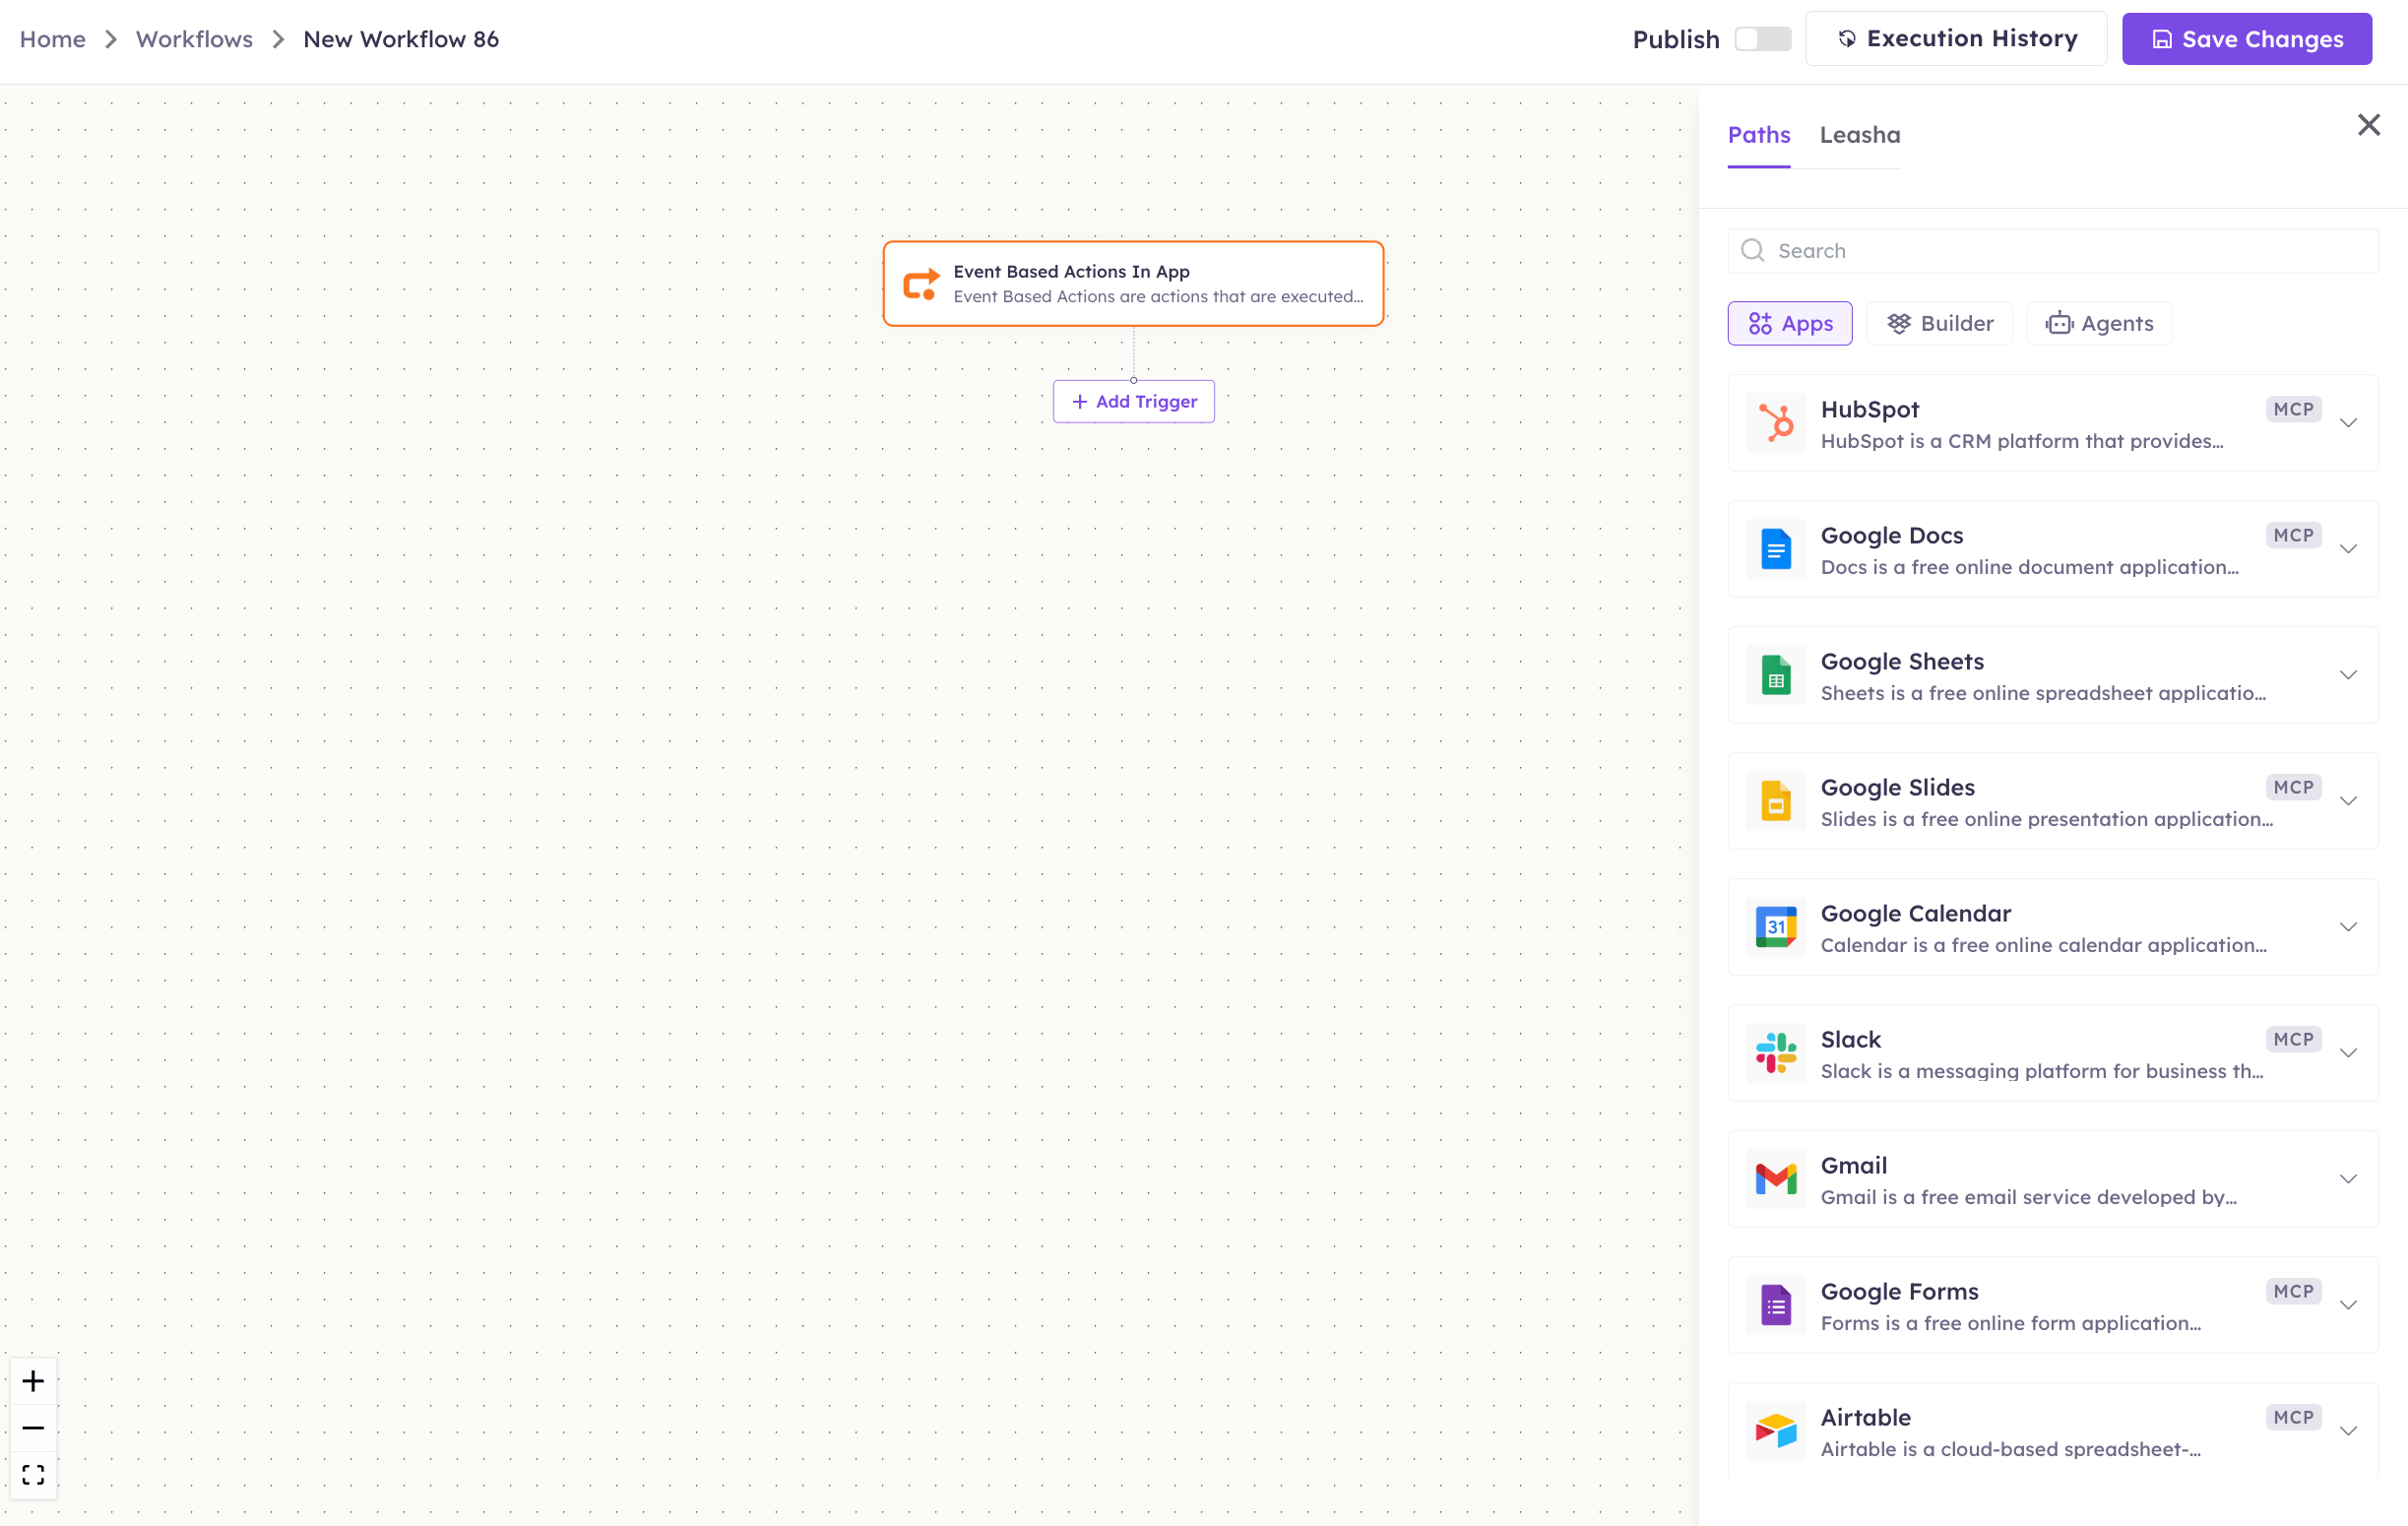 Pick the trigger or action you want. Configure its fields — required fields are marked with a red asterisk (\*).
Under **Selected account**, choose an already-connected account, or click **Add Account** to connect one now.
Fill in the remaining fields and click **Save**. Use **Test** to verify the step, then toggle **Publish** when the workflow is ready.
The steps are the same for every connector. For the full workflow builder guide, see [Using MCP in Workflows](/mcp/workflows).
## 5. Available tools
| Tool | What it does | Changes data? |
| ------------------ | -------------------------------------------------------------------------- | ------------- |
| Create Post | Creates a new post (draft or published) | ✏️ Yes |
| Update Post | Updates an existing post | ✏️ Yes |
| Get Post | Gets a single post by ID | No |
| Delete Post | Deletes a post | ⚠️ Yes |
| Search Posts | Searches posts by status, author, etc. | No |
| Create Category | Creates a category | ✏️ Yes |
| Update Category | Updates a category | ✏️ Yes |
| Get Category | Gets a single category by ID | No |
| Delete Category | Deletes a category | ⚠️ Yes |
| Search Categories | Searches categories | No |
| Create User | Creates a new site user | ✏️ Yes |
| Update User | Updates a user | ✏️ Yes |
| Get User | Gets a single user by ID | No |
| Delete User | Deletes a user | ⚠️ Yes |
| Search Users | Searches users by role or name | No |
| Set Featured Image | Sets a media item as a post's featured image | ✏️ Yes |
| Generate AI Image | Generates an AI image, uploads it to Media, optionally sets it as featured | ✏️ Yes |
## 6. Example usage
**"Draft a blog post titled 'Spring Sale Tips' in the Marketing category and generate a cover image."**
Behind the scenes: Search Categories → Create Post → Generate AI Image (sets it as featured).
**"Find all draft posts by Maria and publish the one about onboarding."**
Behind the scenes: Search Users → Search Posts → Update Post.
## 7. Permissions & data access
**UnleashX CAN:**
* Read, create, update, and delete posts and categories.
* Search posts, categories, and users.
* Manage users (when connected with an Administrator account).
* Upload media, set featured images, and generate AI cover images.
**UnleashX CANNOT:**
* Do anything the connected user's role doesn't permit.
* Change WordPress core settings, themes, or plugins.
* Access sites other than the one you connected.
**To disconnect:** In UnleashX, open your agent → **Data Connectors** → **WordPress** → **Disconnect**. To fully revoke access, go to **Users → Profile → Application Passwords** in WordPress and click **Revoke**. Either action stops access immediately.
## 8. Troubleshooting
| Problem | What it means | How to fix it |
| ----------------------------- | ---------------------------------------------------------------- | ------------------------------------------------------------------------------- |
| `401 Unauthorized` | Wrong username/Application Password, or it was revoked | Recreate the Application Password and re-enter username + password |
| `403 Forbidden` | The connected user's role can't perform that action | Connect with an account that has the needed role (e.g. Administrator for users) |
| `404 Not Found` | The post/category/user ID doesn't exist, or REST API is disabled | Verify the ID and that `/wp-json/` is reachable on your site |
| Application Passwords missing | Disabled or site not on HTTPS | Enable HTTPS and Application Passwords (WordPress 5.6+) |
| Connection refused | Site URL wrong or REST API blocked by a plugin/firewall | Confirm the base URL and that the REST API isn't blocked |
For general connection issues, see [/mcp/integrations](/mcp/integrations).
## 9. Frequently asked questions
**Is my data stored by UnleashX?**
UnleashX calls your WordPress REST API live with your credentials when a tool runs. It doesn't keep a separate copy of your site content.
**Can multiple team members connect?**
Yes. Each person creates their own Application Password on their own WordPress account, and each connection inherits that user's role.
**How do I rotate my key?**
Create a new Application Password in **Users → Profile**, update it in UnleashX, then revoke the old one. Access switches over immediately.
**Does the AI image tool need anything extra?**
Generate AI Image generates images via OpenAI, so an OpenAI API key must be supplied (passed in or configured at the platform level).
## 10. References
* WordPress REST API handbook: [https://developer.wordpress.org/rest-api/](https://developer.wordpress.org/rest-api/)
* Application Passwords reference: [https://developer.wordpress.org/rest-api/using-the-rest-api/authentication/#application-passwords](https://developer.wordpress.org/rest-api/using-the-rest-api/authentication/#application-passwords)
* REST API authentication overview: [https://developer.wordpress.org/rest-api/using-the-rest-api/authentication/](https://developer.wordpress.org/rest-api/using-the-rest-api/authentication/)
Pick the trigger or action you want. Configure its fields — required fields are marked with a red asterisk (\*).
Under **Selected account**, choose an already-connected account, or click **Add Account** to connect one now.
Fill in the remaining fields and click **Save**. Use **Test** to verify the step, then toggle **Publish** when the workflow is ready.
The steps are the same for every connector. For the full workflow builder guide, see [Using MCP in Workflows](/mcp/workflows).
## 5. Available tools
| Tool | What it does | Changes data? |
| ------------------ | -------------------------------------------------------------------------- | ------------- |
| Create Post | Creates a new post (draft or published) | ✏️ Yes |
| Update Post | Updates an existing post | ✏️ Yes |
| Get Post | Gets a single post by ID | No |
| Delete Post | Deletes a post | ⚠️ Yes |
| Search Posts | Searches posts by status, author, etc. | No |
| Create Category | Creates a category | ✏️ Yes |
| Update Category | Updates a category | ✏️ Yes |
| Get Category | Gets a single category by ID | No |
| Delete Category | Deletes a category | ⚠️ Yes |
| Search Categories | Searches categories | No |
| Create User | Creates a new site user | ✏️ Yes |
| Update User | Updates a user | ✏️ Yes |
| Get User | Gets a single user by ID | No |
| Delete User | Deletes a user | ⚠️ Yes |
| Search Users | Searches users by role or name | No |
| Set Featured Image | Sets a media item as a post's featured image | ✏️ Yes |
| Generate AI Image | Generates an AI image, uploads it to Media, optionally sets it as featured | ✏️ Yes |
## 6. Example usage
**"Draft a blog post titled 'Spring Sale Tips' in the Marketing category and generate a cover image."**
Behind the scenes: Search Categories → Create Post → Generate AI Image (sets it as featured).
**"Find all draft posts by Maria and publish the one about onboarding."**
Behind the scenes: Search Users → Search Posts → Update Post.
## 7. Permissions & data access
**UnleashX CAN:**
* Read, create, update, and delete posts and categories.
* Search posts, categories, and users.
* Manage users (when connected with an Administrator account).
* Upload media, set featured images, and generate AI cover images.
**UnleashX CANNOT:**
* Do anything the connected user's role doesn't permit.
* Change WordPress core settings, themes, or plugins.
* Access sites other than the one you connected.
**To disconnect:** In UnleashX, open your agent → **Data Connectors** → **WordPress** → **Disconnect**. To fully revoke access, go to **Users → Profile → Application Passwords** in WordPress and click **Revoke**. Either action stops access immediately.
## 8. Troubleshooting
| Problem | What it means | How to fix it |
| ----------------------------- | ---------------------------------------------------------------- | ------------------------------------------------------------------------------- |
| `401 Unauthorized` | Wrong username/Application Password, or it was revoked | Recreate the Application Password and re-enter username + password |
| `403 Forbidden` | The connected user's role can't perform that action | Connect with an account that has the needed role (e.g. Administrator for users) |
| `404 Not Found` | The post/category/user ID doesn't exist, or REST API is disabled | Verify the ID and that `/wp-json/` is reachable on your site |
| Application Passwords missing | Disabled or site not on HTTPS | Enable HTTPS and Application Passwords (WordPress 5.6+) |
| Connection refused | Site URL wrong or REST API blocked by a plugin/firewall | Confirm the base URL and that the REST API isn't blocked |
For general connection issues, see [/mcp/integrations](/mcp/integrations).
## 9. Frequently asked questions
**Is my data stored by UnleashX?**
UnleashX calls your WordPress REST API live with your credentials when a tool runs. It doesn't keep a separate copy of your site content.
**Can multiple team members connect?**
Yes. Each person creates their own Application Password on their own WordPress account, and each connection inherits that user's role.
**How do I rotate my key?**
Create a new Application Password in **Users → Profile**, update it in UnleashX, then revoke the old one. Access switches over immediately.
**Does the AI image tool need anything extra?**
Generate AI Image generates images via OpenAI, so an OpenAI API key must be supplied (passed in or configured at the platform level).
## 10. References
* WordPress REST API handbook: [https://developer.wordpress.org/rest-api/](https://developer.wordpress.org/rest-api/)
* Application Passwords reference: [https://developer.wordpress.org/rest-api/using-the-rest-api/authentication/#application-passwords](https://developer.wordpress.org/rest-api/using-the-rest-api/authentication/#application-passwords)
* REST API authentication overview: [https://developer.wordpress.org/rest-api/using-the-rest-api/authentication/](https://developer.wordpress.org/rest-api/using-the-rest-api/authentication/)