> ## Documentation Index
> Fetch the complete documentation index at: https://docs.unleashx.ai/llms.txt
> Use this file to discover all available pages before exploring further.
# WooCommerce
> Let your UnleashX agent manage WooCommerce products, orders, and customers from a conversation.
# WooCommerce
> **In one line:** Connect WooCommerce so your UnleashX agent can look up products, check and update orders, manage customers, and react the moment a new order comes in.
| | |
| ------------------ | ----------------------------------------------------------------------------------------------------------------------------------- |
| **Category** | Commerce |
| **Authentication** | Consumer Key + Consumer Secret (REST API) |
| **Setup time** | \~5 minutes |
| **Difficulty** | Medium |
| **Best for** | WooCommerce stores that want an AI agent to answer order and product questions, update order status, and keep customer records tidy |
## 1. Overview
WooCommerce is the commerce plugin that turns a WordPress site into an online store — products, categories, orders, and customers all live in your own WordPress database and are exposed through the WooCommerce REST API.
Once connected to UnleashX, your agent can browse and search your catalog, create and update products, look up an order by ID or by the customer's phone number, move an order to a new status, and create or find customers. Four triggers let a workflow start the moment a new order, product, customer, or coupon appears.
Connecting WooCommerce to UnleashX means the store answers for itself: a shopper asks "where's my order?" and the agent checks it live, a new order fires a workflow, and support stops copy-pasting from wp-admin.
## 2. What you'll need
* A WordPress site with the **WooCommerce plugin active**, served over **HTTPS**.
* Your **Store URL** — the site's home address, e.g. `https://yourstore.com` (no trailing slash).
* An **administrator** (or shop manager) account on that WordPress site.
* A **Consumer Key** (`ck_…`) and **Consumer Secret** (`cs_…`) generated from WooCommerce's REST API screen.
Pretty permalinks must be enabled (**Settings → Permalinks →** anything other than "Plain"), otherwise the WooCommerce REST API returns `404` on every request.
No admin access? Ask your store owner to generate a Read/Write API key and share the Store URL, Consumer Key, and Consumer Secret with you.
## 3. Get your credentials
WooCommerce authenticates with a **Consumer Key / Consumer Secret** pair. Both are generated together in one step inside WordPress admin.
### Find your Store URL
In WordPress admin, go to **Settings → General**.
Copy the value in the **WordPress Address (URL)** field and remove any trailing slash — e.g. `https://yourstore.com`.
If WooCommerce lives in a subfolder or subdomain (e.g. `https://yourstore.com/shop`), use that exact base. UnleashX appends `/wp-json/wc/v3` itself.
### Generate the Consumer Key and Secret
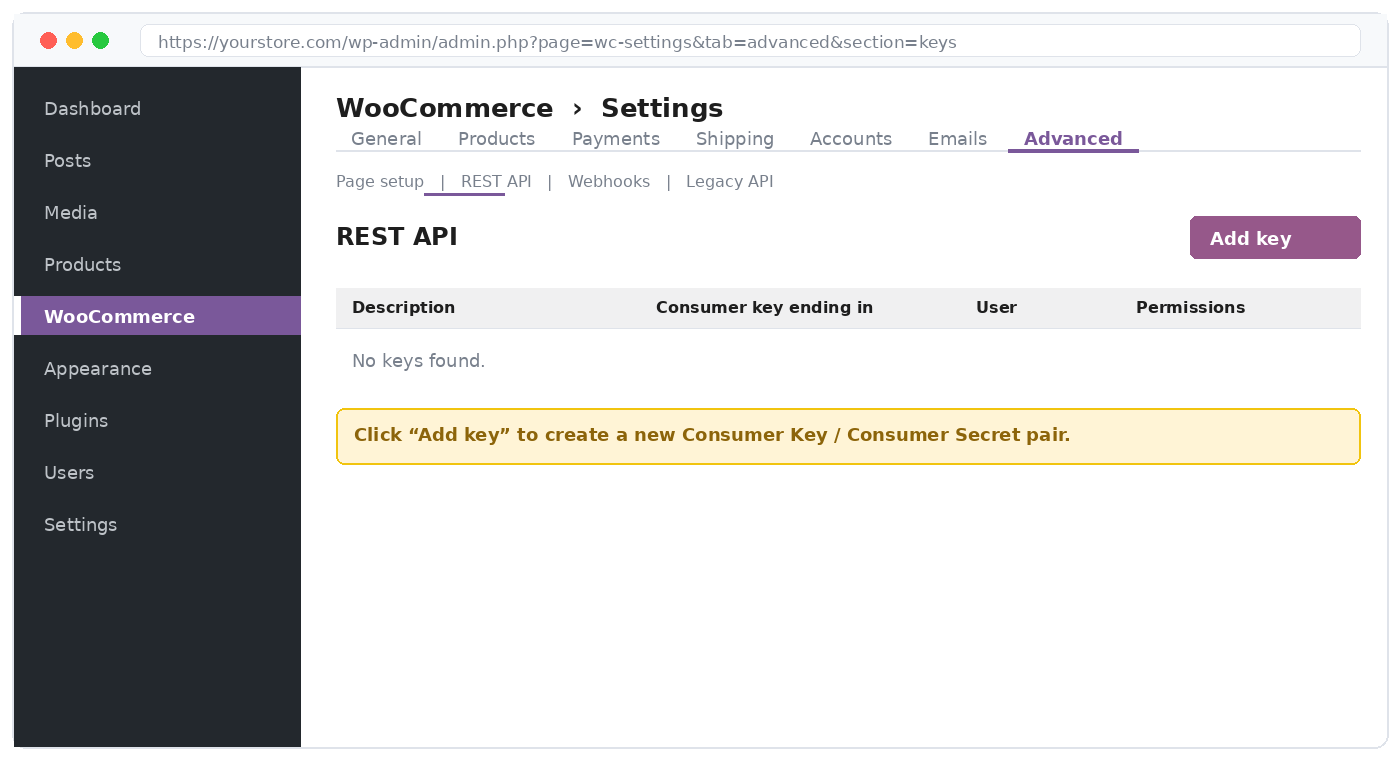
Sign in at `https://yourstore.com/wp-admin`, then go to **WooCommerce → Settings → Advanced → REST API** and click **Add key**.
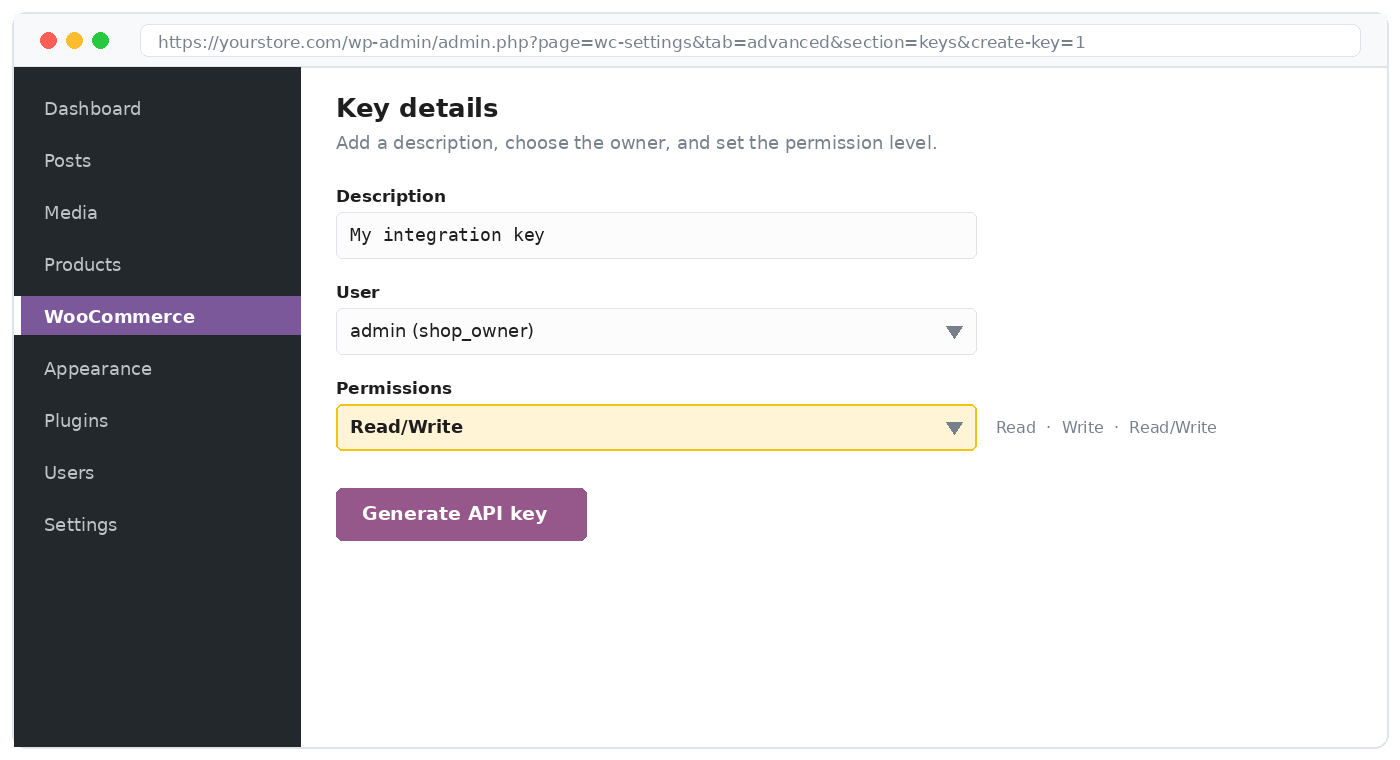
 * **Description** — something you'll recognise later, e.g. "UnleashX".
* **User** — an admin or a dedicated integration user. The key acts as this user.
* **Permissions** — **Read/Write** (choose **Read** if your agent only needs to look things up).
Then click **Generate API key**.
* **Description** — something you'll recognise later, e.g. "UnleashX".
* **User** — an admin or a dedicated integration user. The key acts as this user.
* **Permissions** — **Read/Write** (choose **Read** if your agent only needs to look things up).
Then click **Generate API key**.
 WooCommerce shows the **Consumer key** (`ck_…`) and **Consumer secret** (`cs_…`). Copy both and store them in your password manager.
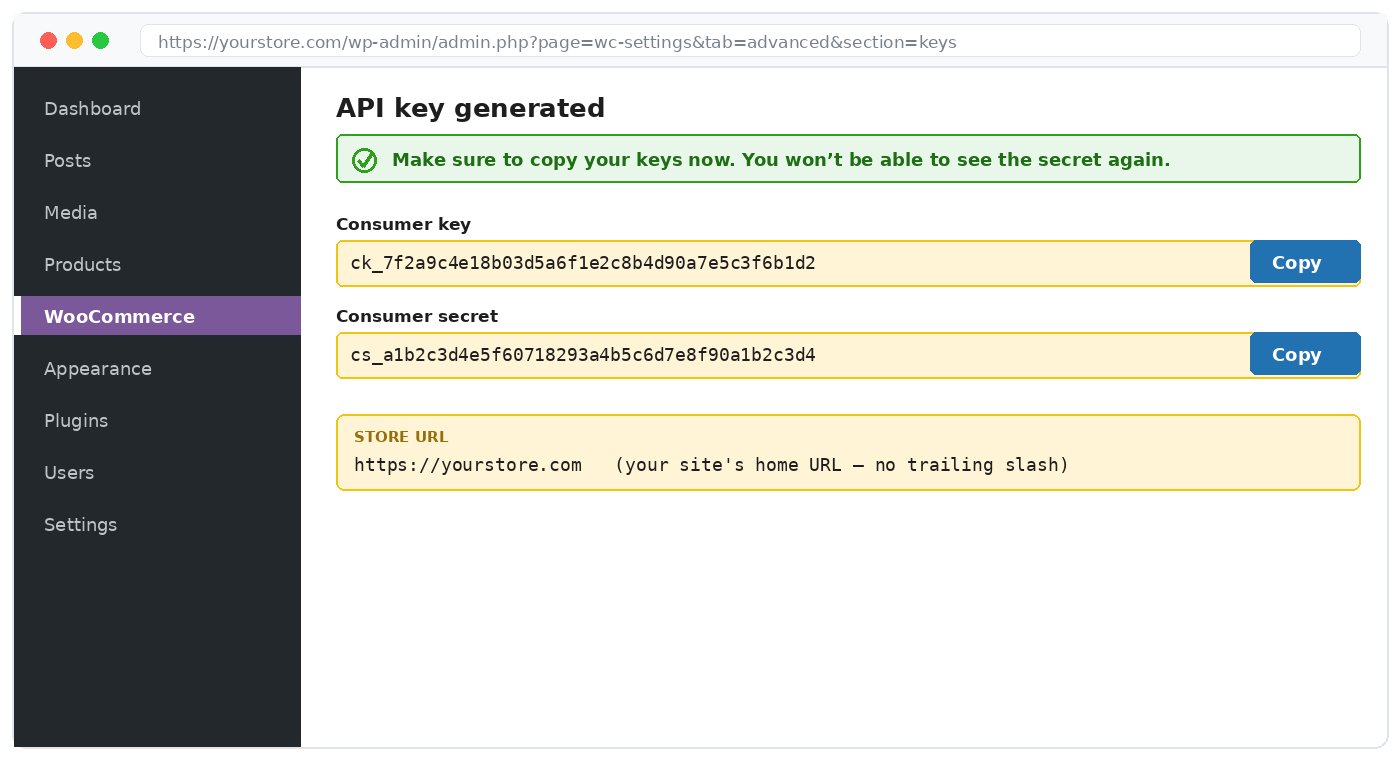 The Consumer Secret is displayed only on this screen. If you lose it you can't recover it — revoke the key and generate a new one.
**What the credentials can access**
| Permission | Why UnleashX needs it |
| -------------------------- | ------------------------------------------------ |
| Read products & categories | List, search, and fetch product details |
| Write products | Create, update, and delete products |
| Read orders | List orders, look one up by ID or customer phone |
| Write orders | Create an order and change its status |
| Read & write customers | List, search, fetch, and create customers |
| Read payment gateways | List the store's available payment methods |
Permissions come from the key, not from the tool. A **Read** key makes every write tool fail with `401` — use **Read/Write** if you want the agent to create products, orders, or customers.
### Quick test (optional)
Confirm the pair works before connecting, by opening this in a browser with your values substituted:
```
https://yourstore.com/wp-json/wc/v3/products?consumer_key=ck_…&consumer_secret=cs_…
```
A JSON list of products (or an empty array) means the key is valid. A `401` means the key or secret is wrong; a `404` usually means permalinks aren't set to a pretty format.
## 4. Connect on UnleashX
Sign in at [https://www.tryunleashx.com](https://www.tryunleashx.com) and open the agent you want to connect.
In the agent, go to **Data Connectors** and locate **WooCommerce**.
Click **Connect** / **Add** / **Configure** and complete the form.
| Field | What to enter |
| ------------------- | --------------------------------------------------------------------------------------------------------------------- |
| **Store URL** | Your store's address, e.g. `https://yourstore.com` — no trailing slash, no `/wp-admin`. |
| **Consumer Key** | The `ck_…` value from Section 3. |
| **Consumer Secret** | The matching `cs_…` value. |
| **Account Name** | A label for this connection inside UnleashX (e.g. "Main store"). This is just for you; it doesn't affect WooCommerce. |
Save. The status will switch to a **Connected** badge and your agent can start working with the store.
Never expose `ck_`/`cs_` in client-side code. Give each integration its own key so you can revoke one without affecting the others.
### Use WooCommerce in a Workflow
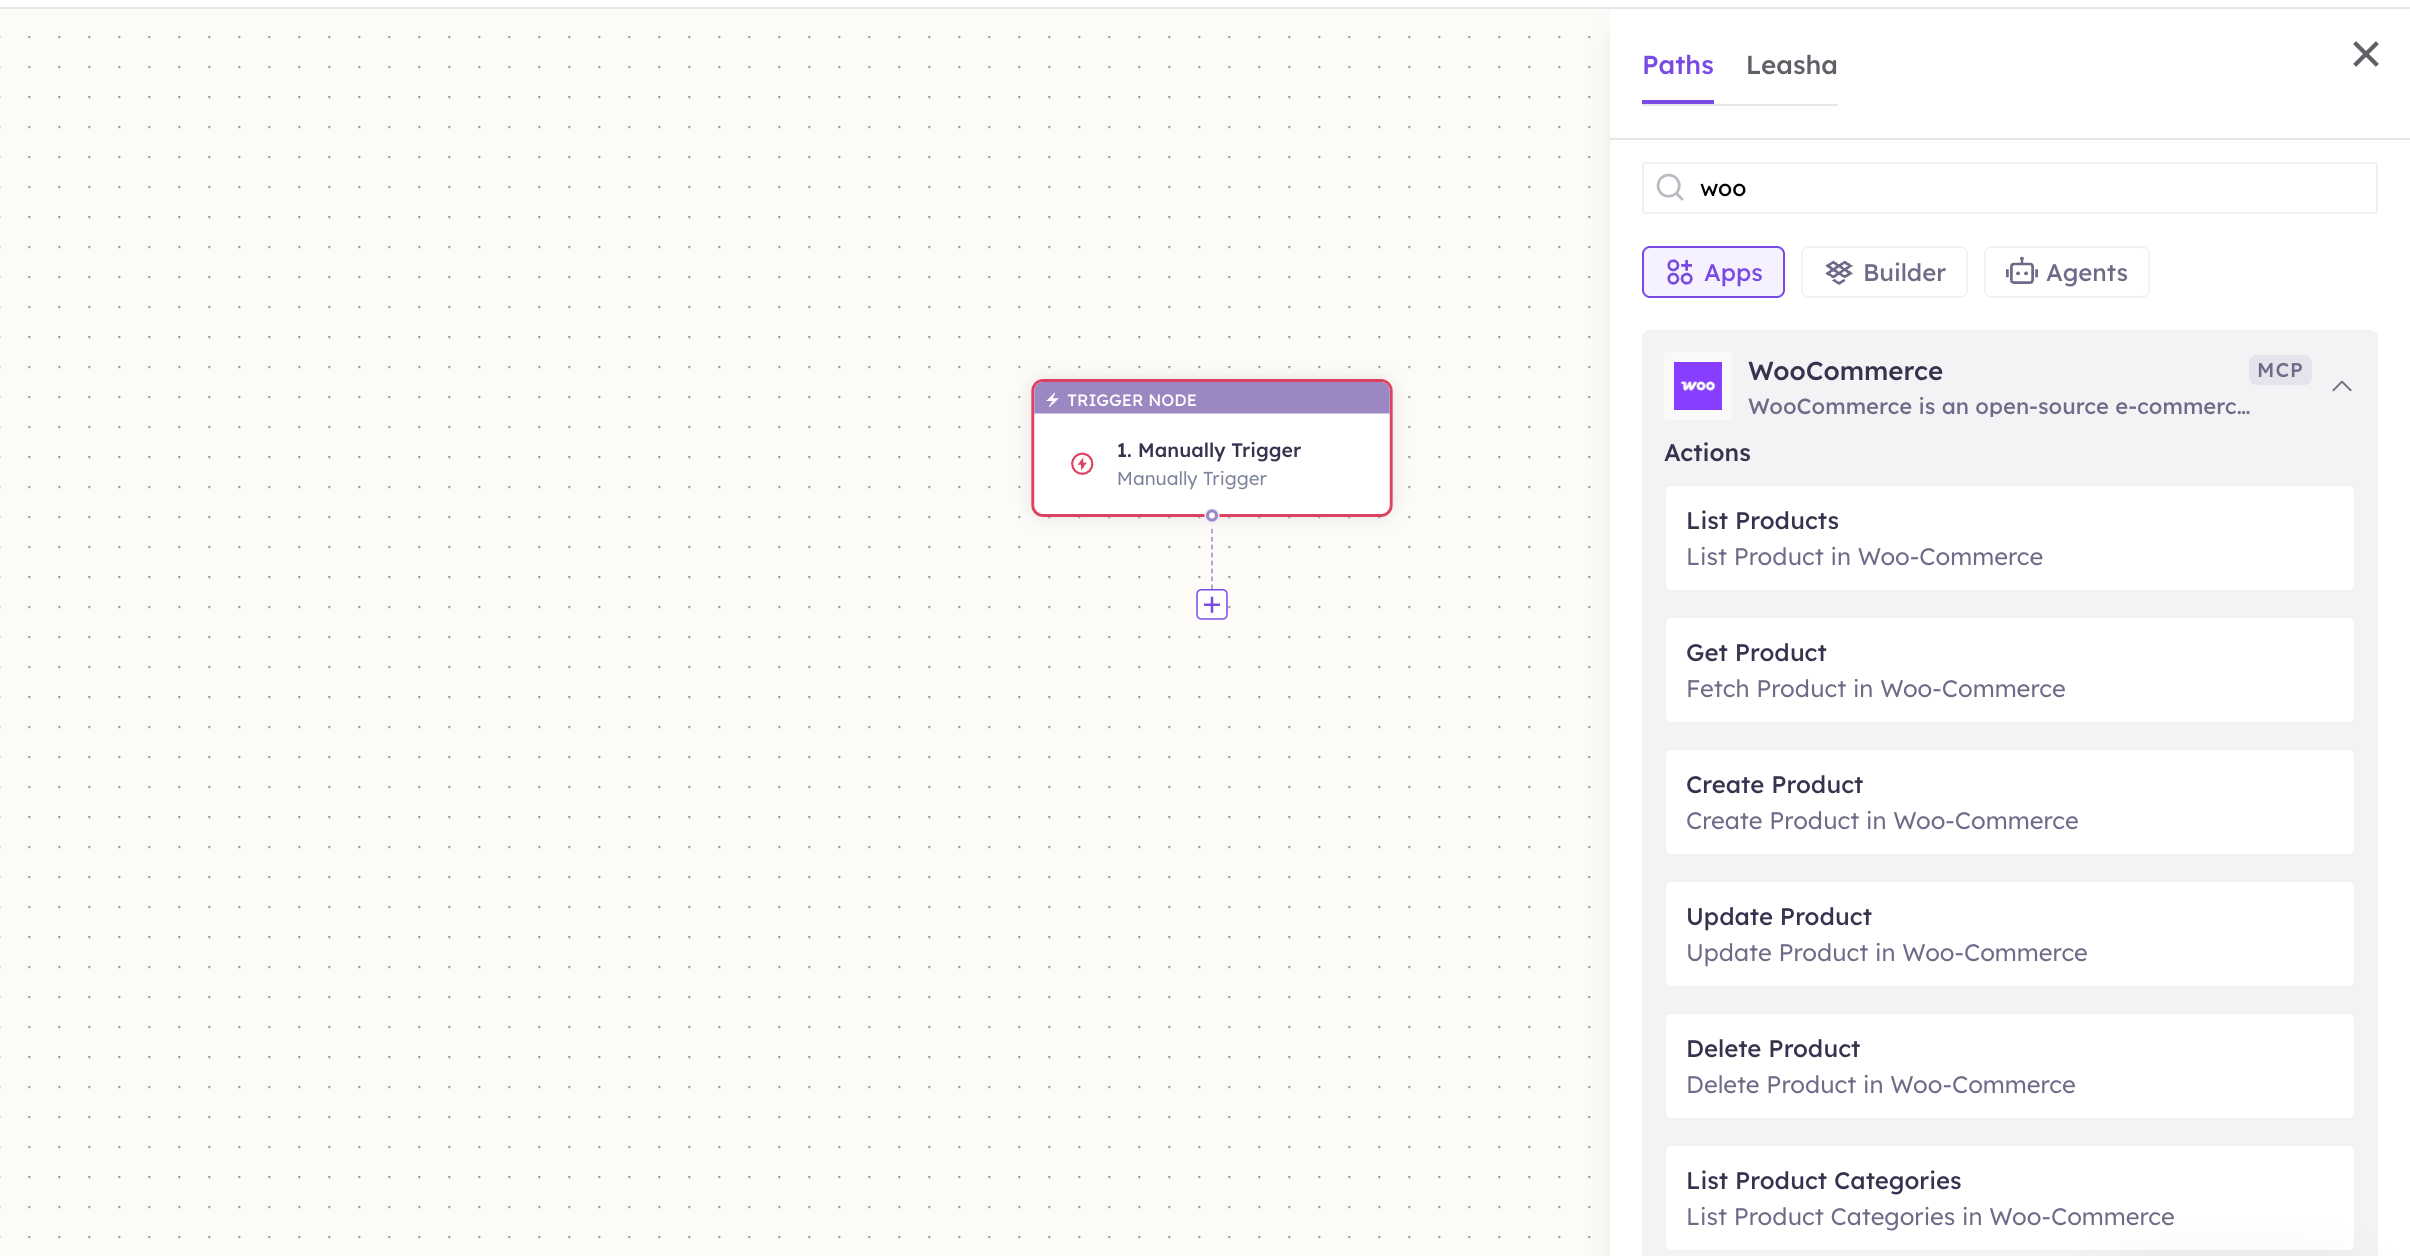
Once connected, you can add **WooCommerce** to any automation from the **Workflows** builder. Its triggers and tools appear in the Apps panel, marked with an **MCP** badge.
Open **Workflows → New Workflow**. On the canvas, click **+ Add Trigger**. In the **Paths** panel, open the **Apps** tab and select **WooCommerce** — its **Triggers** are listed underneath. Use the search box if you have many connectors.
Click the **+** below any node to add a step, then pick **WooCommerce** again — this time the panel lists its **Actions**.
The Consumer Secret is displayed only on this screen. If you lose it you can't recover it — revoke the key and generate a new one.
**What the credentials can access**
| Permission | Why UnleashX needs it |
| -------------------------- | ------------------------------------------------ |
| Read products & categories | List, search, and fetch product details |
| Write products | Create, update, and delete products |
| Read orders | List orders, look one up by ID or customer phone |
| Write orders | Create an order and change its status |
| Read & write customers | List, search, fetch, and create customers |
| Read payment gateways | List the store's available payment methods |
Permissions come from the key, not from the tool. A **Read** key makes every write tool fail with `401` — use **Read/Write** if you want the agent to create products, orders, or customers.
### Quick test (optional)
Confirm the pair works before connecting, by opening this in a browser with your values substituted:
```
https://yourstore.com/wp-json/wc/v3/products?consumer_key=ck_…&consumer_secret=cs_…
```
A JSON list of products (or an empty array) means the key is valid. A `401` means the key or secret is wrong; a `404` usually means permalinks aren't set to a pretty format.
## 4. Connect on UnleashX
Sign in at [https://www.tryunleashx.com](https://www.tryunleashx.com) and open the agent you want to connect.
In the agent, go to **Data Connectors** and locate **WooCommerce**.
Click **Connect** / **Add** / **Configure** and complete the form.
| Field | What to enter |
| ------------------- | --------------------------------------------------------------------------------------------------------------------- |
| **Store URL** | Your store's address, e.g. `https://yourstore.com` — no trailing slash, no `/wp-admin`. |
| **Consumer Key** | The `ck_…` value from Section 3. |
| **Consumer Secret** | The matching `cs_…` value. |
| **Account Name** | A label for this connection inside UnleashX (e.g. "Main store"). This is just for you; it doesn't affect WooCommerce. |
Save. The status will switch to a **Connected** badge and your agent can start working with the store.
Never expose `ck_`/`cs_` in client-side code. Give each integration its own key so you can revoke one without affecting the others.
### Use WooCommerce in a Workflow
Once connected, you can add **WooCommerce** to any automation from the **Workflows** builder. Its triggers and tools appear in the Apps panel, marked with an **MCP** badge.
Open **Workflows → New Workflow**. On the canvas, click **+ Add Trigger**. In the **Paths** panel, open the **Apps** tab and select **WooCommerce** — its **Triggers** are listed underneath. Use the search box if you have many connectors.
Click the **+** below any node to add a step, then pick **WooCommerce** again — this time the panel lists its **Actions**.
 Fill in the fields for the trigger or action you picked. Required fields are marked with a red asterisk (\*).
Under **Selected account**, choose an already-connected account, or click **Add Account** to connect one now.
Click **Save**. Use **Test** to verify the step, then toggle **Publish** when the workflow is ready.
The steps are the same for every connector. For the full workflow builder guide, see [Using MCP in Workflows](/mcp/workflows).
## 5. Available tools
Tools are listed the way they appear in the **Workflows** Apps panel. The **Tool ID** is what the agent calls behind the scenes.
**Products**
| Tool | Tool ID | What it does | Required | Changes data? |
| ------------------------ | -------------------------- | ---------------------------------- | ------------- | ------------- |
| List Products | `list_products` | Lists products in the store | — | No |
| Get Product | `get_product` | Gets a single product by ID | `product_id` | No |
| Create Product | `create_product` | Creates a new product | `name` | ✏️ Yes |
| Update Product | `update_product` | Updates an existing product | `product_id` | ✏️ Yes |
| Delete Product | `delete_product` | Deletes a product | `product_id` | ⚠️ Yes |
| List Product Categories | `list_product_categories` | Lists all product categories | — | No |
| Get Products by Category | `get_products_by_category` | Lists products within one category | `category_id` | No |
**Orders**
| Tool | Tool ID | What it does | Required | Changes data? |
| ------------------- | --------------------- | ------------------------------------------------------------ | -------------------- | ------------- |
| List Orders | `list_orders` | Lists orders; supports search, including phone-number lookup | — | No |
| Get Order | `get_order` | Gets a single order by ID | `order_id` | No |
| Create Order | `create_order` | Creates an order for a customer | `customer_id` | ✏️ Yes |
| Update Order Status | `update_order_status` | Moves an order to a new status | `order_id`, `status` | ✏️ Yes |
**Customers**
| Tool | Tool ID | What it does | Required | Changes data? |
| ---------------- | ------------------ | ----------------------------------- | ------------------------ | ------------- |
| List Customers | `list_customers` | Lists customers | — | No |
| Get Customer | `get_customer` | Gets a single customer by ID | `customer_id` | No |
| Create Customer | `create_customer` | Creates a customer record | `customer_name`, `email` | ✏️ Yes |
| Search Customers | `search_customers` | Searches customers by name or email | `search` | No |
**Store**
| Tool | Tool ID | What it does | Required | Changes data? |
| --------------------- | ----------------------- | ------------------------------------------- | -------- | ------------- |
| List Payment Gateways | `list_payment_gateways` | Lists the store's available payment methods | — | No |
**Triggers**
| Trigger | Trigger ID | Fires when |
| --------------- | ----------------- | ------------------------ |
| On New Order | `on_new_order` | A new order is placed |
| On New Product | `on_new_product` | A new product is added |
| On New Customer | `on_new_customer` | A new customer registers |
| On New Coupon | `on_new_coupon` | A new coupon is created |
## 6. Example usage
**"Where's my order? My number is +91 98765 43210."**
Runs **List Orders** with the phone number as the search term, then **Get Order** for the match.
**"Mark order 1042 as completed."**
Runs **Update Order Status** with `order_id: 1042` and `status: completed`.
**"What do we have in the Accessories category, and is the leather wallet in stock?"**
Runs **List Product Categories** → **Get Products by Category** → **Get Product**.
**"When a new order comes in, message the customer on WhatsApp with the order summary."**
A workflow starts on the **On New Order** trigger and chains into your messaging connector.
## 7. Permissions & data access
**UnleashX CAN:**
* Read products, categories, orders, customers, and payment gateways.
* Create and update products, orders, and customers.
* Delete products.
* Start workflows on new orders, products, customers, and coupons.
**UnleashX CANNOT:**
* Do anything the API key's permission level doesn't allow (a **Read** key can't write).
* Take payments or refund an order.
* Touch WordPress content, plugins, themes, or site settings — that's the separate [WordPress](/mcp/wordpress) connector.
* Access any store other than the one you connected.
**To disconnect:** In UnleashX, open your agent → **Data Connectors** → **WooCommerce** → **Disconnect**. To fully revoke access, go to **WooCommerce → Settings → Advanced → REST API** in wp-admin and revoke the key. Either action stops access immediately.
## 8. Troubleshooting
| Problem | What it means | How to fix it |
| ----------------------------- | --------------------------------------------------------------------------------- | ---------------------------------------------------------------------------------- |
| `401 Unauthorized` | Wrong Consumer Key/Secret, the key was revoked, or it's Read-only on a write tool | Re-check both values; regenerate with **Read/Write** if the agent needs to write |
| `404 Not Found` | Permalinks are set to "Plain", or the REST API is blocked | Set **Settings → Permalinks** to any pretty format, then retry |
| Every request fails over HTTP | Credentials aren't sent over plain HTTP by many hosts | Serve the site over HTTPS |
| `403 Forbidden` | A security plugin or firewall is blocking `/wp-json/` | Allowlist the REST API route in the plugin or at the host |
| Order lookup returns nothing | The phone number is stored in a different format | Search with the digits only, or look the customer up first with `search_customers` |
| Wrong store data | The Store URL points at the wrong site or a subfolder | Use the exact base URL — UnleashX appends `/wp-json/wc/v3` itself |
For general connector issues, see [/mcp/integrations](/mcp/integrations).
## 9. Frequently asked questions
**Is my store data stored by UnleashX?**
No. Tools call your WooCommerce REST API live with your credentials and return the result. UnleashX doesn't keep a copy of your catalog, orders, or customers.
**Can the agent take payments?**
No. It can read the available payment gateways and create or update orders, but payment is handled by your store's checkout.
**Can I connect more than one store?**
Yes. Generate a key per store and add each as its own connection, using **Account Name** to tell them apart.
**How do I rotate my key?**
Generate a new key in **WooCommerce → Settings → Advanced → REST API**, update it in UnleashX, then revoke the old one.
**Do I also need the WordPress connector?**
Only if you want the agent to handle posts, categories, users, or media. Products, orders, and customers are all covered here.
## 10. References
* WooCommerce REST API docs: [https://woocommerce.github.io/woocommerce-rest-api-docs/](https://woocommerce.github.io/woocommerce-rest-api-docs/)
* Generating REST API keys: [https://woocommerce.com/document/woocommerce-rest-api/](https://woocommerce.com/document/woocommerce-rest-api/)
* WordPress permalink settings: [https://wordpress.org/documentation/article/customize-permalinks/](https://wordpress.org/documentation/article/customize-permalinks/)
Fill in the fields for the trigger or action you picked. Required fields are marked with a red asterisk (\*).
Under **Selected account**, choose an already-connected account, or click **Add Account** to connect one now.
Click **Save**. Use **Test** to verify the step, then toggle **Publish** when the workflow is ready.
The steps are the same for every connector. For the full workflow builder guide, see [Using MCP in Workflows](/mcp/workflows).
## 5. Available tools
Tools are listed the way they appear in the **Workflows** Apps panel. The **Tool ID** is what the agent calls behind the scenes.
**Products**
| Tool | Tool ID | What it does | Required | Changes data? |
| ------------------------ | -------------------------- | ---------------------------------- | ------------- | ------------- |
| List Products | `list_products` | Lists products in the store | — | No |
| Get Product | `get_product` | Gets a single product by ID | `product_id` | No |
| Create Product | `create_product` | Creates a new product | `name` | ✏️ Yes |
| Update Product | `update_product` | Updates an existing product | `product_id` | ✏️ Yes |
| Delete Product | `delete_product` | Deletes a product | `product_id` | ⚠️ Yes |
| List Product Categories | `list_product_categories` | Lists all product categories | — | No |
| Get Products by Category | `get_products_by_category` | Lists products within one category | `category_id` | No |
**Orders**
| Tool | Tool ID | What it does | Required | Changes data? |
| ------------------- | --------------------- | ------------------------------------------------------------ | -------------------- | ------------- |
| List Orders | `list_orders` | Lists orders; supports search, including phone-number lookup | — | No |
| Get Order | `get_order` | Gets a single order by ID | `order_id` | No |
| Create Order | `create_order` | Creates an order for a customer | `customer_id` | ✏️ Yes |
| Update Order Status | `update_order_status` | Moves an order to a new status | `order_id`, `status` | ✏️ Yes |
**Customers**
| Tool | Tool ID | What it does | Required | Changes data? |
| ---------------- | ------------------ | ----------------------------------- | ------------------------ | ------------- |
| List Customers | `list_customers` | Lists customers | — | No |
| Get Customer | `get_customer` | Gets a single customer by ID | `customer_id` | No |
| Create Customer | `create_customer` | Creates a customer record | `customer_name`, `email` | ✏️ Yes |
| Search Customers | `search_customers` | Searches customers by name or email | `search` | No |
**Store**
| Tool | Tool ID | What it does | Required | Changes data? |
| --------------------- | ----------------------- | ------------------------------------------- | -------- | ------------- |
| List Payment Gateways | `list_payment_gateways` | Lists the store's available payment methods | — | No |
**Triggers**
| Trigger | Trigger ID | Fires when |
| --------------- | ----------------- | ------------------------ |
| On New Order | `on_new_order` | A new order is placed |
| On New Product | `on_new_product` | A new product is added |
| On New Customer | `on_new_customer` | A new customer registers |
| On New Coupon | `on_new_coupon` | A new coupon is created |
## 6. Example usage
**"Where's my order? My number is +91 98765 43210."**
Runs **List Orders** with the phone number as the search term, then **Get Order** for the match.
**"Mark order 1042 as completed."**
Runs **Update Order Status** with `order_id: 1042` and `status: completed`.
**"What do we have in the Accessories category, and is the leather wallet in stock?"**
Runs **List Product Categories** → **Get Products by Category** → **Get Product**.
**"When a new order comes in, message the customer on WhatsApp with the order summary."**
A workflow starts on the **On New Order** trigger and chains into your messaging connector.
## 7. Permissions & data access
**UnleashX CAN:**
* Read products, categories, orders, customers, and payment gateways.
* Create and update products, orders, and customers.
* Delete products.
* Start workflows on new orders, products, customers, and coupons.
**UnleashX CANNOT:**
* Do anything the API key's permission level doesn't allow (a **Read** key can't write).
* Take payments or refund an order.
* Touch WordPress content, plugins, themes, or site settings — that's the separate [WordPress](/mcp/wordpress) connector.
* Access any store other than the one you connected.
**To disconnect:** In UnleashX, open your agent → **Data Connectors** → **WooCommerce** → **Disconnect**. To fully revoke access, go to **WooCommerce → Settings → Advanced → REST API** in wp-admin and revoke the key. Either action stops access immediately.
## 8. Troubleshooting
| Problem | What it means | How to fix it |
| ----------------------------- | --------------------------------------------------------------------------------- | ---------------------------------------------------------------------------------- |
| `401 Unauthorized` | Wrong Consumer Key/Secret, the key was revoked, or it's Read-only on a write tool | Re-check both values; regenerate with **Read/Write** if the agent needs to write |
| `404 Not Found` | Permalinks are set to "Plain", or the REST API is blocked | Set **Settings → Permalinks** to any pretty format, then retry |
| Every request fails over HTTP | Credentials aren't sent over plain HTTP by many hosts | Serve the site over HTTPS |
| `403 Forbidden` | A security plugin or firewall is blocking `/wp-json/` | Allowlist the REST API route in the plugin or at the host |
| Order lookup returns nothing | The phone number is stored in a different format | Search with the digits only, or look the customer up first with `search_customers` |
| Wrong store data | The Store URL points at the wrong site or a subfolder | Use the exact base URL — UnleashX appends `/wp-json/wc/v3` itself |
For general connector issues, see [/mcp/integrations](/mcp/integrations).
## 9. Frequently asked questions
**Is my store data stored by UnleashX?**
No. Tools call your WooCommerce REST API live with your credentials and return the result. UnleashX doesn't keep a copy of your catalog, orders, or customers.
**Can the agent take payments?**
No. It can read the available payment gateways and create or update orders, but payment is handled by your store's checkout.
**Can I connect more than one store?**
Yes. Generate a key per store and add each as its own connection, using **Account Name** to tell them apart.
**How do I rotate my key?**
Generate a new key in **WooCommerce → Settings → Advanced → REST API**, update it in UnleashX, then revoke the old one.
**Do I also need the WordPress connector?**
Only if you want the agent to handle posts, categories, users, or media. Products, orders, and customers are all covered here.
## 10. References
* WooCommerce REST API docs: [https://woocommerce.github.io/woocommerce-rest-api-docs/](https://woocommerce.github.io/woocommerce-rest-api-docs/)
* Generating REST API keys: [https://woocommerce.com/document/woocommerce-rest-api/](https://woocommerce.com/document/woocommerce-rest-api/)
* WordPress permalink settings: [https://wordpress.org/documentation/article/customize-permalinks/](https://wordpress.org/documentation/article/customize-permalinks/)