> ## Documentation Index
> Fetch the complete documentation index at: https://docs.unleashx.ai/llms.txt
> Use this file to discover all available pages before exploring further.
# SendGrid
> Let UnleashX send email through SendGrid and manage contacts, lists and the suppression list.
# SendGrid
> **In one line:** Connect SendGrid so UnleashX can send emails, manage contacts and lists, validate addresses, and clean up bounced/blocked recipients — all from a conversation or automation.
| | |
| ------------------ | --------------------------------------------------------------------------------------------------------------------------------------- |
| **Category** | Marketing |
| **Authentication** | API Key |
| **Setup time** | \~3 minutes |
| **Difficulty** | Easy |
| **Best for** | Teams that send transactional or notification email through SendGrid and want their agent to send messages and keep contact lists tidy. |
## 1. Overview
SendGrid (by Twilio) is an email delivery platform used to send transactional and marketing email reliably at scale, with contact lists, custom fields and deliverability tooling.
Once connected to UnleashX, your agent can send an email on demand, add or update a contact, organize contacts into lists, validate an address before sending, and remove blocked or bounced recipients from the suppression list.
Connecting SendGrid to UnleashX means follow-up emails and list hygiene happen automatically as part of your workflows, without logging into the SendGrid dashboard.
## 2. What you'll need
* A SendGrid account.
* A **verified sender** (single sender or authenticated domain) — required to send email.
* Permission to create an **API key** (admin access to the SendGrid account).
No admin access? Ask your SendGrid admin to create an API key and verify a sender, then share the key and the verified "from" address with you.
## 3. Get your credentials
UnleashX authenticates to SendGrid with an **API key**.
In SendGrid, go to **Settings → API Keys**: `https://app.sendgrid.com/settings/api_keys`
Click **Create API Key**, name it "UnleashX", and choose **Full Access** (or a restricted key with Mail Send + Marketing/Contacts permissions).
Copy the key now.
SendGrid shows the API key only once. If you lose it, you must create a new one.
Go to **Settings → Sender Authentication** and verify the email address or domain you'll send from.
| Permission the key needs | Why UnleashX needs it |
| --------------------------------- | ------------------------------------------------------------- |
| Mail Send | Send transactional emails. |
| Marketing → Contacts (read/write) | Create/update contacts and manage lists. |
| Marketing → Lists (read/write) | Create and delete contact lists. |
| Suppressions → Blocks | List, read and remove blocked addresses. |
| Email Validation | Validate an address before sending (if enabled on your plan). |
## 4. Connect on UnleashX
Sign in at `https://www.tryunleashx.com` and open the agent you want to connect.
Go to **Data Connectors** and find **SendGrid**.
Click **Connect** / **Add** / **Configure** and paste your SendGrid API key. Provide your verified sender email if prompted.
Save. The status will switch to a **Connected** badge.
### Use SendGrid in a Workflow
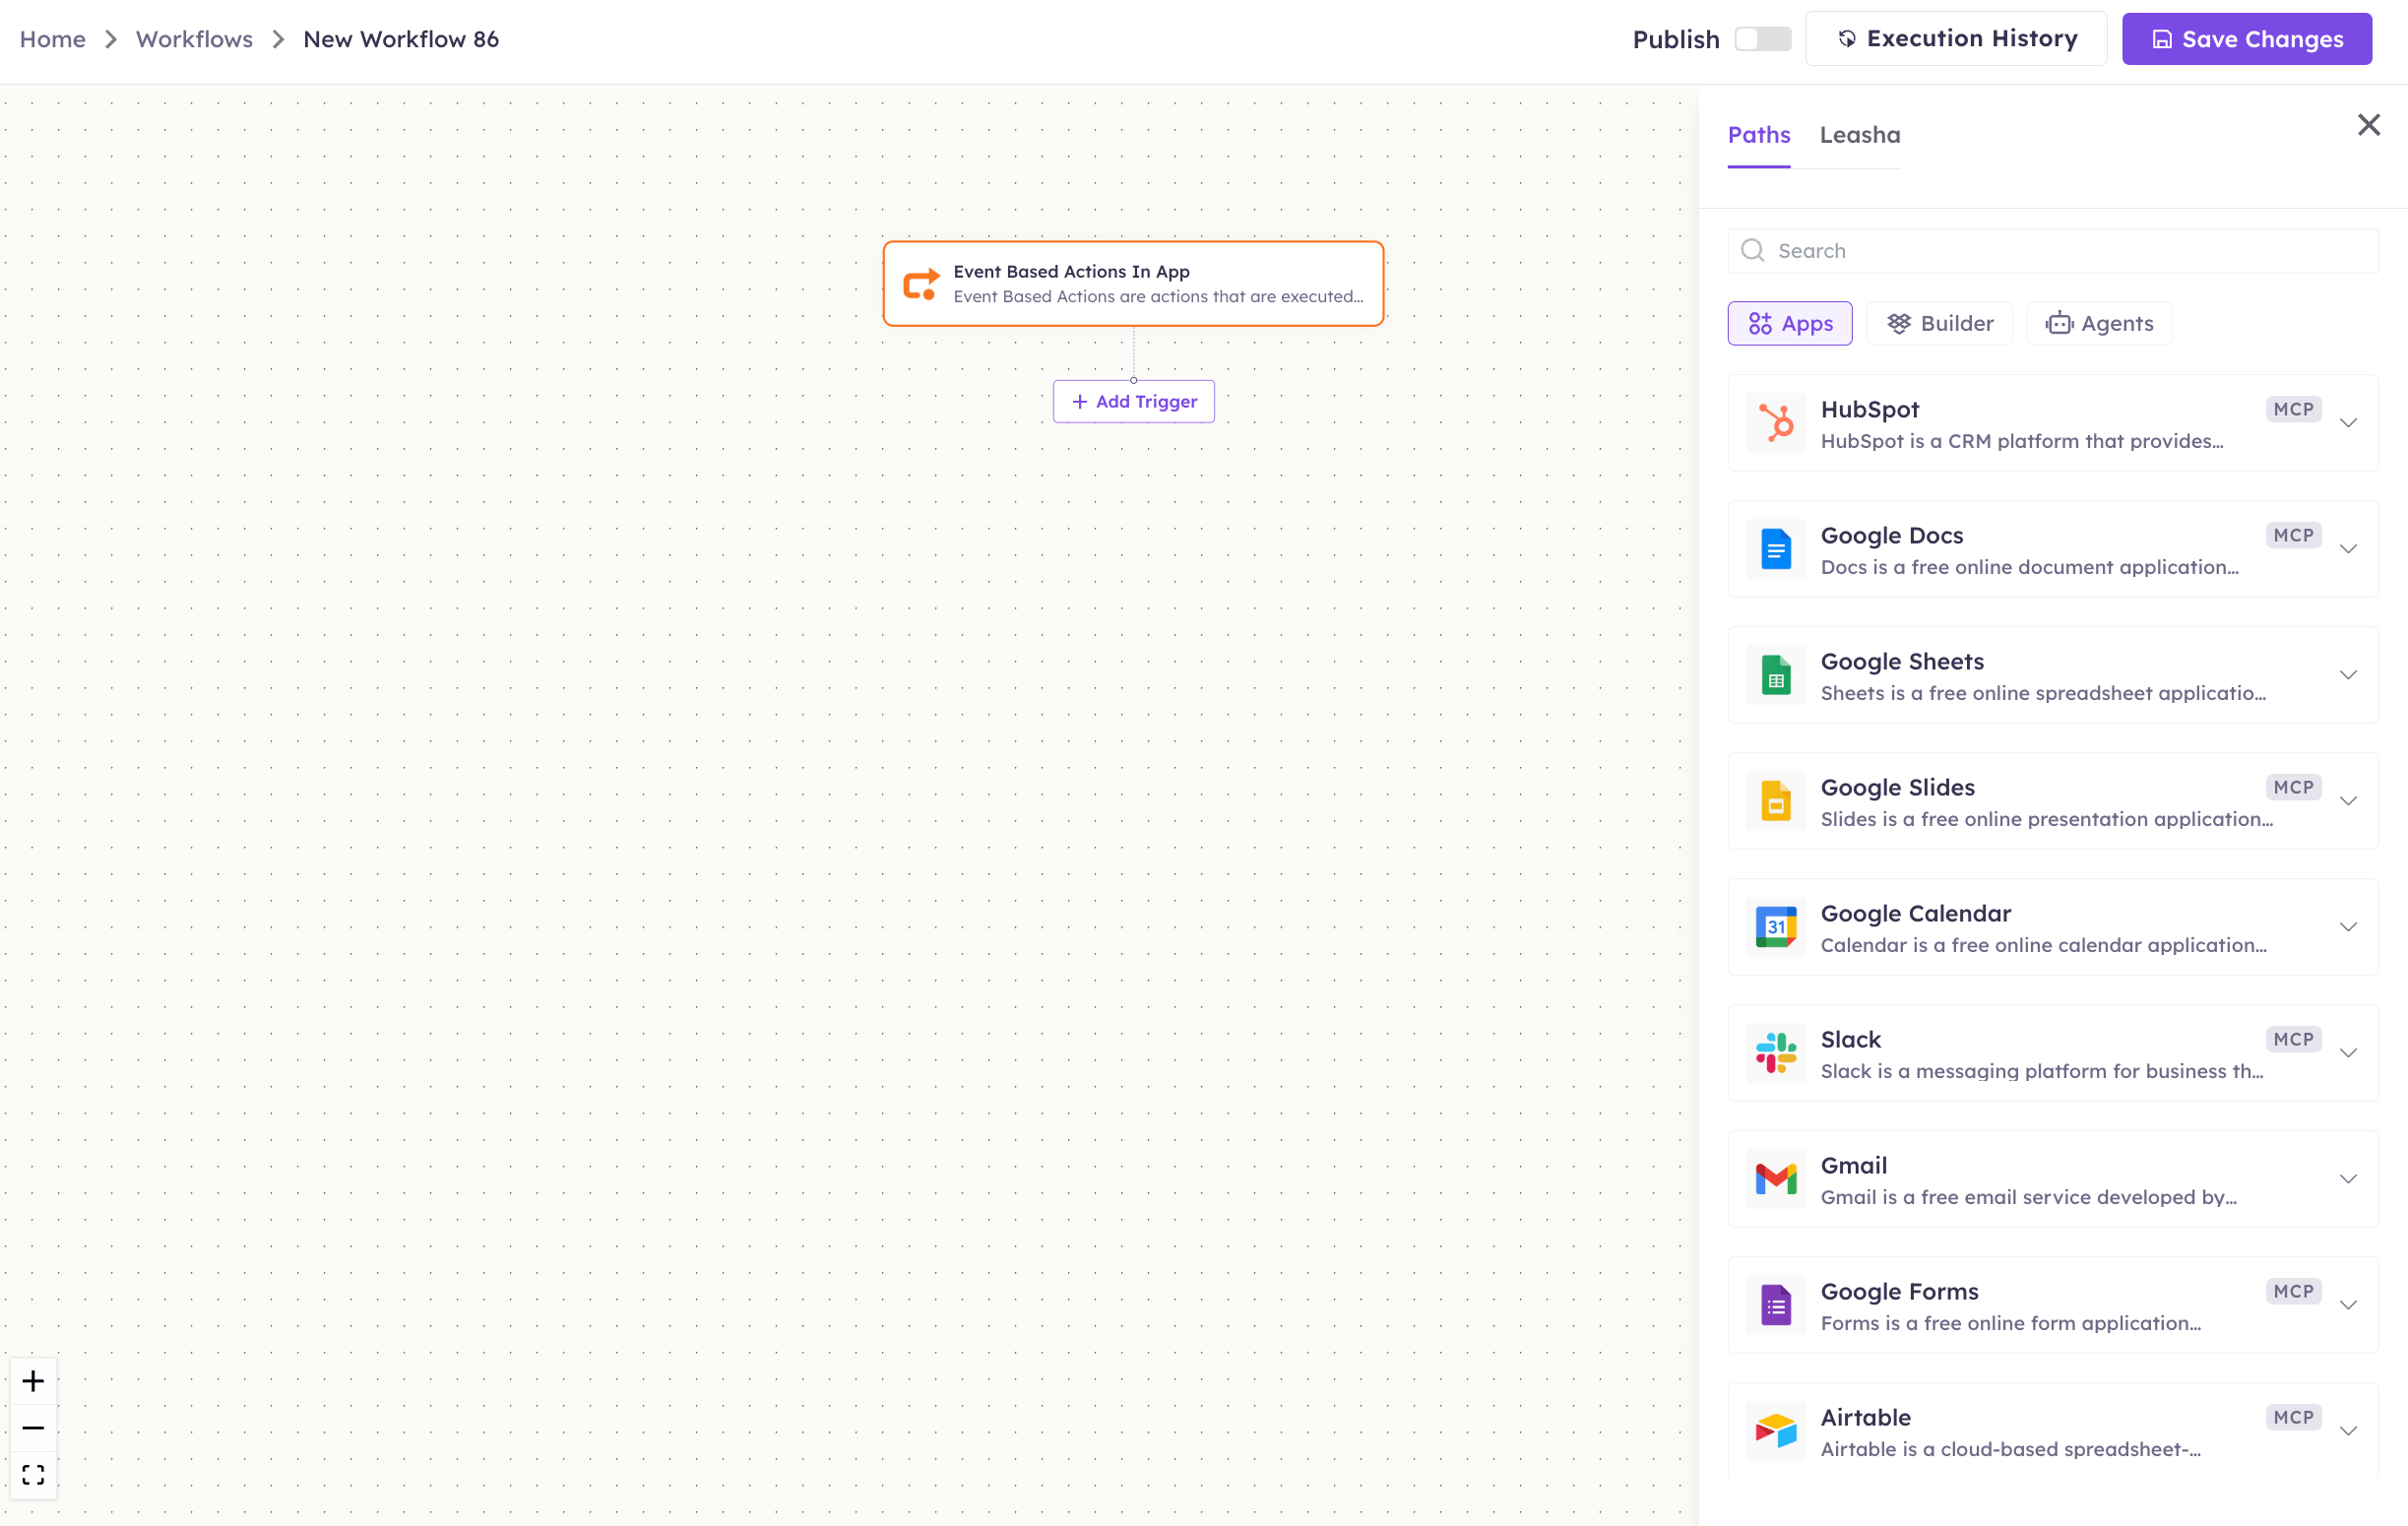
Once connected, you can add **SendGrid** to any automation from the **Workflows** builder. Its triggers and tools appear in the Apps panel, marked with an **MCP** badge.
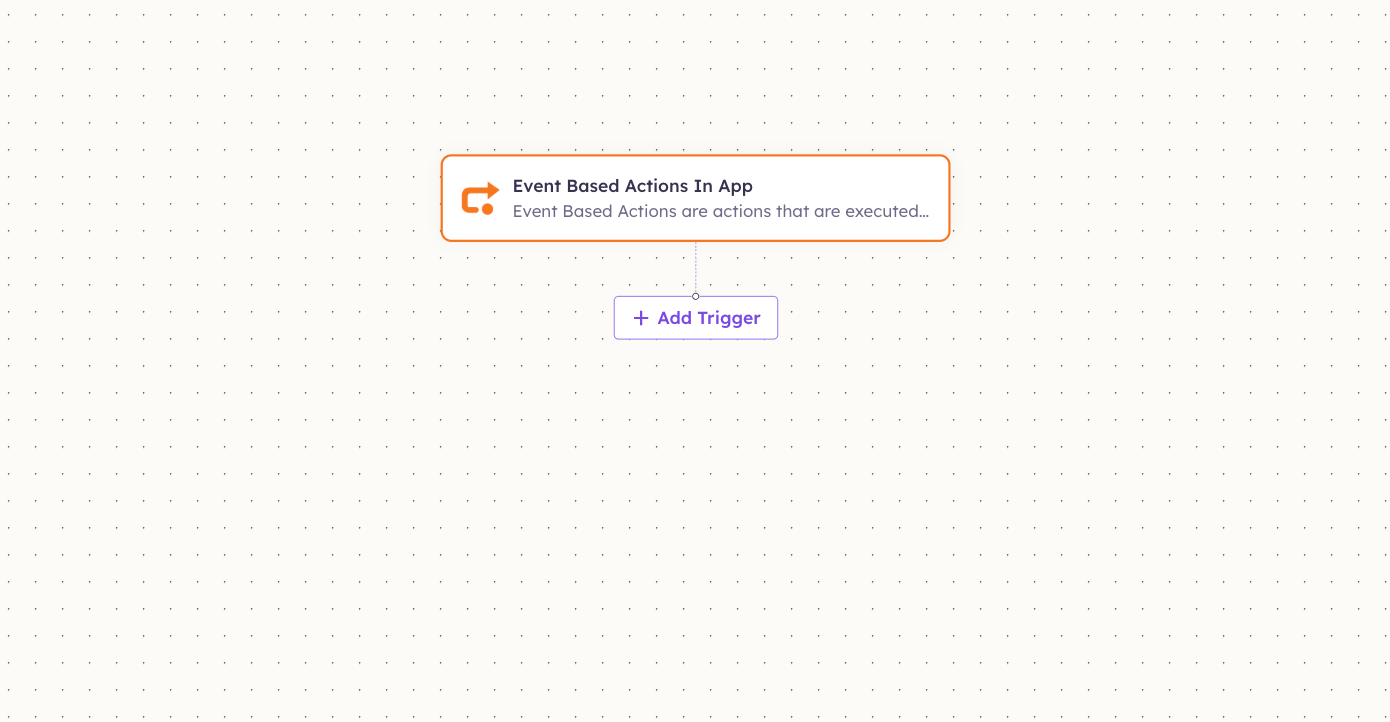
Open **Workflows → New Workflow**. On the canvas, click **+ Add Trigger** (or the **+** below any node) to add a step.
 In the **Paths** panel, open the **Apps** tab and select **SendGrid**. Use the search box if you have many connectors.
 Pick the trigger or action you want. Configure its fields — required fields are marked with a red asterisk (\*).
Under **Selected account**, choose an already-connected account, or click **Add Account** to connect one now.
Fill in the remaining fields and click **Save**. Use **Test** to verify the step, then toggle **Publish** when the workflow is ready.
The steps are the same for every connector. For the full workflow builder guide, see [Using MCP in Workflows](/mcp/workflows).
## 5. Available tools
| Tool | What it does | Changes data? |
| ------------------------ | -------------------------------------------------- | ------------- |
| Send Email | Send an email to a recipient. | ✏️ Yes |
| Create List | Create a new contact list. | ✏️ Yes |
| Add or Update Contact | Add or update a contact (optionally add to lists). | ✏️ Yes |
| Get All Lists | List all contact lists. | No |
| Get All Contacts | List all contacts. | No |
| Get Contact Fields | List available custom contact fields. | No |
| Delete List | Delete a list (optionally its contacts). | ⚠️ Yes |
| List Blocks | List blocked email addresses (suppressions). | No |
| Get Block | Look up a single blocked address. | No |
| Delete Block | Remove an address from the block list. | ⚠️ Yes |
| Validate Email | Validate an email address. | No |
| Remove Contact from List | Remove contacts from a list. | ⚠️ Yes |
| Delete Contacts | Permanently delete contacts by ID or email. | ⚠️ Yes |
## 6. Example usage
**"Email [jane@acme.com](mailto:jane@acme.com) a subject 'Your demo is confirmed' with the details below."**
Runs **Send Email** from your verified sender address.
**"Add [jane@acme.com](mailto:jane@acme.com) to my 'Newsletter' list and remove her old blocked entry."**
Runs **Get All Lists** (to find the list), **Add or Update Contact**, and **Delete Block** if she was previously blocked.
## 7. Permissions & data access
**UnleashX can:**
* Send emails from your verified sender.
* Create/update/delete contacts and lists.
* Read and remove suppression (block) entries and validate addresses.
**UnleashX cannot:**
* Send from an unverified sender address.
* Access SendGrid data beyond what the API key's permissions allow.
* Change your SendGrid billing or account-level settings.
**To disconnect:** In UnleashX go to **Data Connectors → SendGrid → Disconnect**. To fully revoke, delete the API key in **SendGrid → Settings → API Keys**. Revocation is immediate.
## 8. Troubleshooting
| Problem | What it means | How to fix it |
| -------------------------------- | ----------------------------------------------------------------- | ------------------------------------------------------------------------------------ |
| `401 Unauthorized` | The API key is missing, wrong or deleted. | Reconnect in UnleashX with a valid key. |
| `403 Forbidden` | The key lacks the needed permission (e.g. Mail Send or Contacts). | Edit the key's permissions in SendGrid, or create a Full Access key, and reconnect. |
| Email accepted but not delivered | Sender not verified or recipient is suppressed/blocked. | Verify your sender; use **List Blocks** and **Delete Block** to clear the recipient. |
| `400 Bad Request` on send | Missing/invalid "from" email or malformed recipient. | Provide a valid verified sender and recipient and retry. |
| `429 Too Many Requests` | You hit SendGrid's rate limit. | Wait and retry. |
For general connector issues, see [/mcp/integrations](/mcp/integrations).
## 9. Frequently asked questions
**Why do I need a verified sender?**
SendGrid blocks email from unverified addresses to protect deliverability. Verify a single sender or authenticate your domain before sending.
**Is my contact data stored by UnleashX?**
No. Tools call the SendGrid API live and return the result; UnleashX doesn't keep a copy of your contacts.
**How do I rotate my key?**
Create a new API key in SendGrid, reconnect in UnleashX, then delete the old key.
## 10. References
* SendGrid API reference: [https://www.twilio.com/docs/sendgrid/api-reference](https://www.twilio.com/docs/sendgrid/api-reference)
* API Keys page: [https://app.sendgrid.com/settings/api\_keys](https://app.sendgrid.com/settings/api_keys)
* Sender Authentication: [https://www.twilio.com/docs/sendgrid/ui/sending-email/sender-verification](https://www.twilio.com/docs/sendgrid/ui/sending-email/sender-verification)
Pick the trigger or action you want. Configure its fields — required fields are marked with a red asterisk (\*).
Under **Selected account**, choose an already-connected account, or click **Add Account** to connect one now.
Fill in the remaining fields and click **Save**. Use **Test** to verify the step, then toggle **Publish** when the workflow is ready.
The steps are the same for every connector. For the full workflow builder guide, see [Using MCP in Workflows](/mcp/workflows).
## 5. Available tools
| Tool | What it does | Changes data? |
| ------------------------ | -------------------------------------------------- | ------------- |
| Send Email | Send an email to a recipient. | ✏️ Yes |
| Create List | Create a new contact list. | ✏️ Yes |
| Add or Update Contact | Add or update a contact (optionally add to lists). | ✏️ Yes |
| Get All Lists | List all contact lists. | No |
| Get All Contacts | List all contacts. | No |
| Get Contact Fields | List available custom contact fields. | No |
| Delete List | Delete a list (optionally its contacts). | ⚠️ Yes |
| List Blocks | List blocked email addresses (suppressions). | No |
| Get Block | Look up a single blocked address. | No |
| Delete Block | Remove an address from the block list. | ⚠️ Yes |
| Validate Email | Validate an email address. | No |
| Remove Contact from List | Remove contacts from a list. | ⚠️ Yes |
| Delete Contacts | Permanently delete contacts by ID or email. | ⚠️ Yes |
## 6. Example usage
**"Email [jane@acme.com](mailto:jane@acme.com) a subject 'Your demo is confirmed' with the details below."**
Runs **Send Email** from your verified sender address.
**"Add [jane@acme.com](mailto:jane@acme.com) to my 'Newsletter' list and remove her old blocked entry."**
Runs **Get All Lists** (to find the list), **Add or Update Contact**, and **Delete Block** if she was previously blocked.
## 7. Permissions & data access
**UnleashX can:**
* Send emails from your verified sender.
* Create/update/delete contacts and lists.
* Read and remove suppression (block) entries and validate addresses.
**UnleashX cannot:**
* Send from an unverified sender address.
* Access SendGrid data beyond what the API key's permissions allow.
* Change your SendGrid billing or account-level settings.
**To disconnect:** In UnleashX go to **Data Connectors → SendGrid → Disconnect**. To fully revoke, delete the API key in **SendGrid → Settings → API Keys**. Revocation is immediate.
## 8. Troubleshooting
| Problem | What it means | How to fix it |
| -------------------------------- | ----------------------------------------------------------------- | ------------------------------------------------------------------------------------ |
| `401 Unauthorized` | The API key is missing, wrong or deleted. | Reconnect in UnleashX with a valid key. |
| `403 Forbidden` | The key lacks the needed permission (e.g. Mail Send or Contacts). | Edit the key's permissions in SendGrid, or create a Full Access key, and reconnect. |
| Email accepted but not delivered | Sender not verified or recipient is suppressed/blocked. | Verify your sender; use **List Blocks** and **Delete Block** to clear the recipient. |
| `400 Bad Request` on send | Missing/invalid "from" email or malformed recipient. | Provide a valid verified sender and recipient and retry. |
| `429 Too Many Requests` | You hit SendGrid's rate limit. | Wait and retry. |
For general connector issues, see [/mcp/integrations](/mcp/integrations).
## 9. Frequently asked questions
**Why do I need a verified sender?**
SendGrid blocks email from unverified addresses to protect deliverability. Verify a single sender or authenticate your domain before sending.
**Is my contact data stored by UnleashX?**
No. Tools call the SendGrid API live and return the result; UnleashX doesn't keep a copy of your contacts.
**How do I rotate my key?**
Create a new API key in SendGrid, reconnect in UnleashX, then delete the old key.
## 10. References
* SendGrid API reference: [https://www.twilio.com/docs/sendgrid/api-reference](https://www.twilio.com/docs/sendgrid/api-reference)
* API Keys page: [https://app.sendgrid.com/settings/api\_keys](https://app.sendgrid.com/settings/api_keys)
* Sender Authentication: [https://www.twilio.com/docs/sendgrid/ui/sending-email/sender-verification](https://www.twilio.com/docs/sendgrid/ui/sending-email/sender-verification)