> ## Documentation Index
> Fetch the complete documentation index at: https://docs.unleashx.ai/llms.txt
> Use this file to discover all available pages before exploring further.
# monday.com
> Let your UnleashX agent read and manage boards, items, columns, and updates in monday.com.
# monday.com
> **In one line:** Connect monday.com so your UnleashX agent can create and update items, read and set column values, move work across groups, and post updates — all in plain language.
| | |
| ------------------ | -------------------------------------------------------------------------------------------------------------------- |
| **Category** | Productivity & Scheduling |
| **Authentication** | API token |
| **Setup time** | \~2 minutes |
| **Difficulty** | Easy |
| **Best for** | Teams that run work in monday.com and want an AI agent to create items, update statuses, and post updates hands-free |
## 1. Overview
monday.com is a Work OS where teams manage projects on visual boards. Each board holds items (rows), organized into groups, with columns for status, dates, people, and more — plus updates (the comment thread on each item).
Once connected to UnleashX, your agent can list your boards, create and update items, read and set column values, move items between groups, and post updates. It works against your live monday.com account using an API token, so it acts with your own permissions.
Connecting monday.com to UnleashX means your boards keep themselves current as you talk. Instead of opening monday to add an item or change a status, you tell your agent and it makes the change.
## 2. What you'll need
* A monday.com account with access to the boards you want the agent to manage.
* Your **API token** (see Section 3).
* An UnleashX account with access to **Data Connectors**.
You paste an **API token**. UnleashX sends it to the monday.com GraphQL API in the `Authorization` header.
Your token acts with **your monday.com permissions**. The agent can only see and edit boards your account has access to.
## 3. Get your credentials
monday.com MCP authenticates with your **personal API token** — a GraphQL API token tied to your monday.com user. As monday.com puts it on the page itself: *"This GraphQL API token belongs only to you. It grants access to every query and mutation you're allowed to perform."*
You don't create it — monday.com has already generated one for you. You just copy it.
### Step-by-step
Sign in with the account whose permissions you want the agent to act with. The token inherits that user's board access exactly.
Click your **avatar** in the top-right and choose **Developers**. The **monday Developer Center** opens in a new tab.
The left sidebar lists **My apps** at the top, then **API playground**, **API token**, and **API analytics**.
Click **API token**.
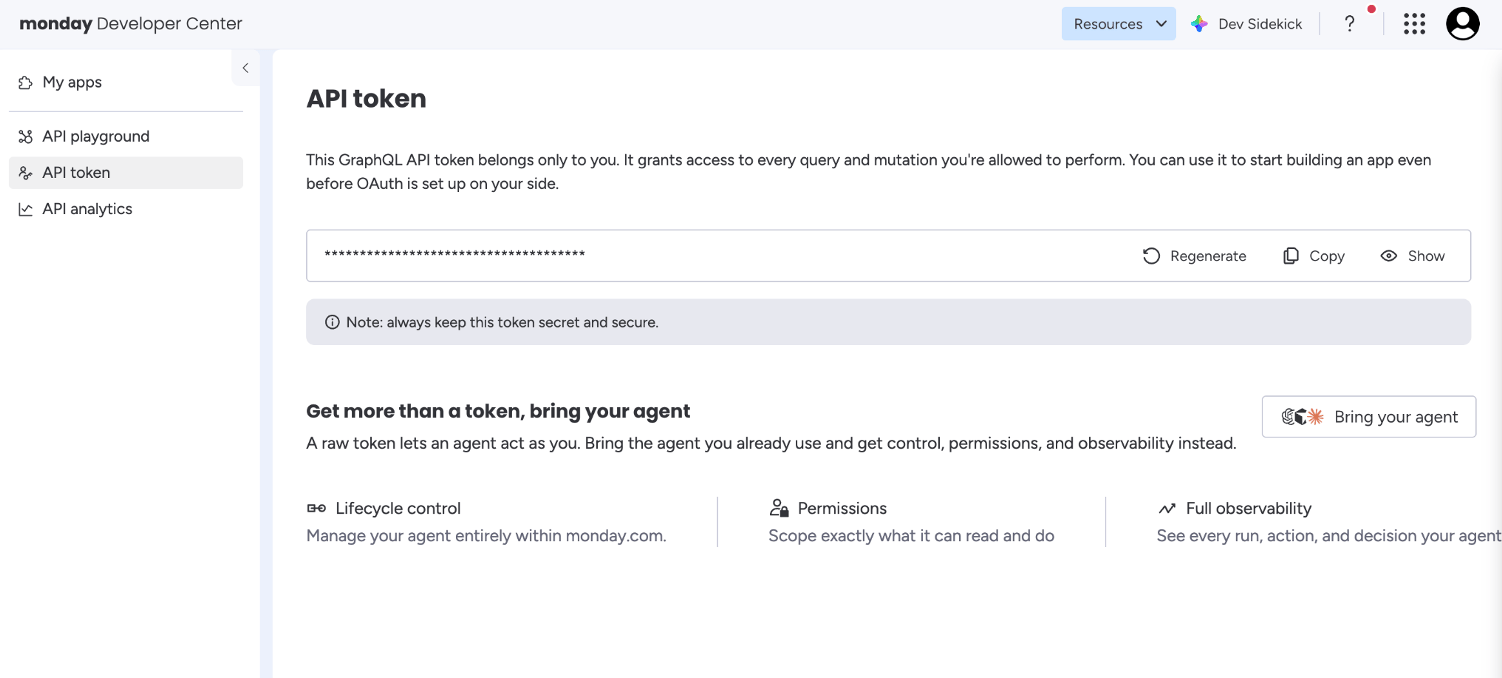 Your token sits in the field in the middle of the page, masked by default. Three controls sit to its right:
* **Show** — reveals the token so you can read it.
* **Copy** — copies the full value to your clipboard (use this one).
* **Regenerate** — replaces the token. **Don't click this** unless you intend to invalidate the current one.
Click **Copy**.
Head to **Data Connectors → monday.com** in UnleashX and paste the token (full walkthrough in Section 4). UnleashX validates it on save, so a bad paste shows up right away.
### Good to know
**Your token doesn't expire and can be viewed again any time.** Unlike connectors that reveal a secret only once, monday.com keeps your token on this page permanently — so if you lose it, come back to **Developer Center → API token** and hit **Copy** again.
**"Regenerate" replaces your existing token.** It issues a new token and **immediately invalidates the old one**.
Only use it if your token has leaked. Everything already using the old token — UnleashX, scripts, other integrations — will start returning `401 Unauthorized` until you update each one with the new value.
As monday.com notes on this page: *always keep this token secret and secure.* It grants **every query and mutation your user can perform** — anyone holding it can read and modify every board, item, and update you can reach. Never commit it to git or share it in chat.
Because the token carries your individual permissions, the agent sees exactly the boards you see. For a shared or automated setup, consider creating a dedicated monday.com user invited only to the boards the agent should touch, and connect with that user's token instead of your own.
The **"Get more than a token, bring your agent"** panel lower on the page is monday.com's own agent platform — separate from the UnleashX connector. You don't need it here; the API token above is all UnleashX requires.
### Permissions this token grants UnleashX
| Access | Why UnleashX needs it |
| ------------ | ------------------------------------------------ |
| Read boards | List boards, groups, columns, and items. |
| Write items | Create and update items and their column values. |
| Post updates | Add updates (comments) to items. |
| Read users | Resolve people/assignees on items. |
## 4. Connect on UnleashX
Go to `https://www.tryunleashx.com` and open the agent you want to connect.
Inside the agent, go to **Data Connectors**.
Locate **monday.com** and click **Connect** (or **Add** / **Configure**).
Paste your **API token** and click **Connect**.
UnleashX validates the token and the monday.com connector shows a **Connected** badge.
### Use monday.com in a Workflow
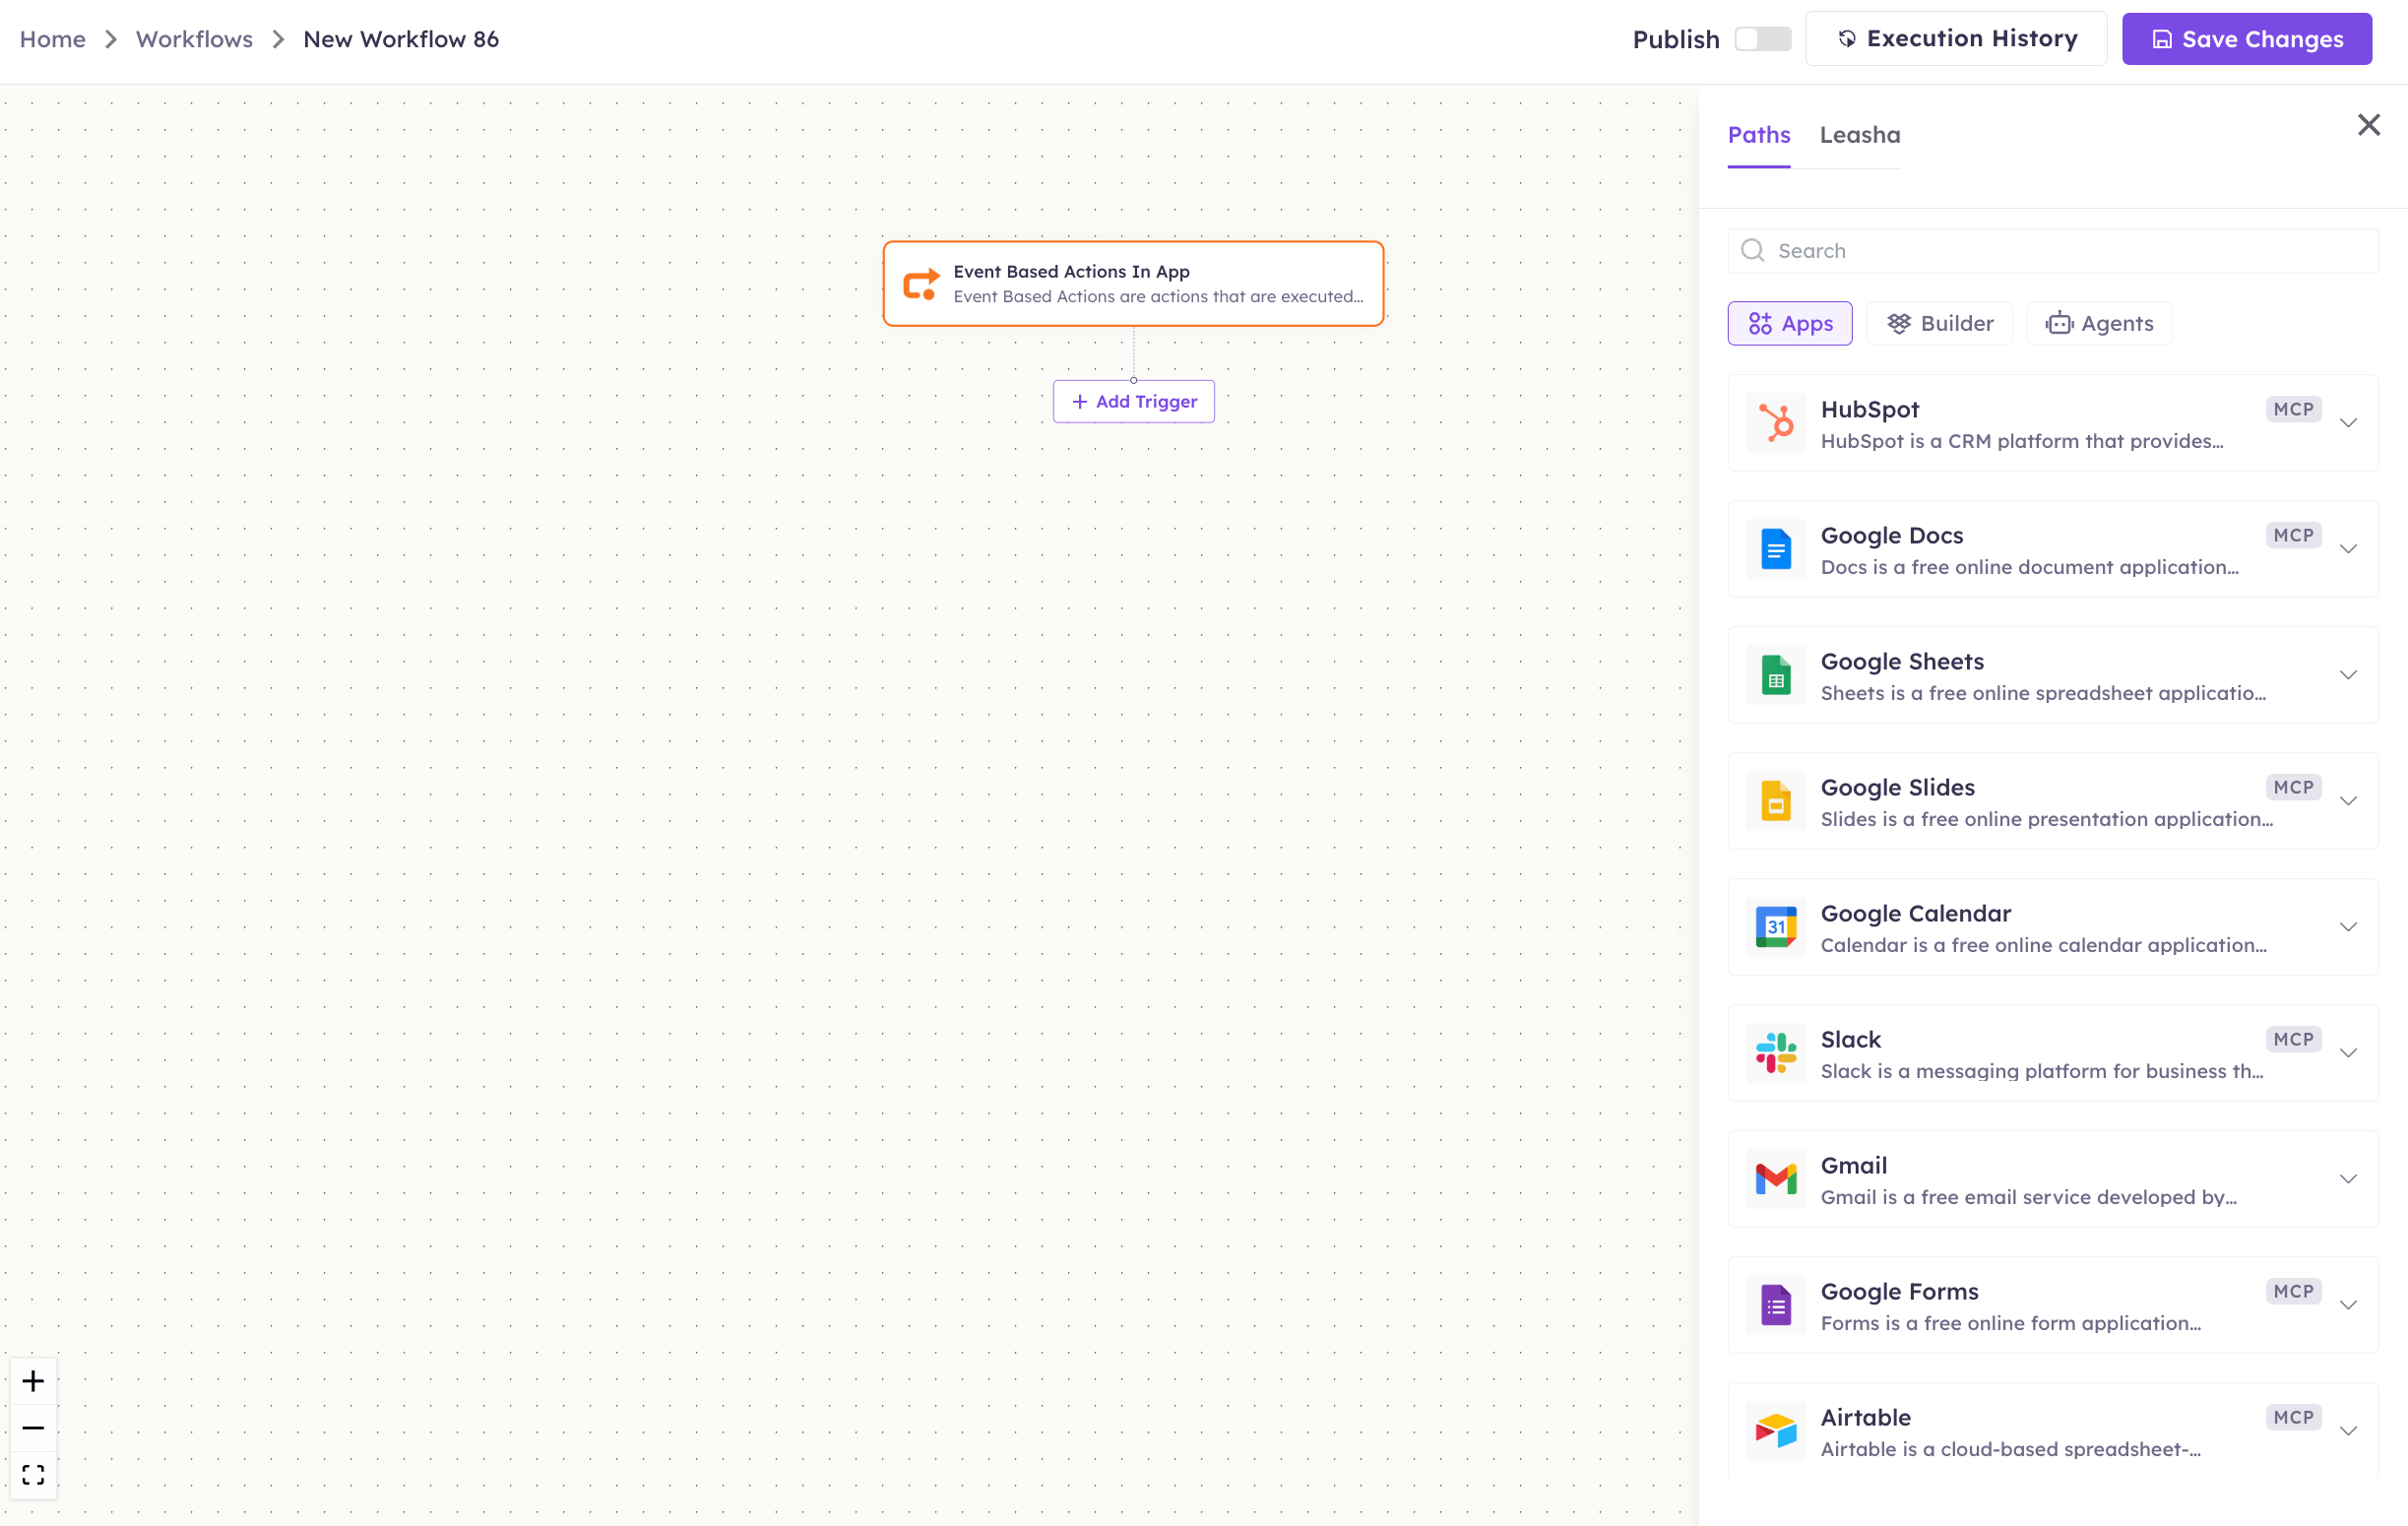
Once connected, you can add **monday.com** to any automation from the **Workflows** builder. Its triggers and tools appear in the Apps panel, marked with an **MCP** badge.
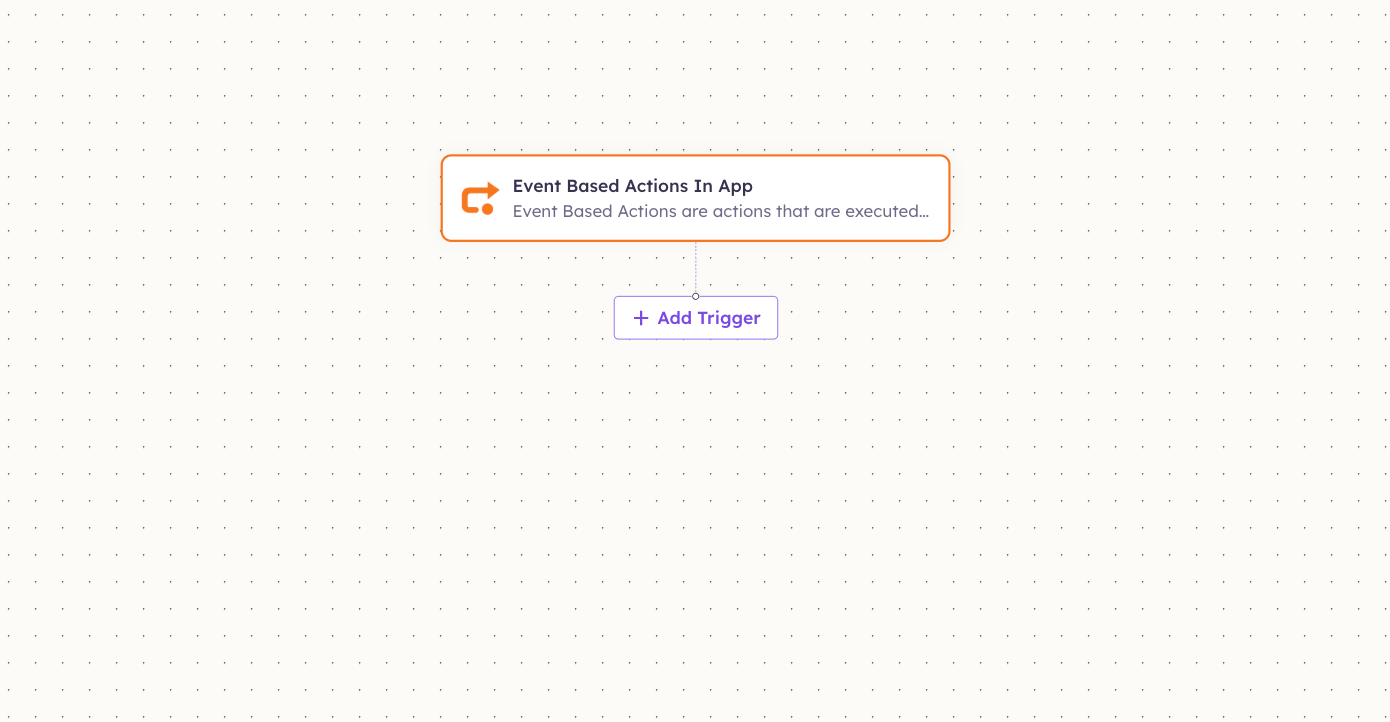
Open **Workflows → New Workflow**. On the canvas, click **+ Add Trigger** (or the **+** below any node) to add a step.
Your token sits in the field in the middle of the page, masked by default. Three controls sit to its right:
* **Show** — reveals the token so you can read it.
* **Copy** — copies the full value to your clipboard (use this one).
* **Regenerate** — replaces the token. **Don't click this** unless you intend to invalidate the current one.
Click **Copy**.
Head to **Data Connectors → monday.com** in UnleashX and paste the token (full walkthrough in Section 4). UnleashX validates it on save, so a bad paste shows up right away.
### Good to know
**Your token doesn't expire and can be viewed again any time.** Unlike connectors that reveal a secret only once, monday.com keeps your token on this page permanently — so if you lose it, come back to **Developer Center → API token** and hit **Copy** again.
**"Regenerate" replaces your existing token.** It issues a new token and **immediately invalidates the old one**.
Only use it if your token has leaked. Everything already using the old token — UnleashX, scripts, other integrations — will start returning `401 Unauthorized` until you update each one with the new value.
As monday.com notes on this page: *always keep this token secret and secure.* It grants **every query and mutation your user can perform** — anyone holding it can read and modify every board, item, and update you can reach. Never commit it to git or share it in chat.
Because the token carries your individual permissions, the agent sees exactly the boards you see. For a shared or automated setup, consider creating a dedicated monday.com user invited only to the boards the agent should touch, and connect with that user's token instead of your own.
The **"Get more than a token, bring your agent"** panel lower on the page is monday.com's own agent platform — separate from the UnleashX connector. You don't need it here; the API token above is all UnleashX requires.
### Permissions this token grants UnleashX
| Access | Why UnleashX needs it |
| ------------ | ------------------------------------------------ |
| Read boards | List boards, groups, columns, and items. |
| Write items | Create and update items and their column values. |
| Post updates | Add updates (comments) to items. |
| Read users | Resolve people/assignees on items. |
## 4. Connect on UnleashX
Go to `https://www.tryunleashx.com` and open the agent you want to connect.
Inside the agent, go to **Data Connectors**.
Locate **monday.com** and click **Connect** (or **Add** / **Configure**).
Paste your **API token** and click **Connect**.
UnleashX validates the token and the monday.com connector shows a **Connected** badge.
### Use monday.com in a Workflow
Once connected, you can add **monday.com** to any automation from the **Workflows** builder. Its triggers and tools appear in the Apps panel, marked with an **MCP** badge.
Open **Workflows → New Workflow**. On the canvas, click **+ Add Trigger** (or the **+** below any node) to add a step.
 In the **Paths** panel, open the **Apps** tab and select **monday.com**. Use the search box if you have many connectors.
 Pick the trigger or action you want (for example, "item created"). Configure its fields — required fields are marked with a red asterisk (\*).
Under **Selected account**, choose an already-connected account, or click **Add Account** to connect one now.
Fill in the remaining fields and click **Save**. Use **Test** to verify the step, then toggle **Publish** when the workflow is ready.
The steps are the same for every connector. For the full workflow builder guide, see [Using MCP in Workflows](/mcp/workflows).
## 5. Available tools
| Tool | What it does | Changes data? |
| ---------------------- | ------------------------------------------------ | ------------- |
| List Boards | Lists boards in your account. | No |
| Get Board | Retrieves a board's structure (groups, columns). | No |
| List Items | Lists items on a board. | No |
| Get Item | Retrieves a single item and its column values. | No |
| Create Item | Creates a new item on a board. | ✏️ Yes |
| Update Item | Updates an item's column values. | ✏️ Yes |
| Change Column Value | Sets a specific column value on an item. | ✏️ Yes |
| Move Item to Group | Moves an item to another group. | ✏️ Yes |
| Delete Item | Deletes an item. | ⚠️ Yes |
| Create Group | Creates a new group on a board. | ✏️ Yes |
| List Columns | Lists a board's columns. | No |
| Create Update | Posts an update (comment) on an item. | ✏️ Yes |
| List Updates | Lists updates on an item. | No |
| Search Items by Column | Finds items by a column value. | No |
| List Users | Lists users in your account. | No |
| Create Board | Creates a new board. | ✏️ Yes |
## 6. Example usage
**"Add an item 'Renew SSL cert' to the DevOps board, set status to Working on it, and assign it to me."**
→ Runs Create Item on the board, then Change Column Value for status and person.
**"Which items on the Sales board are stuck? Post an update on each asking for a status."**
→ Runs List Items (filtering by status), then Create Update on each matching item.
## 7. Permissions & data access
**UnleashX can:**
* List and read boards, groups, columns, items, and updates.
* Create and update items, set column values, and move items.
* Post updates and create groups/boards.
* Delete items where your permissions allow (marked ⚠️).
**UnleashX cannot:**
* Access boards your account can't see.
* Change monday.com admin, billing, or account settings.
**To disconnect:** In UnleashX, open **Data Connectors → monday.com → Disconnect**. You can regenerate your API token in the Developers area to invalidate the old one. Disconnecting removes access immediately.
## 8. Troubleshooting
| Problem | What it means | How to fix it |
| ------------------------------- | ----------------------------------------------------- | --------------------------------------------------------------------- |
| **401 Unauthorized** | The token is invalid or was regenerated. | Copy the current token from **Developers → API token** and reconnect. |
| **Complexity budget exhausted** | The GraphQL query exceeded monday's complexity limit. | Narrow the request (fewer items/columns at once). |
| **403 / no permission** | Your account can't access that board or action. | Get added to the board, or pick one you can access. |
| **404 Not found** | The board/item ID is wrong or was deleted. | Have the agent list boards/items to find the correct ID. |
For general MCP issues, see [/mcp/integrations](/mcp/integrations).
## 9. Frequently asked questions
**Is my monday.com data stored by UnleashX?**
No. UnleashX reads and writes live through the monday.com API per request; it doesn't keep a copy.
**Can the agent delete items?**
Yes — tools marked ⚠️ make permanent changes and only work if your permissions allow it. Use them deliberately.
**Can multiple team members connect monday.com?**
Yes. Each person uses their own API token, so the agent acts with that user's access.
## 10. References
* monday.com API documentation: [https://developer.monday.com/api-reference/docs](https://developer.monday.com/api-reference/docs)
* Get your API token: [https://developer.monday.com/api-reference/docs/authentication](https://developer.monday.com/api-reference/docs/authentication)
* Rate limits & complexity: [https://developer.monday.com/api-reference/docs/rate-limits](https://developer.monday.com/api-reference/docs/rate-limits)
Pick the trigger or action you want (for example, "item created"). Configure its fields — required fields are marked with a red asterisk (\*).
Under **Selected account**, choose an already-connected account, or click **Add Account** to connect one now.
Fill in the remaining fields and click **Save**. Use **Test** to verify the step, then toggle **Publish** when the workflow is ready.
The steps are the same for every connector. For the full workflow builder guide, see [Using MCP in Workflows](/mcp/workflows).
## 5. Available tools
| Tool | What it does | Changes data? |
| ---------------------- | ------------------------------------------------ | ------------- |
| List Boards | Lists boards in your account. | No |
| Get Board | Retrieves a board's structure (groups, columns). | No |
| List Items | Lists items on a board. | No |
| Get Item | Retrieves a single item and its column values. | No |
| Create Item | Creates a new item on a board. | ✏️ Yes |
| Update Item | Updates an item's column values. | ✏️ Yes |
| Change Column Value | Sets a specific column value on an item. | ✏️ Yes |
| Move Item to Group | Moves an item to another group. | ✏️ Yes |
| Delete Item | Deletes an item. | ⚠️ Yes |
| Create Group | Creates a new group on a board. | ✏️ Yes |
| List Columns | Lists a board's columns. | No |
| Create Update | Posts an update (comment) on an item. | ✏️ Yes |
| List Updates | Lists updates on an item. | No |
| Search Items by Column | Finds items by a column value. | No |
| List Users | Lists users in your account. | No |
| Create Board | Creates a new board. | ✏️ Yes |
## 6. Example usage
**"Add an item 'Renew SSL cert' to the DevOps board, set status to Working on it, and assign it to me."**
→ Runs Create Item on the board, then Change Column Value for status and person.
**"Which items on the Sales board are stuck? Post an update on each asking for a status."**
→ Runs List Items (filtering by status), then Create Update on each matching item.
## 7. Permissions & data access
**UnleashX can:**
* List and read boards, groups, columns, items, and updates.
* Create and update items, set column values, and move items.
* Post updates and create groups/boards.
* Delete items where your permissions allow (marked ⚠️).
**UnleashX cannot:**
* Access boards your account can't see.
* Change monday.com admin, billing, or account settings.
**To disconnect:** In UnleashX, open **Data Connectors → monday.com → Disconnect**. You can regenerate your API token in the Developers area to invalidate the old one. Disconnecting removes access immediately.
## 8. Troubleshooting
| Problem | What it means | How to fix it |
| ------------------------------- | ----------------------------------------------------- | --------------------------------------------------------------------- |
| **401 Unauthorized** | The token is invalid or was regenerated. | Copy the current token from **Developers → API token** and reconnect. |
| **Complexity budget exhausted** | The GraphQL query exceeded monday's complexity limit. | Narrow the request (fewer items/columns at once). |
| **403 / no permission** | Your account can't access that board or action. | Get added to the board, or pick one you can access. |
| **404 Not found** | The board/item ID is wrong or was deleted. | Have the agent list boards/items to find the correct ID. |
For general MCP issues, see [/mcp/integrations](/mcp/integrations).
## 9. Frequently asked questions
**Is my monday.com data stored by UnleashX?**
No. UnleashX reads and writes live through the monday.com API per request; it doesn't keep a copy.
**Can the agent delete items?**
Yes — tools marked ⚠️ make permanent changes and only work if your permissions allow it. Use them deliberately.
**Can multiple team members connect monday.com?**
Yes. Each person uses their own API token, so the agent acts with that user's access.
## 10. References
* monday.com API documentation: [https://developer.monday.com/api-reference/docs](https://developer.monday.com/api-reference/docs)
* Get your API token: [https://developer.monday.com/api-reference/docs/authentication](https://developer.monday.com/api-reference/docs/authentication)
* Rate limits & complexity: [https://developer.monday.com/api-reference/docs/rate-limits](https://developer.monday.com/api-reference/docs/rate-limits)