> ## Documentation Index
> Fetch the complete documentation index at: https://docs.unleashx.ai/llms.txt
> Use this file to discover all available pages before exploring further.
# Intercom
> Let your UnleashX agent manage contacts, conversations, companies, and notes in Intercom.
# Intercom
> **In one line:** Connect Intercom so your UnleashX agent can look up contacts, read and reply to conversations, manage companies, and add notes and tags — all in plain language.
| | |
| ------------------ | -------------------------------------------------------------------------------------------------------------------- |
| **Category** | CRM & Marketing |
| **Authentication** | OAuth (Intercom) |
| **Setup time** | \~3 minutes |
| **Difficulty** | Easy |
| **Best for** | Support and customer teams that want an AI agent to triage conversations, update contacts, and log notes in Intercom |
## 1. Overview
Intercom is a customer communications platform for support, engagement, and marketing. It holds your contacts (leads and users), the companies they belong to, and the conversations your team has with them across chat, email, and the Messenger.
Once connected to UnleashX, your agent can find and update contacts, read conversations, reply or leave internal notes, manage companies, apply tags, and search across your workspace. It works against your live Intercom workspace using your own Intercom sign-in, so it respects your permissions.
Connecting Intercom to UnleashX means your inbox and customer records update themselves as you talk. Instead of opening Intercom to reply to a conversation or update a contact, you tell your agent and it does it.
## 2. What you'll need
* An Intercom account with access to the workspace you want to connect.
* A seat/role with permission to view and manage contacts and conversations.
* An UnleashX account with access to **Data Connectors**.
No API key to paste. Intercom uses OAuth — you click **Authorize** and sign in with Intercom.
Intercom enforces your **workspace role and permissions**. If your seat can't manage conversations or contacts, the agent can't either.
## 3. Get your credentials
There's no key to copy. Authentication runs through Intercom's secure OAuth sign-in.
Connecting Intercom (Section 4) opens an Intercom **Authorize** window.
Sign in with your Intercom account at `https://app.intercom.com`. Complete two-factor authentication if prompted.
If you belong to more than one workspace, pick the one you want the agent to work with.
Intercom shows the access UnleashX is requesting. Click **Authorize / Connect**.
Intercom redirects you back automatically and the connector links to your workspace. Behind the scenes UnleashX calls Intercom with a `Bearer` token — you never handle the token yourself.
**Permissions UnleashX requests:**
| Access | Why UnleashX needs it |
| ------------------------ | ---------------------------------------------------- |
| Read/write contacts | Find, create, and update contacts (leads and users). |
| Read/write conversations | Read conversations, reply, and add internal notes. |
| Read/write companies | List and manage companies and their contacts. |
| Manage tags | Apply and remove tags on contacts and conversations. |
| Read admins | Resolve teammates for assignment. |
Intercom shows exactly what UnleashX is asking for on the authorize screen. Intercom — not UnleashX — enforces these limits.
## 4. Connect on UnleashX
Go to `https://www.tryunleashx.com` and open the agent you want to connect.
Inside the agent, go to **Data Connectors**.
Locate **Intercom** and click **Connect** (or **Add** / **Configure**).
Click **Authorize**, sign in with Intercom, pick your workspace, and confirm.
You return to UnleashX and the Intercom connector shows a **Connected** badge.
### Use Intercom in a Workflow
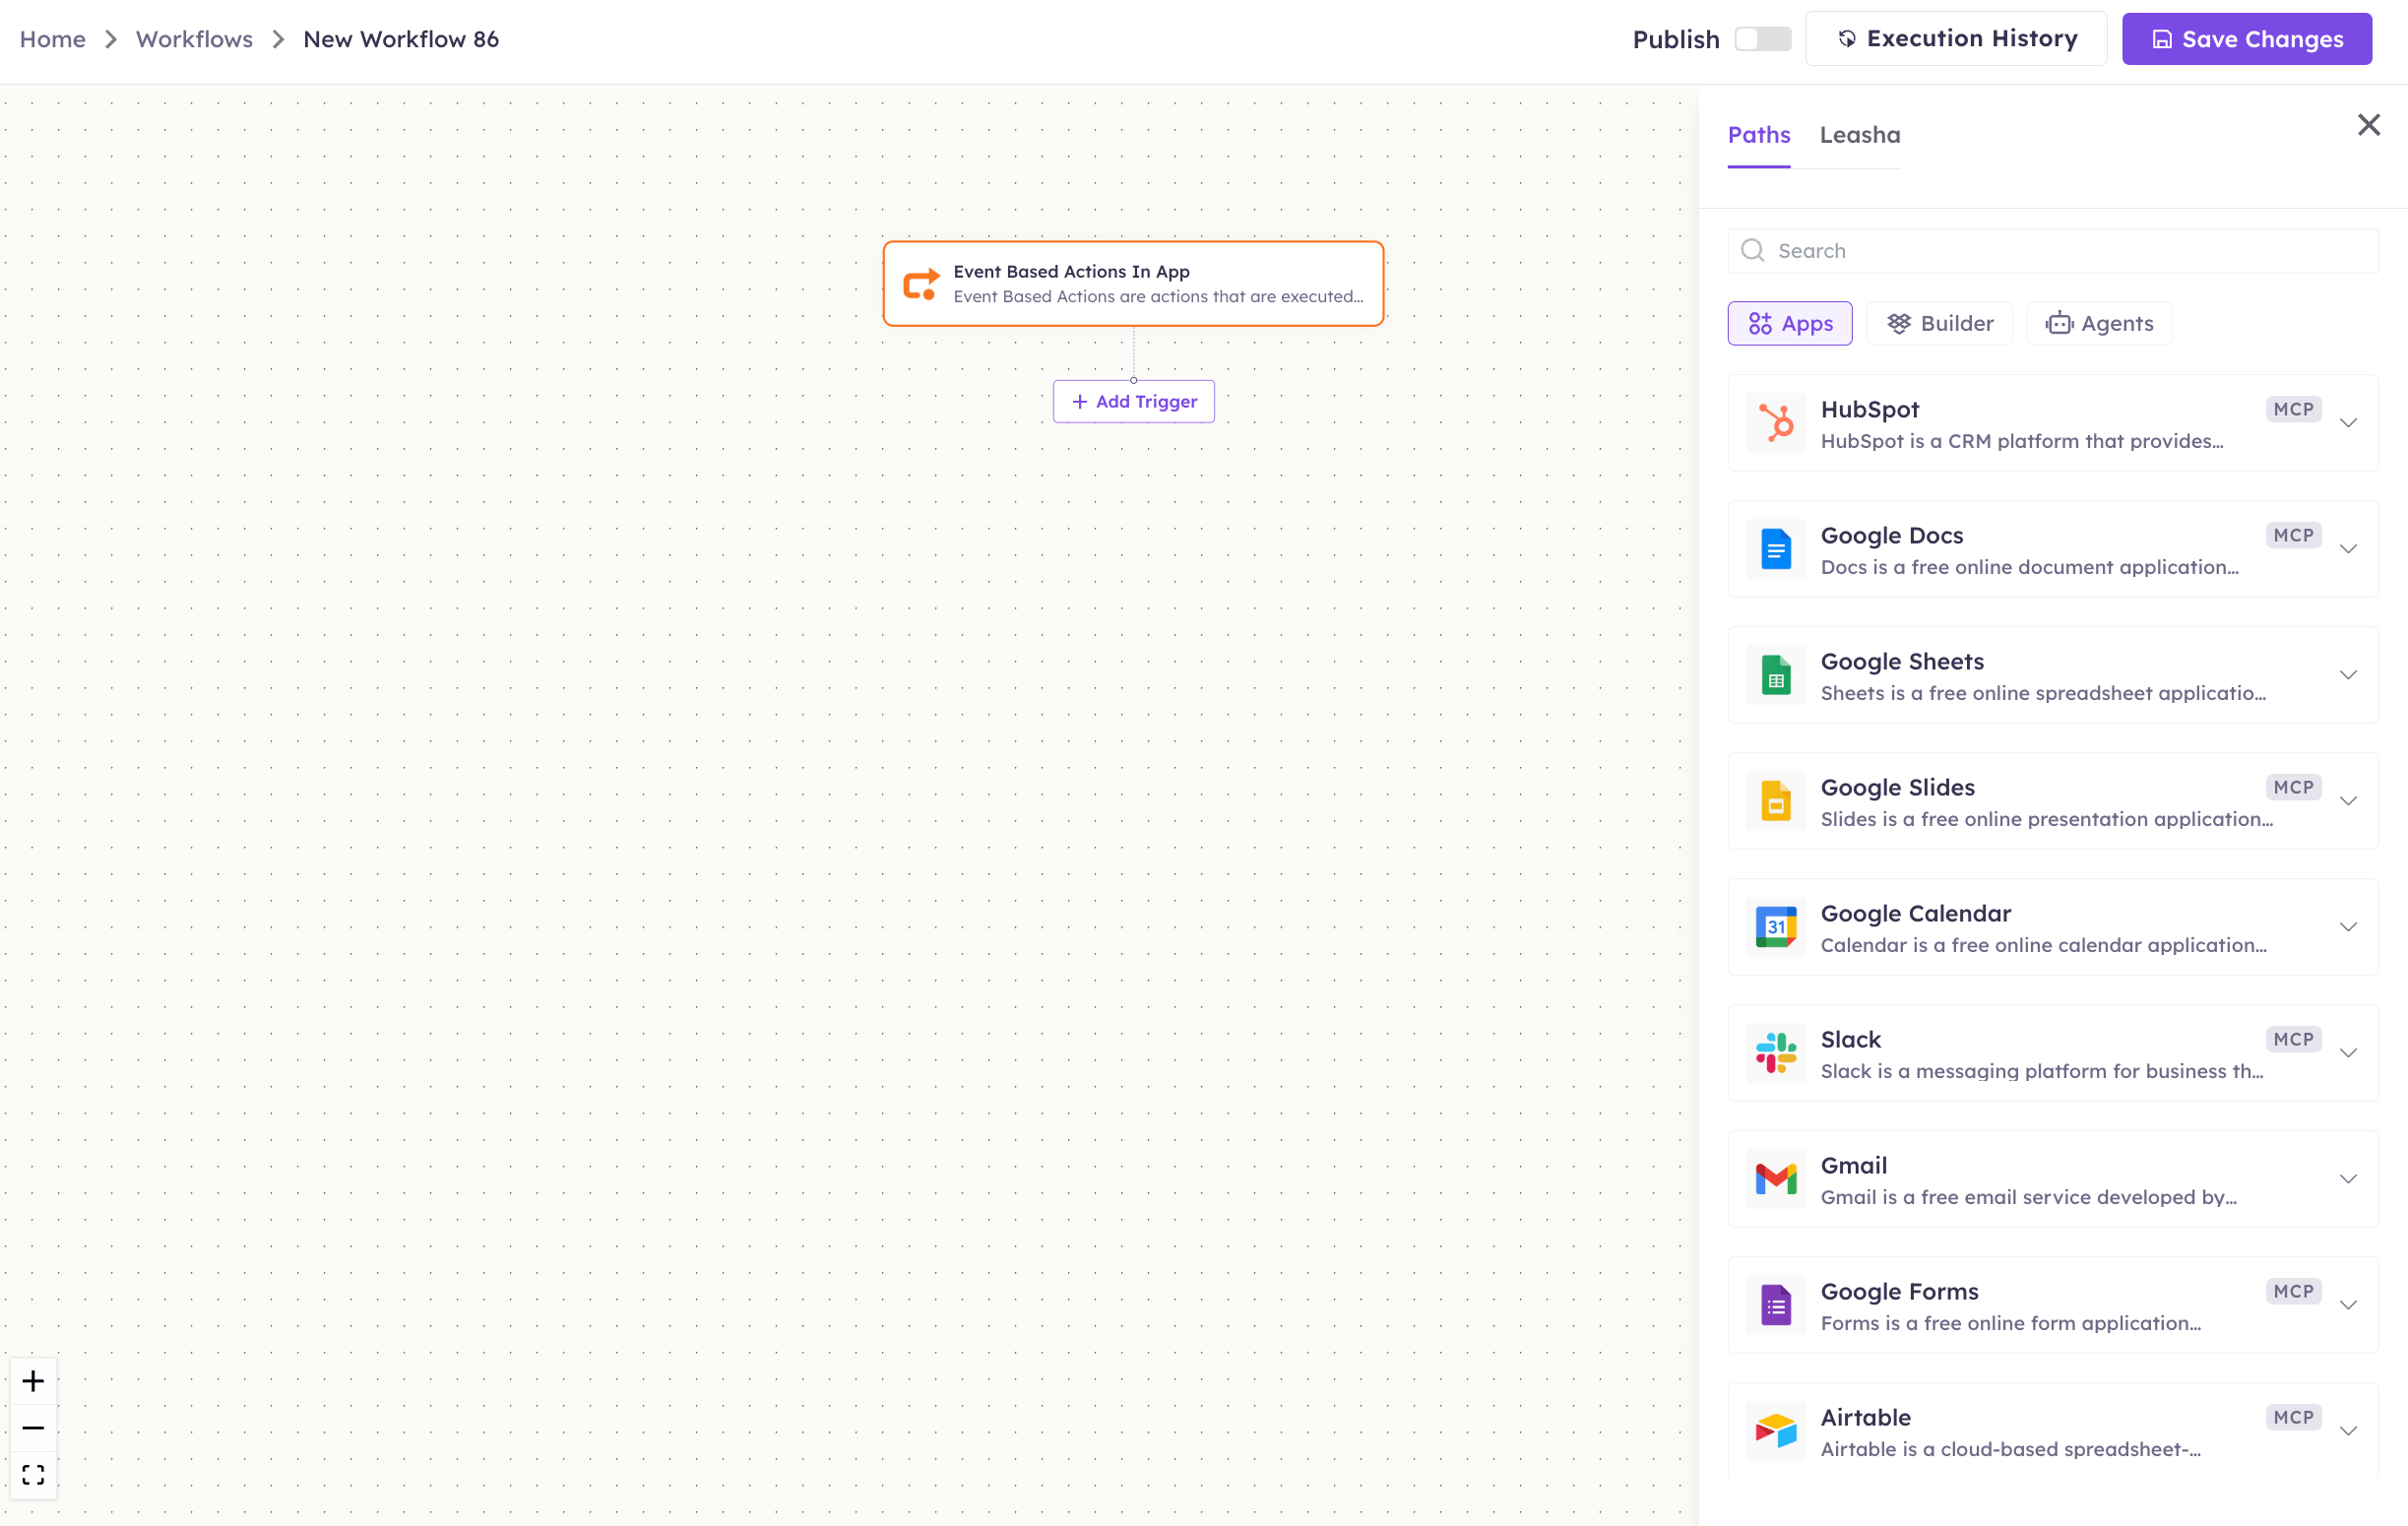
Once connected, you can add **Intercom** to any automation from the **Workflows** builder. Its triggers and tools appear in the Apps panel, marked with an **MCP** badge.
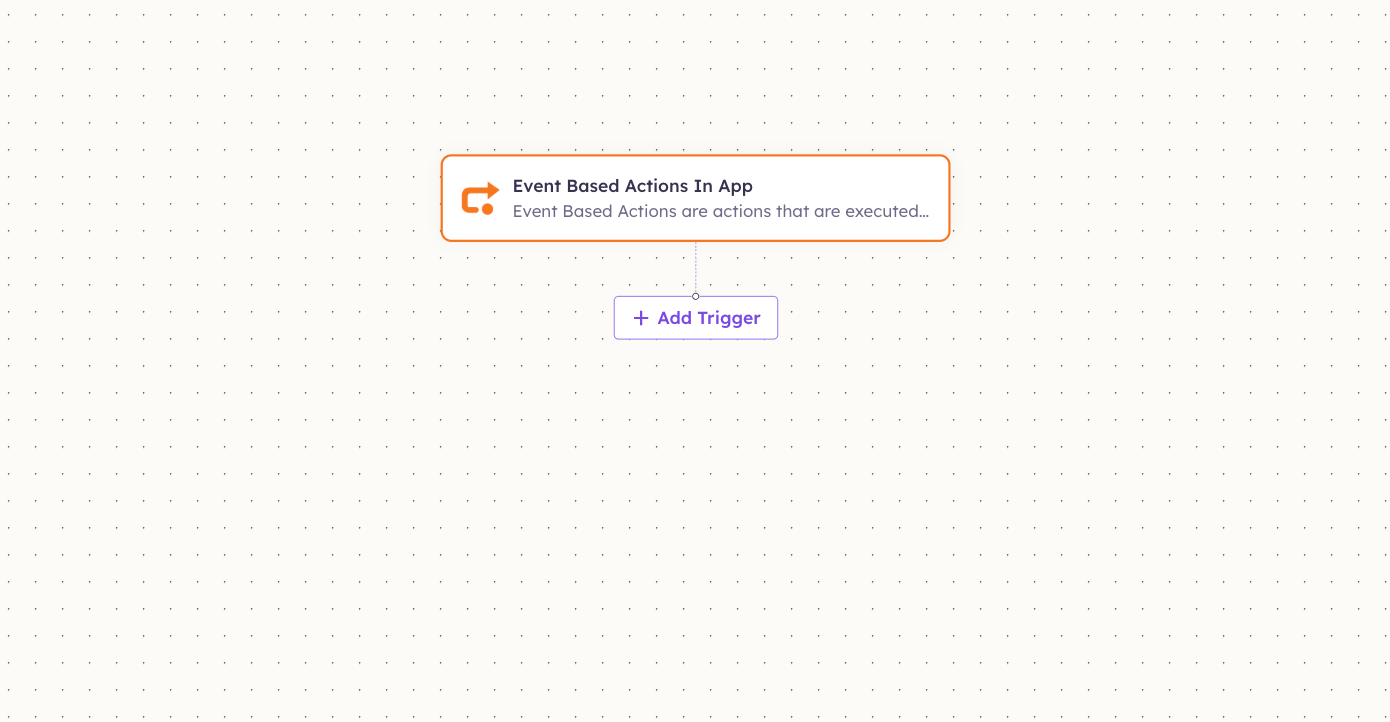
Open **Workflows → New Workflow**. On the canvas, click **+ Add Trigger** (or the **+** below any node) to add a step.
 In the **Paths** panel, open the **Apps** tab and select **Intercom**. Use the search box if you have many connectors.
 Pick the trigger or action you want (for example, "new conversation"). Configure its fields — required fields are marked with a red asterisk (\*).
Under **Selected account**, choose an already-connected account, or click **Add Account** to connect one now.
Fill in the remaining fields and click **Save**. Use **Test** to verify the step, then toggle **Publish** when the workflow is ready.
The steps are the same for every connector. For the full workflow builder guide, see [Using MCP in Workflows](/mcp/workflows).
## 5. Available tools
| Tool | What it does | Changes data? |
| ------------------------ | ------------------------------------------- | ------------- |
| Search Contacts | Searches contacts by attributes. | No |
| Get Contact | Retrieves a single contact by ID. | No |
| List Contacts | Lists contacts. | No |
| Create Contact | Creates a new contact (lead or user). | ✏️ Yes |
| Update Contact | Updates a contact. | ✏️ Yes |
| Delete Contact | Deletes a contact. | ⚠️ Yes |
| List Conversations | Lists conversations. | No |
| Get Conversation | Retrieves a conversation with its messages. | No |
| Search Conversations | Searches conversations. | No |
| Reply to Conversation | Sends a reply in a conversation. | ✏️ Yes |
| Add Note to Conversation | Adds an internal note to a conversation. | ✏️ Yes |
| Assign Conversation | Assigns a conversation to a teammate/team. | ✏️ Yes |
| Close Conversation | Closes a conversation. | ✏️ Yes |
| Snooze Conversation | Snoozes a conversation. | ✏️ Yes |
| List Companies | Lists companies. | No |
| Get Company | Retrieves a company by ID. | No |
| Create or Update Company | Creates or updates a company. | ✏️ Yes |
| List Tags | Lists tags in the workspace. | No |
| Tag Contact | Applies a tag to a contact. | ✏️ Yes |
| Tag Conversation | Applies a tag to a conversation. | ✏️ Yes |
| List Admins | Lists teammates (admins) in the workspace. | No |
## 6. Example usage
**"Find the contact [jordan@acme.com](mailto:jordan@acme.com) and tell me their open conversations."**
→ Runs Search Contacts to find the contact, then List/Search Conversations for their open threads.
**"Reply to the latest conversation from Globex letting them know the fix is live, then close it."**
→ Runs Search Conversations to find it, Reply to Conversation with the message, then Close Conversation.
## 7. Permissions & data access
**UnleashX can:**
* Search, list, and read contacts, conversations, and companies.
* Create and update contacts and companies.
* Reply to conversations, add internal notes, assign, snooze, close, and tag.
* Delete contacts where your role allows (marked ⚠️).
**UnleashX cannot:**
* Do anything your Intercom role doesn't permit.
* Access a workspace you didn't connect.
* Change Intercom billing or workspace admin settings.
**To disconnect:** In UnleashX, open **Data Connectors → Intercom → Disconnect**. You can also revoke the authorization in Intercom under **Settings → Authorized apps**. Disconnecting revokes access immediately.
## 8. Troubleshooting
| Problem | What it means | How to fix it |
| ------------------------- | ------------------------------------------------------ | ------------------------------------------------------------ |
| **401 Unauthorized** | The Intercom token expired or was revoked. | Reconnect Intercom in **Data Connectors** and sign in again. |
| **403 Forbidden** | Your seat lacks permission for that action. | Ask a workspace admin to adjust your role, then retry. |
| **404 Not found** | The contact/conversation ID is wrong or was deleted. | Have the agent search to find the correct record. |
| **429 Too Many Requests** | You hit Intercom's rate limit. | Wait and retry; space out bulk operations. |
| **Wrong workspace** | The agent is acting on a different Intercom workspace. | Reconnect and select the correct workspace. |
For general MCP issues, see [/mcp/integrations](/mcp/integrations).
## 9. Frequently asked questions
**Is my Intercom data stored by UnleashX?**
No. UnleashX reads and writes live through the Intercom API per request; it doesn't keep a copy of your contacts or conversations.
**Does the agent reply as me?**
Replies and notes are posted through your connected Intercom identity, subject to your role.
**Can the agent delete contacts?**
Yes — tools marked ⚠️ make permanent changes and only work if your role allows it. Use them deliberately.
**Can multiple teammates connect Intercom?**
Yes. Each teammate authorizes their own Intercom account and acts with their own permissions.
## 10. References
* Intercom API reference: [https://developers.intercom.com/docs/references/rest-api/](https://developers.intercom.com/docs/references/rest-api/)
* Intercom OAuth: [https://developers.intercom.com/docs/build-an-integration/learn-more/authentication/setting-up-oauth/](https://developers.intercom.com/docs/build-an-integration/learn-more/authentication/setting-up-oauth/)
* Rate limiting: [https://developers.intercom.com/docs/references/rest-api/errors/rate-limiting/](https://developers.intercom.com/docs/references/rest-api/errors/rate-limiting/)
Pick the trigger or action you want (for example, "new conversation"). Configure its fields — required fields are marked with a red asterisk (\*).
Under **Selected account**, choose an already-connected account, or click **Add Account** to connect one now.
Fill in the remaining fields and click **Save**. Use **Test** to verify the step, then toggle **Publish** when the workflow is ready.
The steps are the same for every connector. For the full workflow builder guide, see [Using MCP in Workflows](/mcp/workflows).
## 5. Available tools
| Tool | What it does | Changes data? |
| ------------------------ | ------------------------------------------- | ------------- |
| Search Contacts | Searches contacts by attributes. | No |
| Get Contact | Retrieves a single contact by ID. | No |
| List Contacts | Lists contacts. | No |
| Create Contact | Creates a new contact (lead or user). | ✏️ Yes |
| Update Contact | Updates a contact. | ✏️ Yes |
| Delete Contact | Deletes a contact. | ⚠️ Yes |
| List Conversations | Lists conversations. | No |
| Get Conversation | Retrieves a conversation with its messages. | No |
| Search Conversations | Searches conversations. | No |
| Reply to Conversation | Sends a reply in a conversation. | ✏️ Yes |
| Add Note to Conversation | Adds an internal note to a conversation. | ✏️ Yes |
| Assign Conversation | Assigns a conversation to a teammate/team. | ✏️ Yes |
| Close Conversation | Closes a conversation. | ✏️ Yes |
| Snooze Conversation | Snoozes a conversation. | ✏️ Yes |
| List Companies | Lists companies. | No |
| Get Company | Retrieves a company by ID. | No |
| Create or Update Company | Creates or updates a company. | ✏️ Yes |
| List Tags | Lists tags in the workspace. | No |
| Tag Contact | Applies a tag to a contact. | ✏️ Yes |
| Tag Conversation | Applies a tag to a conversation. | ✏️ Yes |
| List Admins | Lists teammates (admins) in the workspace. | No |
## 6. Example usage
**"Find the contact [jordan@acme.com](mailto:jordan@acme.com) and tell me their open conversations."**
→ Runs Search Contacts to find the contact, then List/Search Conversations for their open threads.
**"Reply to the latest conversation from Globex letting them know the fix is live, then close it."**
→ Runs Search Conversations to find it, Reply to Conversation with the message, then Close Conversation.
## 7. Permissions & data access
**UnleashX can:**
* Search, list, and read contacts, conversations, and companies.
* Create and update contacts and companies.
* Reply to conversations, add internal notes, assign, snooze, close, and tag.
* Delete contacts where your role allows (marked ⚠️).
**UnleashX cannot:**
* Do anything your Intercom role doesn't permit.
* Access a workspace you didn't connect.
* Change Intercom billing or workspace admin settings.
**To disconnect:** In UnleashX, open **Data Connectors → Intercom → Disconnect**. You can also revoke the authorization in Intercom under **Settings → Authorized apps**. Disconnecting revokes access immediately.
## 8. Troubleshooting
| Problem | What it means | How to fix it |
| ------------------------- | ------------------------------------------------------ | ------------------------------------------------------------ |
| **401 Unauthorized** | The Intercom token expired or was revoked. | Reconnect Intercom in **Data Connectors** and sign in again. |
| **403 Forbidden** | Your seat lacks permission for that action. | Ask a workspace admin to adjust your role, then retry. |
| **404 Not found** | The contact/conversation ID is wrong or was deleted. | Have the agent search to find the correct record. |
| **429 Too Many Requests** | You hit Intercom's rate limit. | Wait and retry; space out bulk operations. |
| **Wrong workspace** | The agent is acting on a different Intercom workspace. | Reconnect and select the correct workspace. |
For general MCP issues, see [/mcp/integrations](/mcp/integrations).
## 9. Frequently asked questions
**Is my Intercom data stored by UnleashX?**
No. UnleashX reads and writes live through the Intercom API per request; it doesn't keep a copy of your contacts or conversations.
**Does the agent reply as me?**
Replies and notes are posted through your connected Intercom identity, subject to your role.
**Can the agent delete contacts?**
Yes — tools marked ⚠️ make permanent changes and only work if your role allows it. Use them deliberately.
**Can multiple teammates connect Intercom?**
Yes. Each teammate authorizes their own Intercom account and acts with their own permissions.
## 10. References
* Intercom API reference: [https://developers.intercom.com/docs/references/rest-api/](https://developers.intercom.com/docs/references/rest-api/)
* Intercom OAuth: [https://developers.intercom.com/docs/build-an-integration/learn-more/authentication/setting-up-oauth/](https://developers.intercom.com/docs/build-an-integration/learn-more/authentication/setting-up-oauth/)
* Rate limiting: [https://developers.intercom.com/docs/references/rest-api/errors/rate-limiting/](https://developers.intercom.com/docs/references/rest-api/errors/rate-limiting/)