> ## Documentation Index
> Fetch the complete documentation index at: https://docs.unleashx.ai/llms.txt
> Use this file to discover all available pages before exploring further.
# Gmail
> Let your UnleashX agent read, send, organize, and manage Gmail email on your behalf.
# Gmail
> **In one line:** Connect your Gmail account so your UnleashX agent can send, search, label, and triage email for you.
| | |
| ------------------ | ------------------------------------------------------------------------------------------ |
| **Category** | Communication |
| **Authentication** | OAuth (Google sign-in) |
| **Setup time** | \~2 minutes |
| **Difficulty** | Easy |
| **Best for** | Teams who want an AI assistant to draft, send, and organize email without leaving UnleashX |
## 1. Overview
Gmail is Google's email service, part of Google Workspace. It holds your inbox, sent mail, drafts, labels, and attachments.
Once connected, your UnleashX agent can send emails (including CC/BCC and attachments), search and read messages, create and send drafts, apply or remove labels, and triage your inbox — marking messages read/unread, important, archived, or trashed.
Connecting Gmail to UnleashX turns email into something your agent can act on directly: it can answer "did the invoice from Acme arrive?", send a follow-up, or label and archive a thread — all from a natural-language request, so you spend less time clicking around your inbox.
## 2. What you'll need
Any personal Gmail account or a Google Workspace account with Gmail enabled.
You must be able to complete the Google sign-in and approve the requested permissions. On Workspace accounts, your admin may restrict third-party app access.
An agent in your UnleashX workspace where you'll add the Gmail connector.
No admin access? On personal Gmail you can connect yourself. On a managed Google Workspace account, your admin may need to allow UnleashX in the Google Admin console before the authorize step succeeds.
## 3. Get your credentials
Gmail uses **Google OAuth 2.0**. You do **not** create or paste an API key. Instead, UnleashX redirects you to Google, you sign in once, and Google issues an access token to UnleashX automatically.
In your agent's **Data Connectors**, find **Gmail** and click **Connect** (see Section 4). This launches Google's secure sign-in page.
Choose the Google account whose Gmail you want to connect.
Google shows exactly what UnleashX is asking for. Click **Allow** to grant access. Google then sends you back to UnleashX and the connection completes.
There is no key to copy. Access is granted by your Google sign-in, and you can revoke it at any time from your [Google Account permissions page](https://myaccount.google.com/permissions).
**Scopes UnleashX requests for Gmail:**
| Scope | Why UnleashX needs it |
| -------------------------------------------------- | ---------------------------------------------------------------------------- |
| `https://www.googleapis.com/auth/gmail.readonly` | Read messages, search emails, list labels and attachments. |
| `https://www.googleapis.com/auth/gmail.send` | Send emails and send drafts on your behalf. |
| `https://www.googleapis.com/auth/gmail.compose` | Create drafts in your account. |
| `https://www.googleapis.com/auth/gmail.modify` | Apply/remove labels, mark read/unread/important, archive, and trash/untrash. |
| `https://www.googleapis.com/auth/userinfo.email` | Identify which account is connected. |
| `https://www.googleapis.com/auth/userinfo.profile` | Read your basic profile (name, picture). |
| `openid` | Sign-in / identity verification. |
## 4. Connect on UnleashX
Sign in at [https://www.tryunleashx.com](https://www.tryunleashx.com) and open the agent you want to give email access to.
In the agent, open **Data Connectors**.
Locate **Gmail** and click **Connect** / **Add** / **Configure**.
Click **Authorize**, sign in with Google, and approve the requested permissions.
You'll return to UnleashX and the connector status will show a **Connected** badge.
### Use Gmail in a Workflow
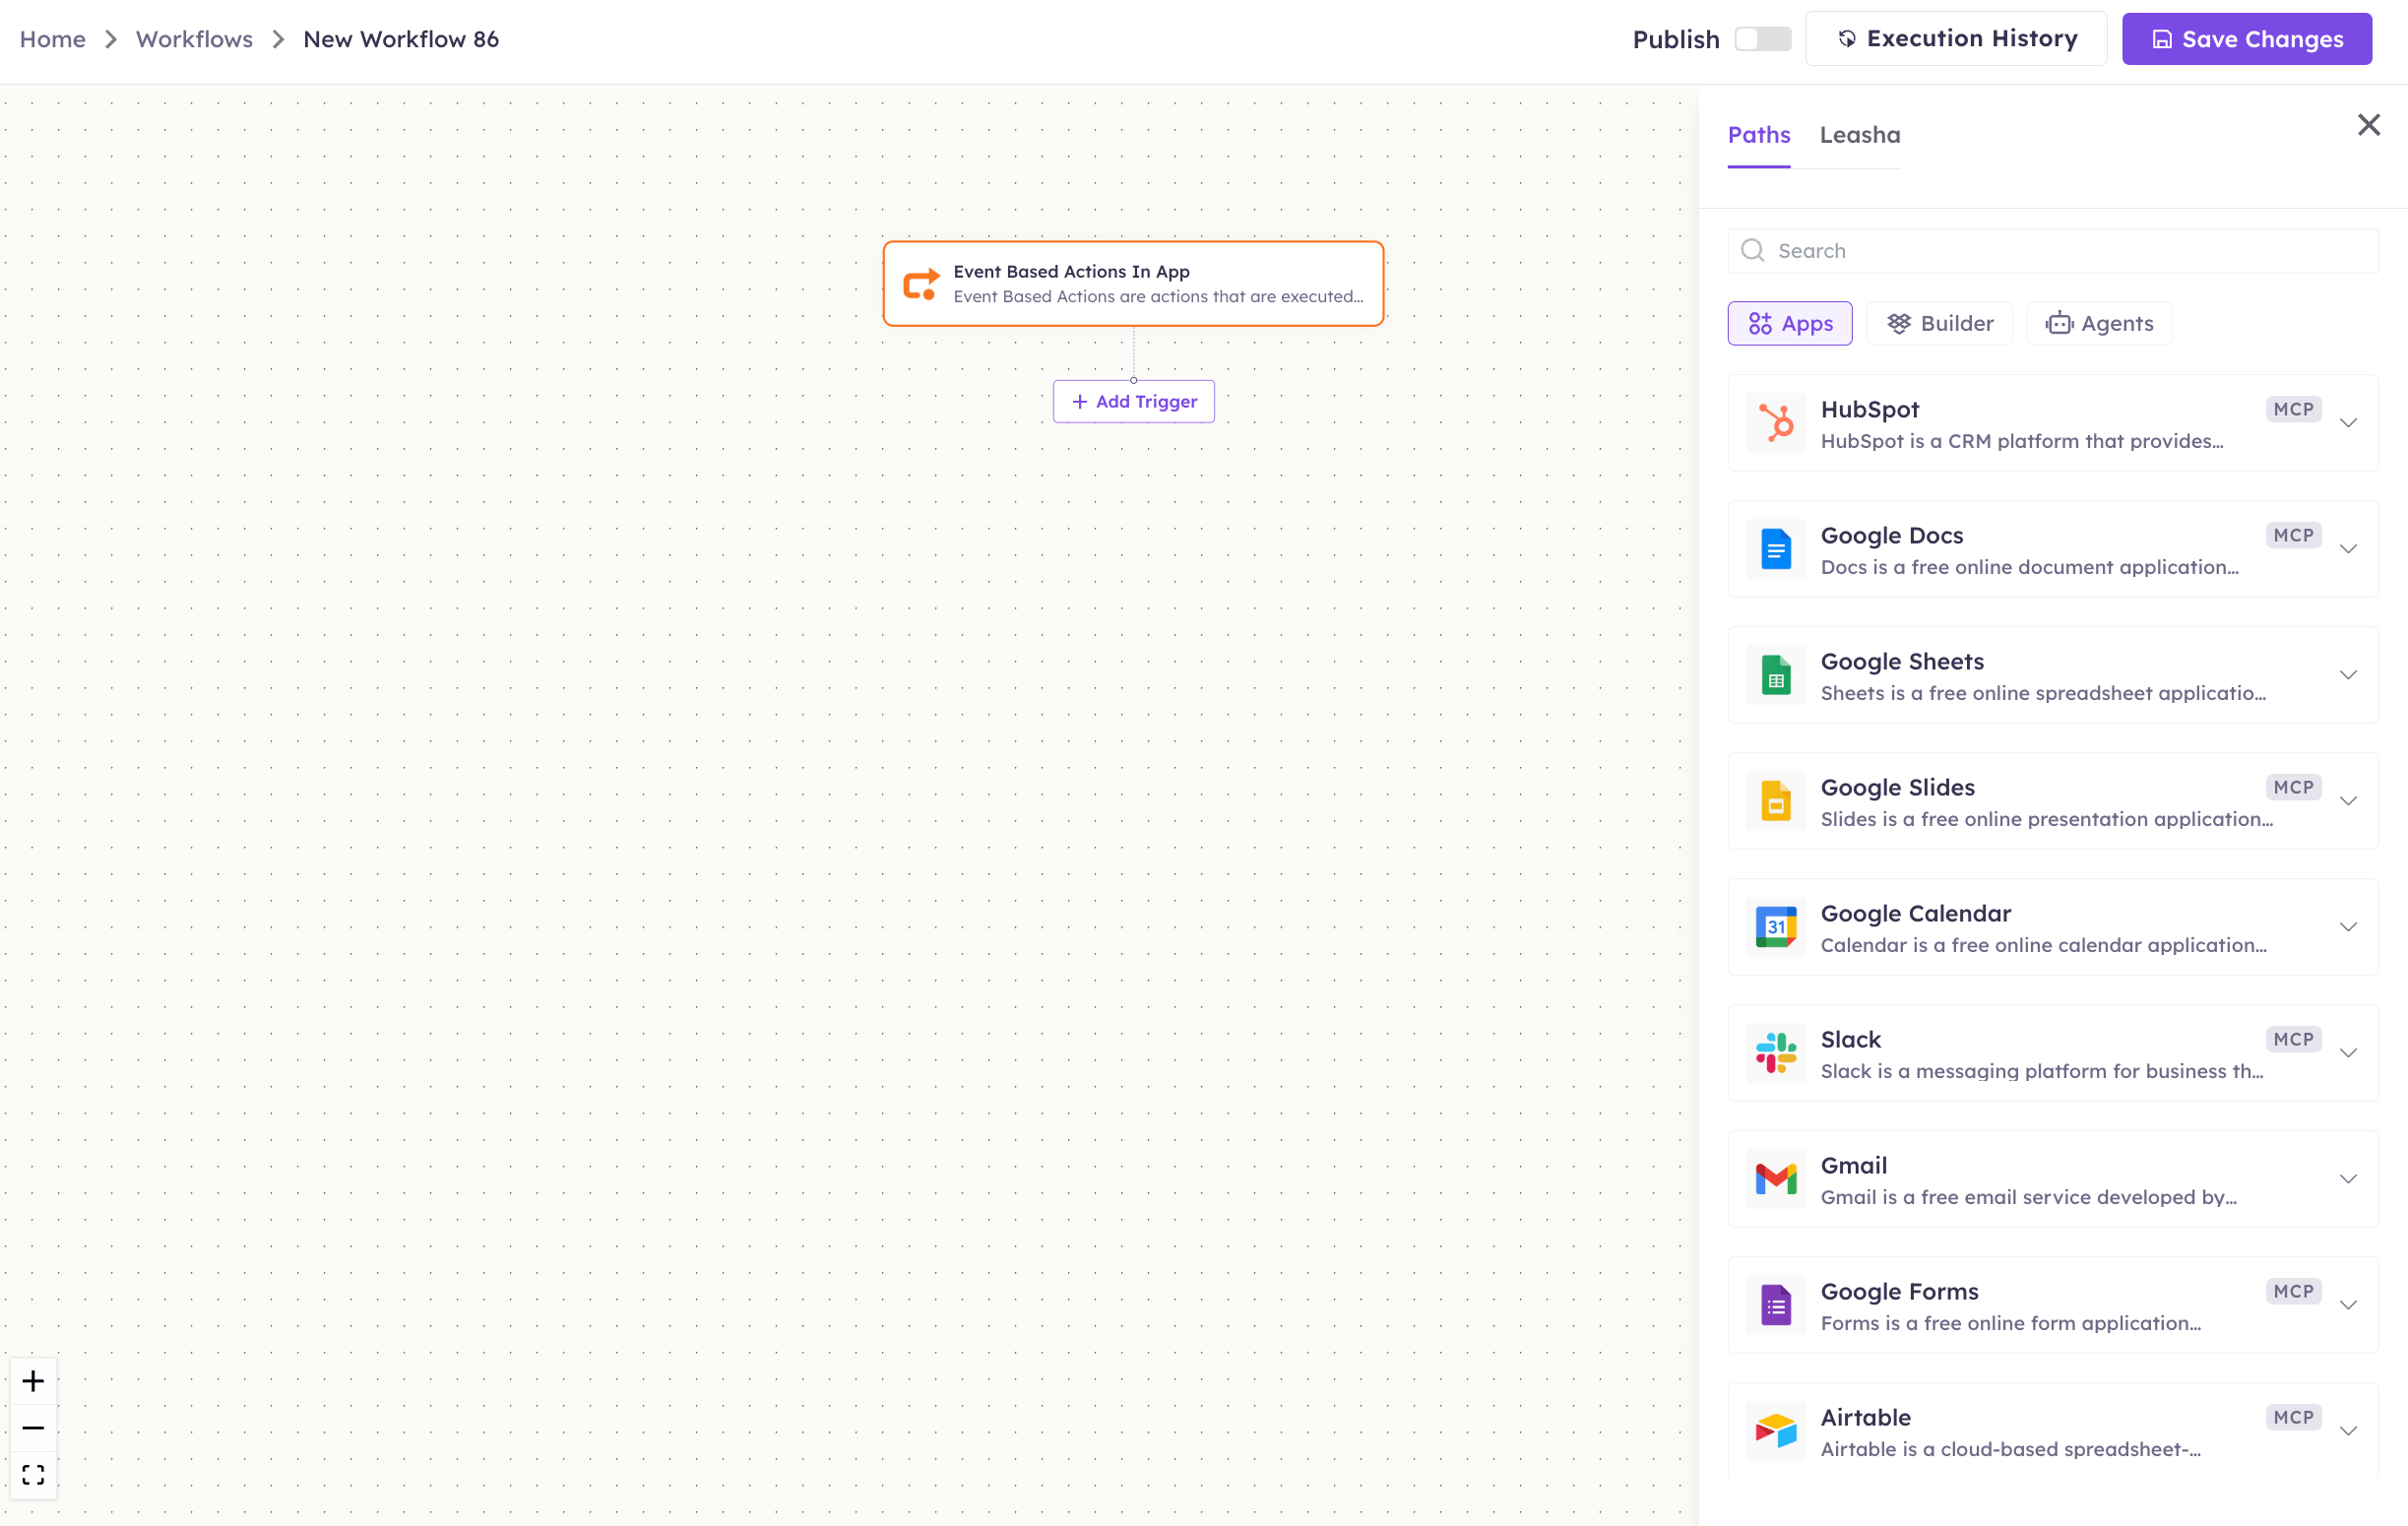
Once connected, you can add **Gmail** to any automation from the **Workflows** builder. Its triggers and tools appear in the Apps panel, marked with an **MCP** badge.
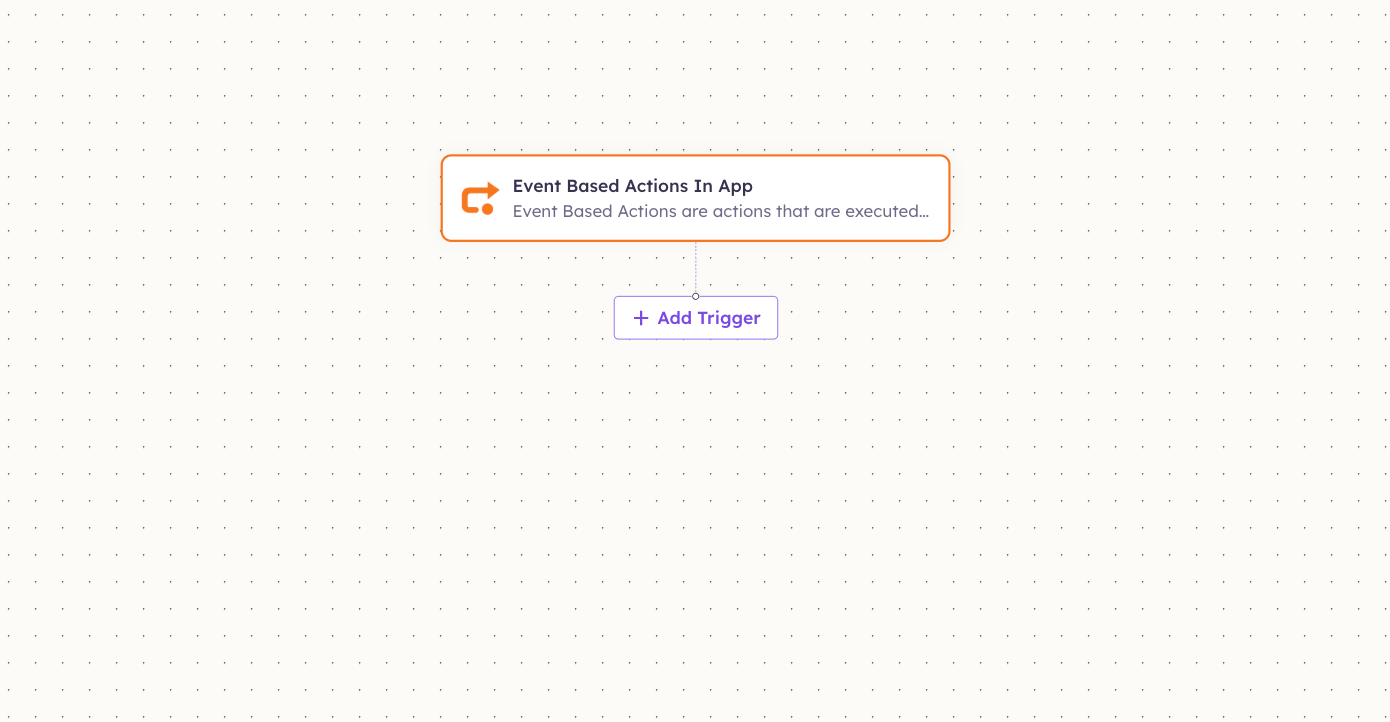
Open **Workflows → New Workflow**. On the canvas, click **+ Add Trigger** (or the **+** below any node) to add a step.
 In the **Paths** panel, open the **Apps** tab and select **Gmail**. Use the search box if you have many connectors.
 Pick the trigger or action you want. Configure its fields — required fields are marked with a red asterisk (\*).
Under **Selected account**, choose an already-connected account, or click **Add Account** to connect one now.
Fill in the remaining fields and click **Save**. Use **Test** to verify the step, then toggle **Publish** when the workflow is ready.
The steps are the same for every connector. For the full workflow builder guide, see [Using MCP in Workflows](/mcp/workflows).
## 5. Available tools
| Tool | What it does | Changes data? |
| ------------------------------------ | --------------------------------------------------- | ------------- |
| Send Email | Send an email, with optional CC/BCC. | ✏️ Yes |
| Fetch Recent Emails | Fetch recent emails from a folder (e.g. INBOX). | No |
| Download Attachment | Download an attachment from a URL. | No |
| List Attachments | List attachments on a message (name, size, id). | No |
| Send Email with URL Attachment | Send an email with an attachment pulled from a URL. | ✏️ Yes |
| Get Prestaged Attachment | Get the path of a pre-staged attachment. | No |
| Send Email with Prestaged Attachment | Send an email with a pre-staged attachment. | ✏️ Yes |
| Get Profile | Get the connected Gmail account's profile info. | No |
| Search Emails | Search emails using Gmail search syntax. | No |
| Get Email | Get a specific email by message ID. | No |
| Create Draft | Create a draft email. | ✏️ Yes |
| Send Draft | Send an existing draft. | ✏️ Yes |
| Add Label | Add a label to a message. | ✏️ Yes |
| Remove Label | Remove a label from a message. | ✏️ Yes |
| Fetch Labels | List all available Gmail labels. | No |
| Create Label | Create a new Gmail label. | ✏️ Yes |
| Trash Email | Move an email to Trash. | ⚠️ Yes |
| Untrash Email | Restore an email from Trash. | ✏️ Yes |
| Mark as Read | Mark a message as read. | ✏️ Yes |
| Mark as Unread | Mark a message as unread. | ✏️ Yes |
| Mark as Important | Mark a message as important. | ✏️ Yes |
| Mark as Unimportant | Remove the important marker. | ✏️ Yes |
| Archive Email | Archive a message (remove from inbox). | ✏️ Yes |
| Unarchive Email | Unarchive a message (return to inbox). | ✏️ Yes |
## 6. Example usage
> **"Send an email to [maria@acme.com](mailto:maria@acme.com) with the subject 'Q3 report' and attach the file at this link."**
>
> Runs **Send Email with URL Attachment** (or **Send Email** if there's no attachment).
> **"Find the unread emails from billing and mark them as read."**
>
> Runs **Search Emails** to find them, then **Mark as Read** on each.
## 7. Permissions & data access
**UnleashX can:**
* Send emails and send your drafts.
* Read messages and search your mailbox.
* Create drafts and labels.
* Apply/remove labels and mark messages read, unread, important, archived, or trashed.
**UnleashX cannot:**
* Permanently delete email (trashing is reversible via untrash).
* Change your Gmail account password or security settings.
* Access other Google services unless you connect those integrations separately.
**To disconnect:** In UnleashX, open **Data Connectors → Gmail → Disconnect**. You can also revoke access at [https://myaccount.google.com/permissions](https://myaccount.google.com/permissions). Revoking takes effect immediately.
The connection authenticates each request with your Google OAuth access token (resolved from an `access-token` header, a `gmail_access_token` header, or an `Authorization: Bearer` header, falling back to your UnleashX session), and refreshes it automatically when it expires.
## 8. Troubleshooting
| Problem | What it means | How to fix it |
| ----------------------------- | -------------------------------------------------------------------------- | ---------------------------------------------------------------------------------------------- |
| `401 Unauthorized` | The access token is missing or expired. | Reconnect Gmail in **Data Connectors** to refresh the Google sign-in. |
| `403 Forbidden` | The granted scopes don't cover the action, or admin policy blocks the app. | Re-authorize and approve all requested scopes; on Workspace, ask your admin to allow UnleashX. |
| `Invalid grant` after a while | Google revoked or expired the refresh token. | Disconnect and reconnect to start a fresh OAuth session. |
| Attachment fails to send | The source URL is unreachable or too large. | Verify the URL is public/valid and within Gmail's 25 MB attachment limit. |
For general connector issues, see [/mcp/integrations](/mcp/integrations).
## 9. Frequently asked questions
**Is my email stored by UnleashX?**
UnleashX reads and acts on messages to fulfill your requests. It does not create a permanent copy of your mailbox; it works through Google's API in real time.
**Can multiple team members connect Gmail?**
Yes. Each person authorizes their own Google account, and the agent acts as that connected user.
**How do I rotate or revoke access?**
There's no key to rotate. To revoke, disconnect in UnleashX or remove UnleashX at [https://myaccount.google.com/permissions](https://myaccount.google.com/permissions), then reconnect to grant fresh access.
## 10. References
* [Gmail API documentation](https://developers.google.com/gmail/api)
* [Gmail API OAuth scopes](https://developers.google.com/gmail/api/auth/scopes)
* [Google Cloud Console](https://console.cloud.google.com/)
* [Manage third-party access to your Google Account](https://myaccount.google.com/permissions)
Pick the trigger or action you want. Configure its fields — required fields are marked with a red asterisk (\*).
Under **Selected account**, choose an already-connected account, or click **Add Account** to connect one now.
Fill in the remaining fields and click **Save**. Use **Test** to verify the step, then toggle **Publish** when the workflow is ready.
The steps are the same for every connector. For the full workflow builder guide, see [Using MCP in Workflows](/mcp/workflows).
## 5. Available tools
| Tool | What it does | Changes data? |
| ------------------------------------ | --------------------------------------------------- | ------------- |
| Send Email | Send an email, with optional CC/BCC. | ✏️ Yes |
| Fetch Recent Emails | Fetch recent emails from a folder (e.g. INBOX). | No |
| Download Attachment | Download an attachment from a URL. | No |
| List Attachments | List attachments on a message (name, size, id). | No |
| Send Email with URL Attachment | Send an email with an attachment pulled from a URL. | ✏️ Yes |
| Get Prestaged Attachment | Get the path of a pre-staged attachment. | No |
| Send Email with Prestaged Attachment | Send an email with a pre-staged attachment. | ✏️ Yes |
| Get Profile | Get the connected Gmail account's profile info. | No |
| Search Emails | Search emails using Gmail search syntax. | No |
| Get Email | Get a specific email by message ID. | No |
| Create Draft | Create a draft email. | ✏️ Yes |
| Send Draft | Send an existing draft. | ✏️ Yes |
| Add Label | Add a label to a message. | ✏️ Yes |
| Remove Label | Remove a label from a message. | ✏️ Yes |
| Fetch Labels | List all available Gmail labels. | No |
| Create Label | Create a new Gmail label. | ✏️ Yes |
| Trash Email | Move an email to Trash. | ⚠️ Yes |
| Untrash Email | Restore an email from Trash. | ✏️ Yes |
| Mark as Read | Mark a message as read. | ✏️ Yes |
| Mark as Unread | Mark a message as unread. | ✏️ Yes |
| Mark as Important | Mark a message as important. | ✏️ Yes |
| Mark as Unimportant | Remove the important marker. | ✏️ Yes |
| Archive Email | Archive a message (remove from inbox). | ✏️ Yes |
| Unarchive Email | Unarchive a message (return to inbox). | ✏️ Yes |
## 6. Example usage
> **"Send an email to [maria@acme.com](mailto:maria@acme.com) with the subject 'Q3 report' and attach the file at this link."**
>
> Runs **Send Email with URL Attachment** (or **Send Email** if there's no attachment).
> **"Find the unread emails from billing and mark them as read."**
>
> Runs **Search Emails** to find them, then **Mark as Read** on each.
## 7. Permissions & data access
**UnleashX can:**
* Send emails and send your drafts.
* Read messages and search your mailbox.
* Create drafts and labels.
* Apply/remove labels and mark messages read, unread, important, archived, or trashed.
**UnleashX cannot:**
* Permanently delete email (trashing is reversible via untrash).
* Change your Gmail account password or security settings.
* Access other Google services unless you connect those integrations separately.
**To disconnect:** In UnleashX, open **Data Connectors → Gmail → Disconnect**. You can also revoke access at [https://myaccount.google.com/permissions](https://myaccount.google.com/permissions). Revoking takes effect immediately.
The connection authenticates each request with your Google OAuth access token (resolved from an `access-token` header, a `gmail_access_token` header, or an `Authorization: Bearer` header, falling back to your UnleashX session), and refreshes it automatically when it expires.
## 8. Troubleshooting
| Problem | What it means | How to fix it |
| ----------------------------- | -------------------------------------------------------------------------- | ---------------------------------------------------------------------------------------------- |
| `401 Unauthorized` | The access token is missing or expired. | Reconnect Gmail in **Data Connectors** to refresh the Google sign-in. |
| `403 Forbidden` | The granted scopes don't cover the action, or admin policy blocks the app. | Re-authorize and approve all requested scopes; on Workspace, ask your admin to allow UnleashX. |
| `Invalid grant` after a while | Google revoked or expired the refresh token. | Disconnect and reconnect to start a fresh OAuth session. |
| Attachment fails to send | The source URL is unreachable or too large. | Verify the URL is public/valid and within Gmail's 25 MB attachment limit. |
For general connector issues, see [/mcp/integrations](/mcp/integrations).
## 9. Frequently asked questions
**Is my email stored by UnleashX?**
UnleashX reads and acts on messages to fulfill your requests. It does not create a permanent copy of your mailbox; it works through Google's API in real time.
**Can multiple team members connect Gmail?**
Yes. Each person authorizes their own Google account, and the agent acts as that connected user.
**How do I rotate or revoke access?**
There's no key to rotate. To revoke, disconnect in UnleashX or remove UnleashX at [https://myaccount.google.com/permissions](https://myaccount.google.com/permissions), then reconnect to grant fresh access.
## 10. References
* [Gmail API documentation](https://developers.google.com/gmail/api)
* [Gmail API OAuth scopes](https://developers.google.com/gmail/api/auth/scopes)
* [Google Cloud Console](https://console.cloud.google.com/)
* [Manage third-party access to your Google Account](https://myaccount.google.com/permissions)