> ## Documentation Index
> Fetch the complete documentation index at: https://docs.unleashx.ai/llms.txt
> Use this file to discover all available pages before exploring further.
# Cal.com
> Let your UnleashX agent book, reschedule, and cancel Cal.com meetings and check availability.
# Cal.com
> **In one line:** Connect Cal.com so your UnleashX agent can check availability, book meetings, reschedule or cancel them, and manage webhooks automatically.
| | |
| ------------------ | ---------------------------------------------------------------------------- |
| **Category** | Productivity |
| **Authentication** | API Key |
| **Setup time** | \~5 minutes |
| **Difficulty** | Easy |
| **Best for** | Anyone who wants their agent to schedule and manage meetings on their behalf |
## 1. Overview
Cal.com is an open-source scheduling platform. You publish event types (like "30-minute intro call"), share a booking link, and invitees pick a time that fits your availability — no back-and-forth emails.
Once connected, your UnleashX agent can look up your event types, check open slots, create bookings, reschedule or cancel them, and set up webhooks so other systems hear about new bookings. That lets your agent handle scheduling end to end during a call or chat.
Connecting Cal.com to UnleashX is useful for sales, support, and customer teams who want to turn "let's find a time" into a confirmed meeting instantly, without leaving the conversation.
## 2. What you'll need
* A Cal.com account (cloud at cal.com or your self-hosted instance).
* At least one **event type** set up so there's something to book.
* A Cal.com **API key**.
Any Cal.com user can create an API key for their own account. The key acts as you, so the agent can only manage the bookings and event types your account owns.
## 3. Get your credentials
Cal.com uses an **API Key**.
Sign in at [https://app.cal.com](https://app.cal.com) and open **Settings**.
In the sidebar, choose **Developer**, then **API keys**. (Direct link: [https://app.cal.com/settings/developer/api-keys](https://app.cal.com/settings/developer/api-keys))
Click **Add** / **Create new API key**, name it `UnleashX`, optionally set an expiration, and confirm.
Copy the generated API key.
The API key is shown only once. Copy it now — if you lose it, delete it and create a new one.
**What the key can access**
| Scope / Access | Why UnleashX needs it |
| ------------------------ | ------------------------------------------------------- |
| Read event types | To know what meetings can be booked and their durations |
| Read availability | To find open time slots before booking |
| Create & manage bookings | To book, reschedule, and cancel meetings |
| Manage webhooks | To notify other systems when bookings change |
A Cal.com API key reflects your account's access. UnleashX only calls the endpoints needed for the tools listed in Section 5.
## 4. Connect on UnleashX
Go to [https://www.tryunleashx.com](https://www.tryunleashx.com) and open the agent you want to connect.
In the agent, go to **Data Connectors**.
Locate **Cal.com** in the list and click **Connect** / **Add** / **Configure**.
Paste your Cal.com **API key**. UnleashX sends it as a Bearer token (`access-token` / `token` header).
Save. When the status shows a **Connected** badge, your agent can start scheduling with Cal.com.
### Use Cal.com in a Workflow
Once connected, you can add **Cal.com** to any automation from the **Workflows** builder. Its triggers and tools appear in the Apps panel, marked with an **MCP** badge.
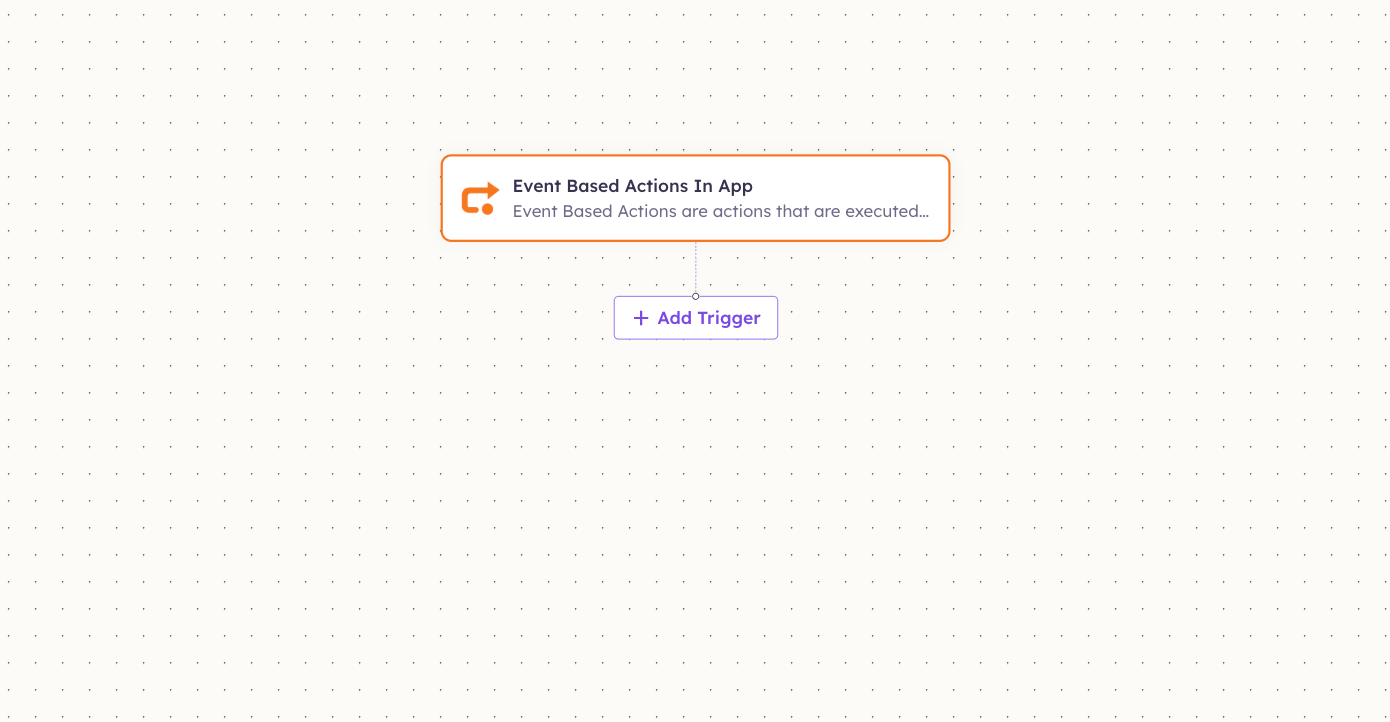
Open **Workflows → New Workflow**. On the canvas, click **+ Add Trigger** (or the **+** below any node) to add a step.
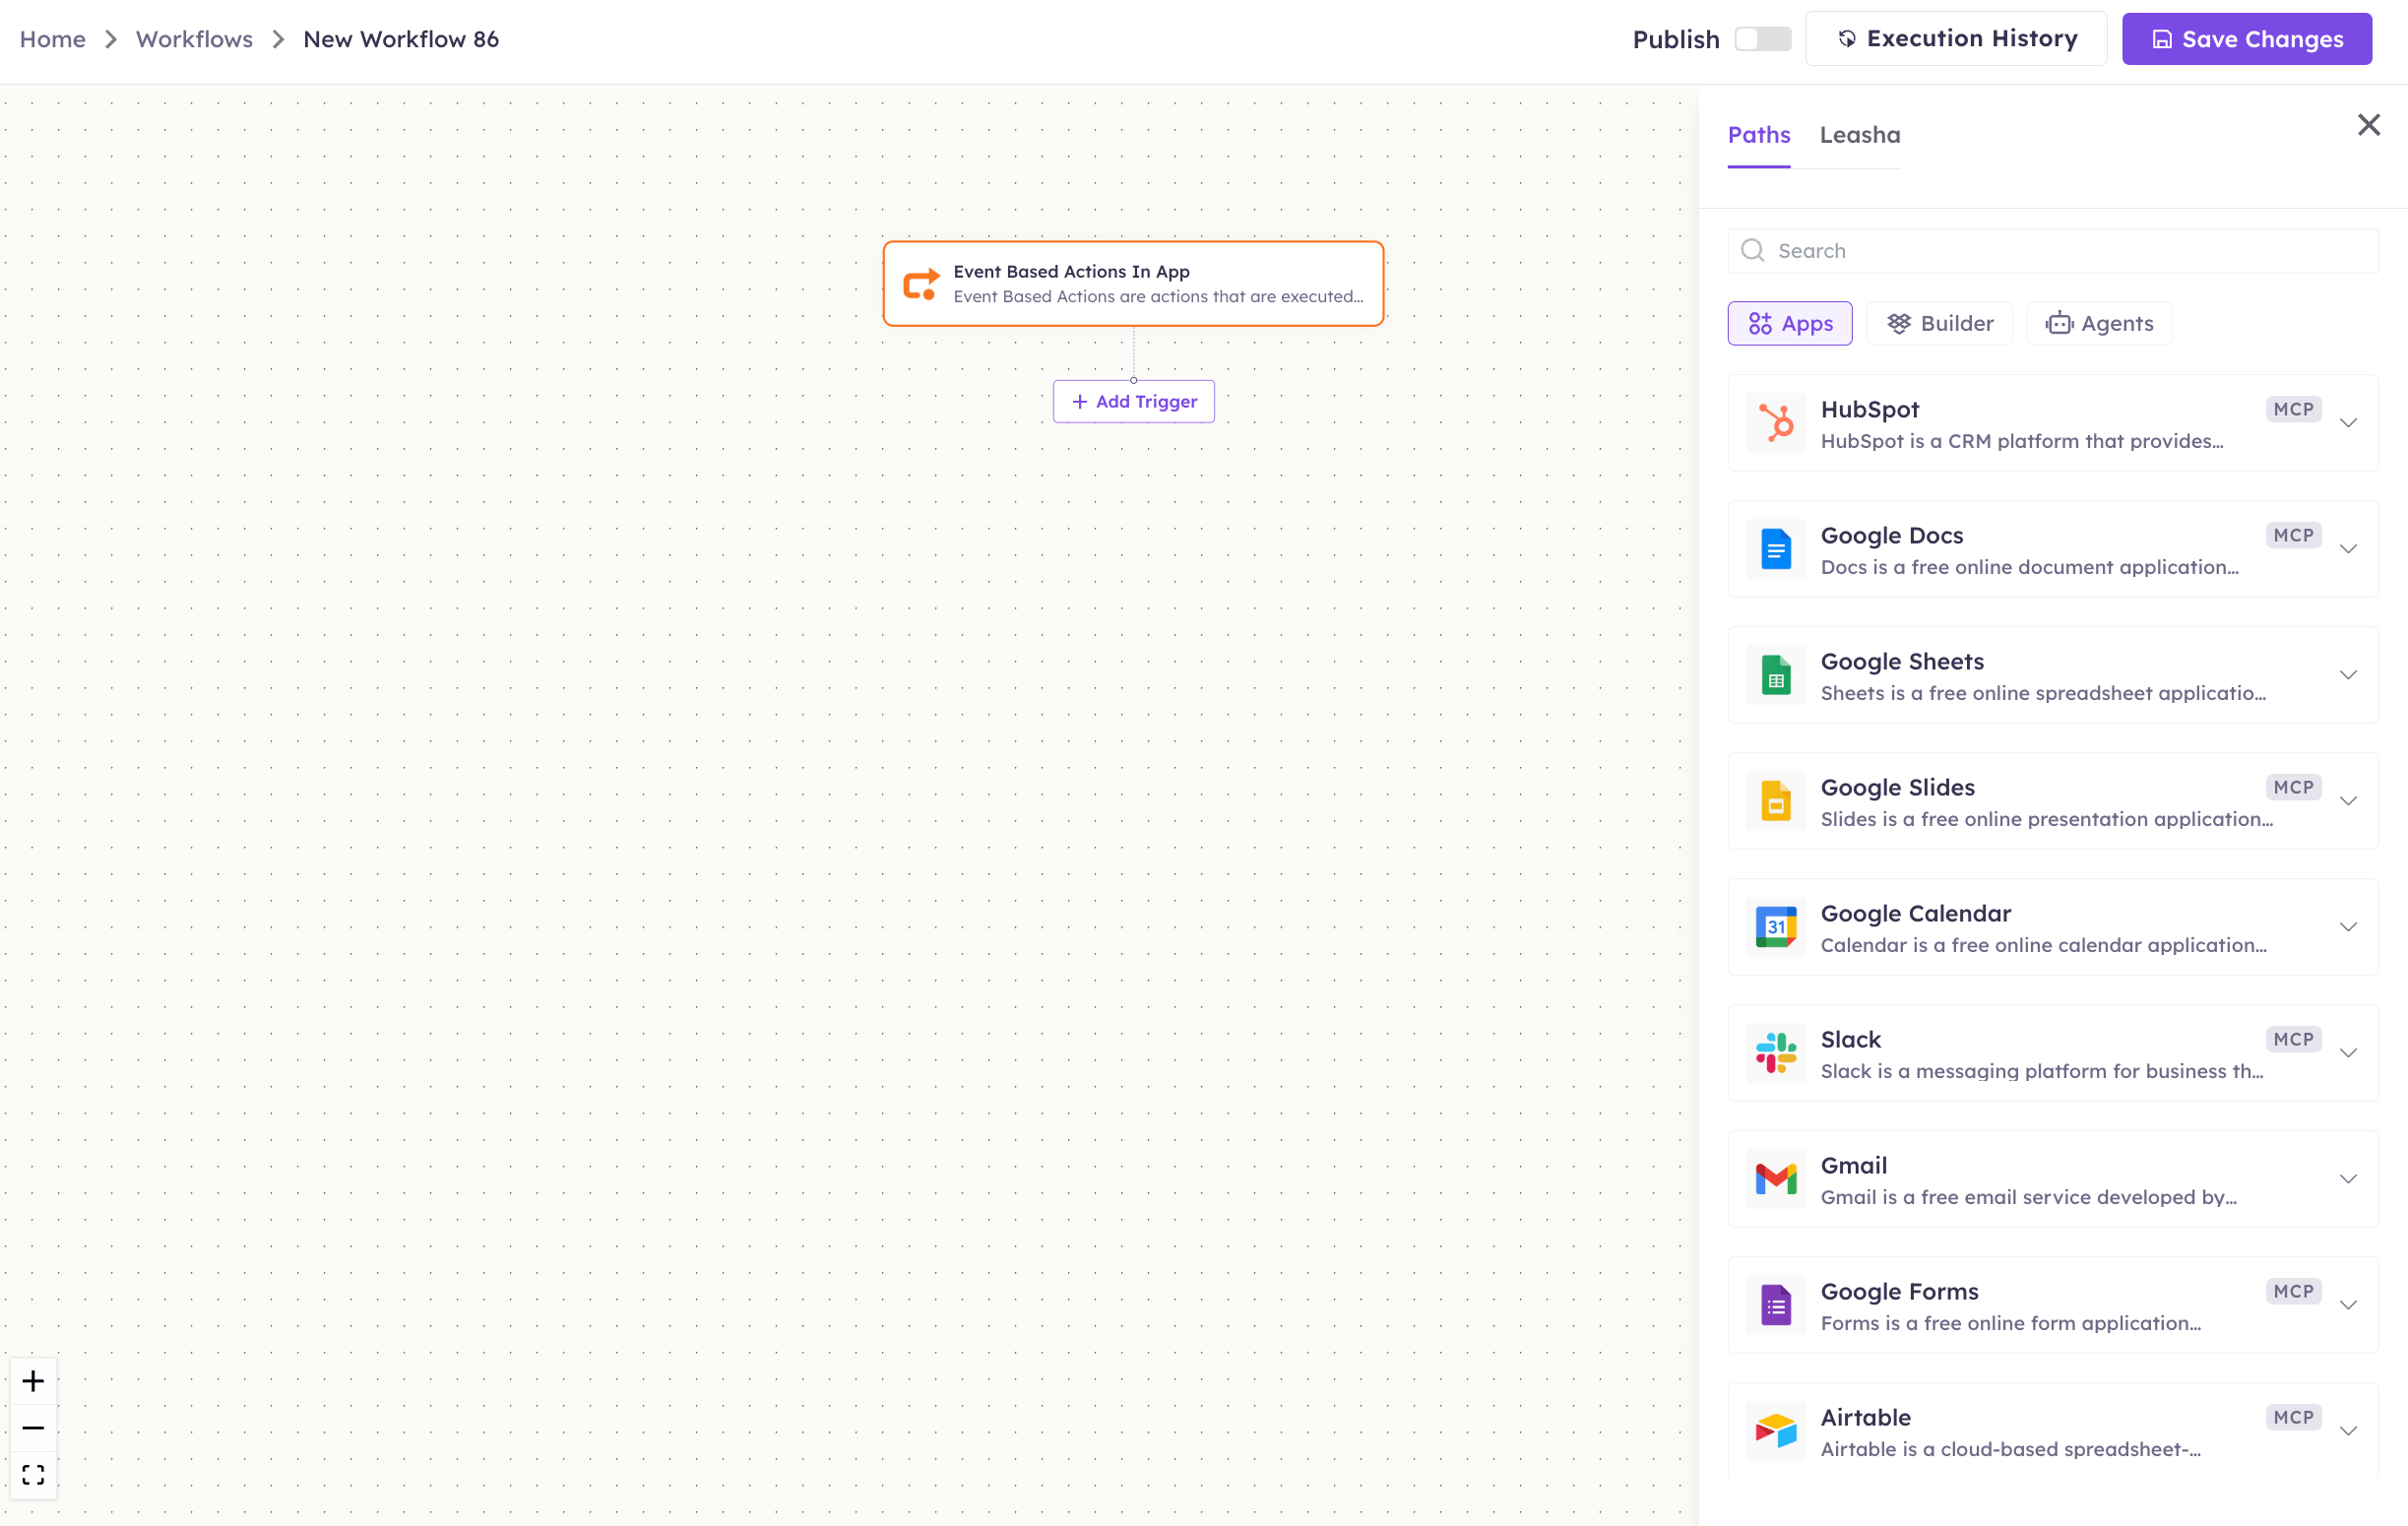
 In the **Paths** panel, open the **Apps** tab and select **Cal.com**. Use the search box if you have many connectors.
 Pick the trigger or action you want. Configure its fields — required fields are marked with a red asterisk (\*).
Under **Selected account**, choose an already-connected account, or click **Add Account** to connect one now.
Fill in the remaining fields and click **Save**. Use **Test** to verify the step, then toggle **Publish** when the workflow is ready.
The screenshots above use Google Sheets as an example — the steps are identical for Cal.com. For the full workflow builder guide, see [Using MCP in Workflows](/mcp/workflows).
## 5. Available tools
| Tool | What it does | Changes data? |
| -------------------------- | --------------------------------------- | ------------- |
| Get Booking | Gets details of a single booking | No |
| List Bookings | Lists bookings | No |
| List Bookings with Changes | Lists bookings including recent changes | No |
| Create Booking | Creates a new booking | ✏️ Yes |
| Reschedule Booking | Reschedules an existing booking | ✏️ Yes |
| Delete Booking | Cancels/deletes a booking | ⚠️ Yes |
| List Event Types | Lists your event types | No |
| Get Availability | Checks available time slots | No |
| Create Webhook | Creates a webhook subscription | ✏️ Yes |
| List Webhooks | Lists your webhooks | No |
| Delete Webhook | Deletes a webhook | ⚠️ Yes |
## 6. Example usage
**"Book a 30-minute intro call with this lead tomorrow at 2pm."**
Behind the scenes: List Event Types → Get Availability → Create Booking.
**"Move my 3pm meeting with Sam to Thursday morning."**
Behind the scenes: List Bookings → Get Availability → Reschedule Booking.
## 7. Permissions & data access
**UnleashX CAN:**
* Read your event types, availability, and bookings.
* Create, reschedule, and cancel bookings.
* Create, list, and delete webhooks.
**UnleashX CANNOT:**
* Access another user's Cal.com account or bookings.
* Change Cal.com account, billing, or team settings.
* Act beyond what your API key's account can do.
**To disconnect:** In UnleashX, open your agent → **Data Connectors** → **Cal.com** → **Disconnect**. To fully revoke access, delete the key in Cal.com **Settings → Developer → API keys**. Either action stops access immediately.
## 8. Troubleshooting
| Problem | What it means | How to fix it |
| ------------------ | ------------------------------------------------------- | --------------------------------------------------------------------- |
| `401 Unauthorized` | The API key is wrong, expired, or deleted | Create a new key in **Settings → Developer → API keys** and reconnect |
| `403 Forbidden` | The key's account lacks permission for that action | Verify the account owns the event type/booking, then retry |
| `404 Not Found` | The booking or event type ID doesn't exist | Re-list to get a current ID; it may have been cancelled |
| No slots returned | The event type has no open availability | Check the event type's availability schedule in Cal.com |
| Booking fails | Required fields (name/email/time) missing or slot taken | Re-check availability and provide all attendee details |
For general connection issues, see [/mcp/integrations](/mcp/integrations).
## 9. Frequently asked questions
**Is my data stored by UnleashX?**
UnleashX calls Cal.com live with your key when a tool runs. It doesn't keep a separate copy of your calendar.
**Can multiple team members connect?**
Yes. Each person creates their own API key and connects it to their agent.
**How do I rotate my key?**
Create a new key in Cal.com, update it in UnleashX, then delete the old one. Access switches over immediately.
**Does this work with self-hosted Cal.com?**
Yes, as long as your instance exposes the Cal.com API and you provide a valid API key.
## 10. References
* Cal.com API documentation: [https://cal.com/docs/api-reference](https://cal.com/docs/api-reference)
* API keys page: [https://app.cal.com/settings/developer/api-keys](https://app.cal.com/settings/developer/api-keys)
* Cal.com developer docs: [https://cal.com/docs](https://cal.com/docs)
Pick the trigger or action you want. Configure its fields — required fields are marked with a red asterisk (\*).
Under **Selected account**, choose an already-connected account, or click **Add Account** to connect one now.
Fill in the remaining fields and click **Save**. Use **Test** to verify the step, then toggle **Publish** when the workflow is ready.
The screenshots above use Google Sheets as an example — the steps are identical for Cal.com. For the full workflow builder guide, see [Using MCP in Workflows](/mcp/workflows).
## 5. Available tools
| Tool | What it does | Changes data? |
| -------------------------- | --------------------------------------- | ------------- |
| Get Booking | Gets details of a single booking | No |
| List Bookings | Lists bookings | No |
| List Bookings with Changes | Lists bookings including recent changes | No |
| Create Booking | Creates a new booking | ✏️ Yes |
| Reschedule Booking | Reschedules an existing booking | ✏️ Yes |
| Delete Booking | Cancels/deletes a booking | ⚠️ Yes |
| List Event Types | Lists your event types | No |
| Get Availability | Checks available time slots | No |
| Create Webhook | Creates a webhook subscription | ✏️ Yes |
| List Webhooks | Lists your webhooks | No |
| Delete Webhook | Deletes a webhook | ⚠️ Yes |
## 6. Example usage
**"Book a 30-minute intro call with this lead tomorrow at 2pm."**
Behind the scenes: List Event Types → Get Availability → Create Booking.
**"Move my 3pm meeting with Sam to Thursday morning."**
Behind the scenes: List Bookings → Get Availability → Reschedule Booking.
## 7. Permissions & data access
**UnleashX CAN:**
* Read your event types, availability, and bookings.
* Create, reschedule, and cancel bookings.
* Create, list, and delete webhooks.
**UnleashX CANNOT:**
* Access another user's Cal.com account or bookings.
* Change Cal.com account, billing, or team settings.
* Act beyond what your API key's account can do.
**To disconnect:** In UnleashX, open your agent → **Data Connectors** → **Cal.com** → **Disconnect**. To fully revoke access, delete the key in Cal.com **Settings → Developer → API keys**. Either action stops access immediately.
## 8. Troubleshooting
| Problem | What it means | How to fix it |
| ------------------ | ------------------------------------------------------- | --------------------------------------------------------------------- |
| `401 Unauthorized` | The API key is wrong, expired, or deleted | Create a new key in **Settings → Developer → API keys** and reconnect |
| `403 Forbidden` | The key's account lacks permission for that action | Verify the account owns the event type/booking, then retry |
| `404 Not Found` | The booking or event type ID doesn't exist | Re-list to get a current ID; it may have been cancelled |
| No slots returned | The event type has no open availability | Check the event type's availability schedule in Cal.com |
| Booking fails | Required fields (name/email/time) missing or slot taken | Re-check availability and provide all attendee details |
For general connection issues, see [/mcp/integrations](/mcp/integrations).
## 9. Frequently asked questions
**Is my data stored by UnleashX?**
UnleashX calls Cal.com live with your key when a tool runs. It doesn't keep a separate copy of your calendar.
**Can multiple team members connect?**
Yes. Each person creates their own API key and connects it to their agent.
**How do I rotate my key?**
Create a new key in Cal.com, update it in UnleashX, then delete the old one. Access switches over immediately.
**Does this work with self-hosted Cal.com?**
Yes, as long as your instance exposes the Cal.com API and you provide a valid API key.
## 10. References
* Cal.com API documentation: [https://cal.com/docs/api-reference](https://cal.com/docs/api-reference)
* API keys page: [https://app.cal.com/settings/developer/api-keys](https://app.cal.com/settings/developer/api-keys)
* Cal.com developer docs: [https://cal.com/docs](https://cal.com/docs)