> ## Documentation Index
> Fetch the complete documentation index at: https://docs.unleashx.ai/llms.txt
> Use this file to discover all available pages before exploring further.
# Airtable
> Let UnleashX read, create, update and delete Airtable records and watch tables for new rows.
# Airtable
> **In one line:** Connect Airtable so UnleashX can read and search records, add and update rows, create tables, and detect new records — turning your bases into a live data source for your agent.
| | |
| ------------------ | ---------------------------------------------------------------------------------------------------------------------- |
| **Category** | Productivity |
| **Authentication** | Personal Access Token |
| **Setup time** | \~4 minutes |
| **Difficulty** | Easy |
| **Best for** | Teams that run operations, CRMs or trackers in Airtable and want their agent to log and look up records automatically. |
## 1. Overview
Airtable is a flexible database that looks like a spreadsheet. Teams use it as a lightweight CRM, content calendar, inventory tracker, project board and much more — organized into bases, tables, records and fields.
Once connected to UnleashX, your agent can add a new record after a call, update a status, search for a row by any value, list what's in a table, or watch a table and react when a new record appears.
Connecting Airtable to UnleashX means your operational data stays current automatically, and your agent can both read context from a base and write results back into it.
## 2. What you'll need
* An Airtable account.
* The base(s) and table(s) you want UnleashX to access.
* Permission to create a **Personal Access Token** with access to those bases.
No access to a base? Ask the base owner to share it with you (or with the account that creates the token). The token only reaches bases it's explicitly granted.
## 3. Get your credentials
UnleashX authenticates to Airtable with a **Personal Access Token (PAT)**.
Go to **Airtable → Builder hub → Personal access tokens**: `https://airtable.com/create/tokens`
Click **Create token** and give it a name like "UnleashX".
Add the scopes from the table below.
Under **Access**, add the specific base(s) (or workspace) the token may reach.
Click **Create token** and copy it.
Airtable shows the token only once. Copy it now and store it safely — you can't view it again.
| Scope | Why UnleashX needs it |
| -------------------- | -------------------------------------------------------- |
| `data.records:read` | Read, list and search records. |
| `data.records:write` | Create, update and delete records. |
| `schema.bases:read` | List your bases, tables and fields so you can pick them. |
| `schema.bases:write` | Create new tables (only needed for **Create Table**). |
| `user.email:read` | Identify which Airtable account is connected. |
## 4. Connect on UnleashX
Sign in at `https://www.tryunleashx.com` and open the agent you want to connect.
Go to **Data Connectors** and find **Airtable**.
Click **Connect** / **Add** / **Configure** and paste your Personal Access Token.
Save. The status will switch to a **Connected** badge.
### Use Airtable in a Workflow
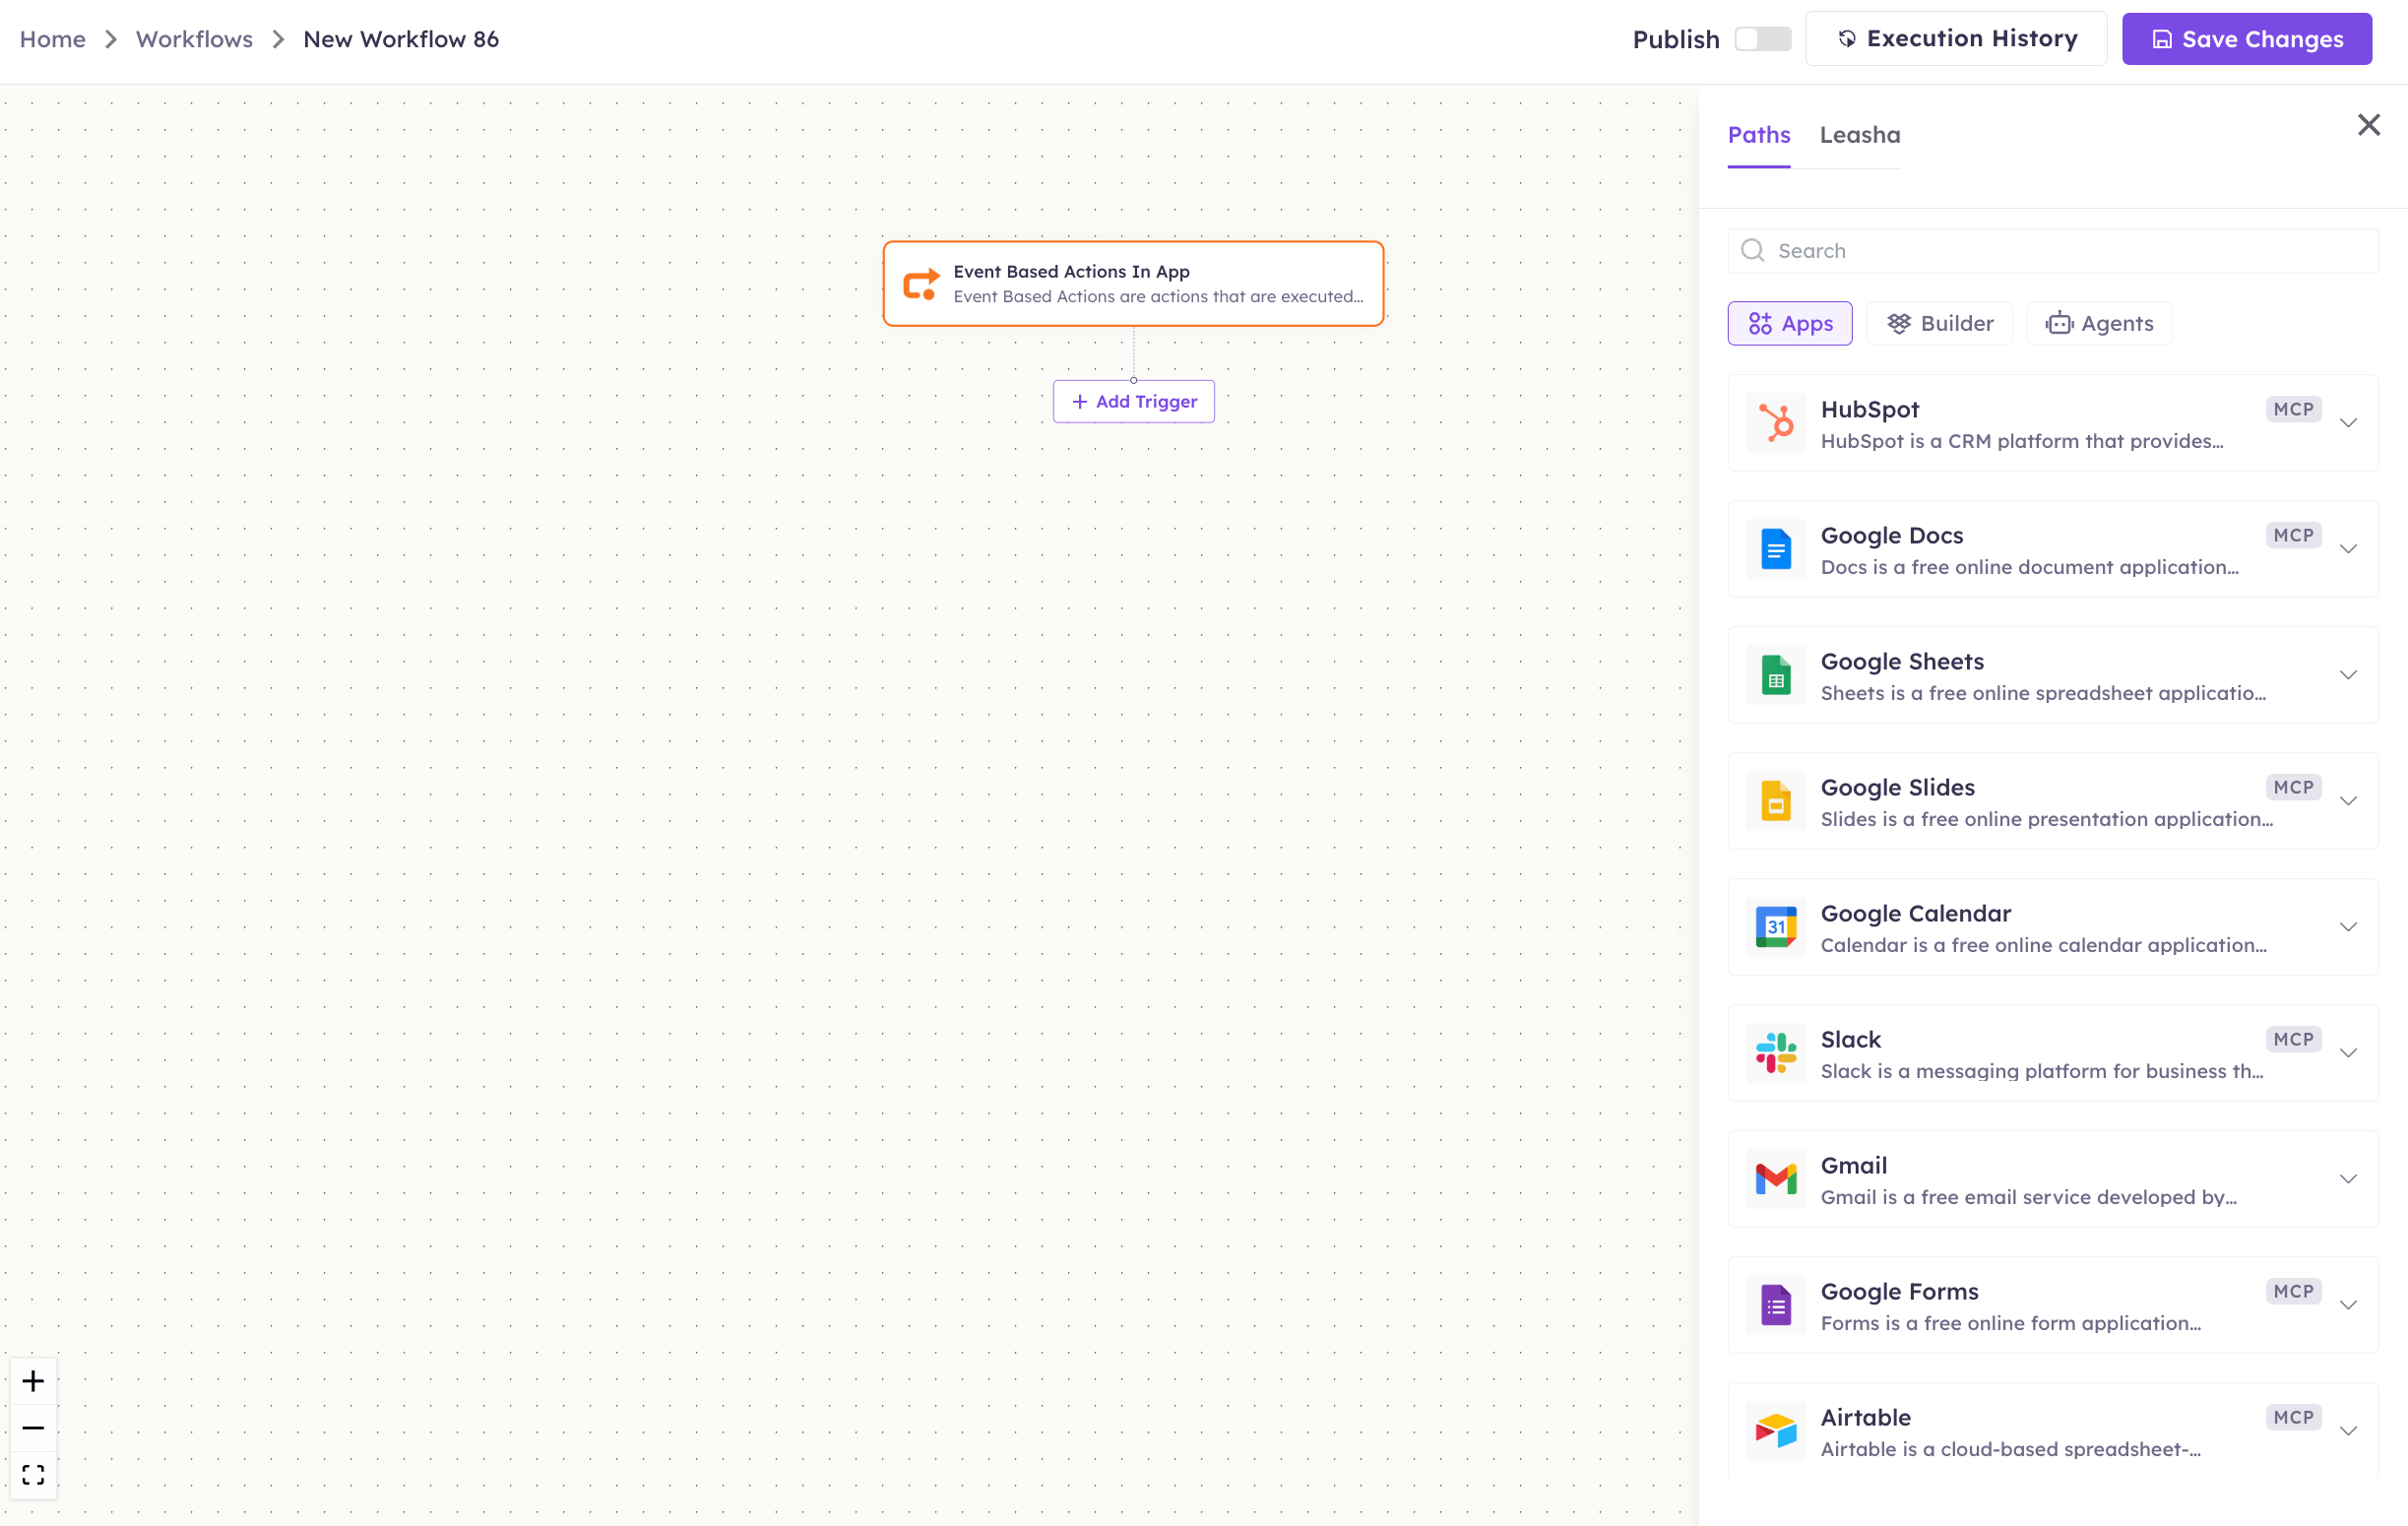
Once connected, you can add **Airtable** to any automation from the **Workflows** builder. Its triggers and tools appear in the Apps panel, marked with an **MCP** badge.
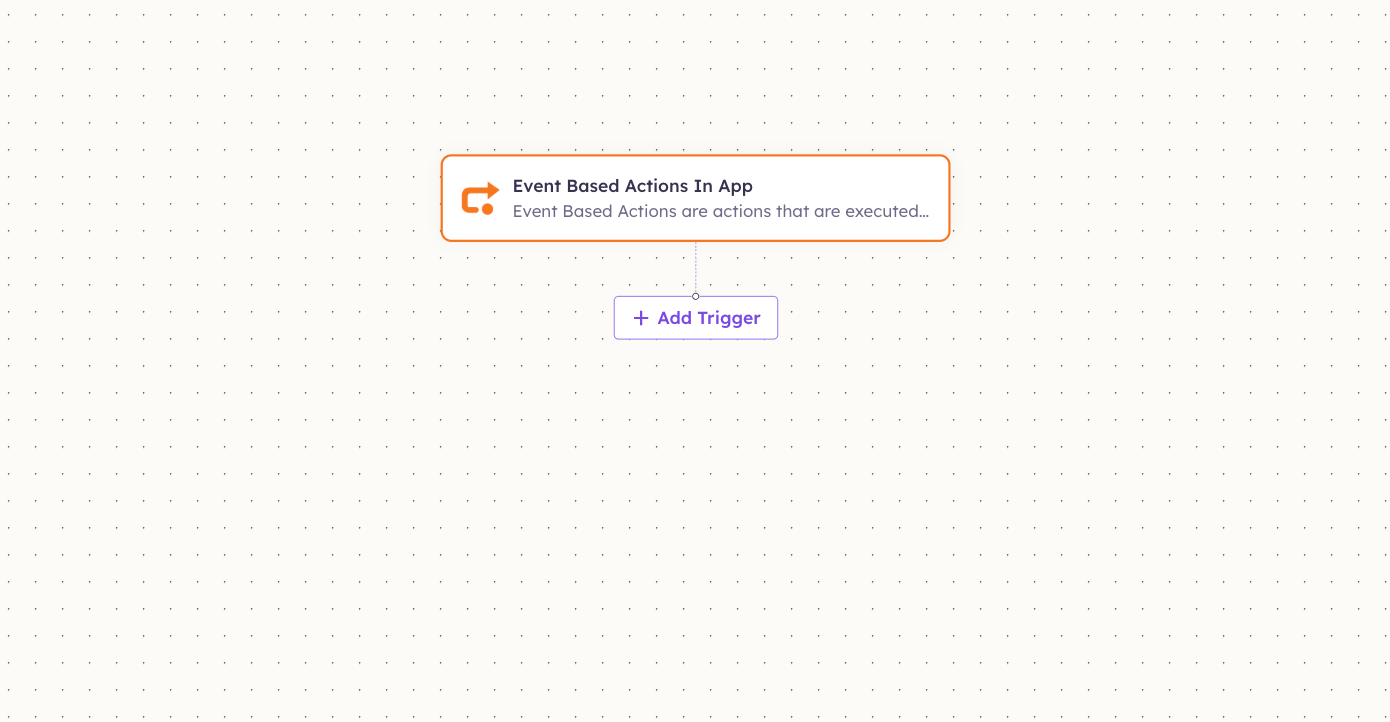
Open **Workflows → New Workflow**. On the canvas, click **+ Add Trigger** (or the **+** below any node) to add a step.
 In the **Paths** panel, open the **Apps** tab and select **Airtable**. Use the search box if you have many connectors.
 Pick the trigger or action you want. Configure its fields — required fields are marked with a red asterisk (\*).
Under **Selected account**, choose an already-connected account, or click **Add Account** to connect one now.
Fill in the remaining fields and click **Save**. Use **Test** to verify the step, then toggle **Publish** when the workflow is ready.
The steps are the same for every connector. For the full workflow builder guide, see [Using MCP in Workflows](/mcp/workflows).
## 5. Available tools
| Tool | What it does | Changes data? |
| ------------------- | -------------------------------------------------------------- | ------------- |
| Create Record | Create a new record in a table. | ✏️ Yes |
| Get Record | Read a single record by ID. | No |
| Update Record | Update fields on an existing record. | ✏️ Yes |
| Delete Record | Permanently delete a record. | ⚠️ Yes |
| Search Records | Search records by field, value, formula or date range. | No |
| List Bases | List the bases the token can access. | No |
| List Tables | List tables in a base. | No |
| Create Table | Create a new table in a base. | ✏️ Yes |
| List Columns | List the fields/columns of a table. | No |
| List Records | List records in a table. | No |
| Get Record IDs | List record IDs in a table. | No |
| On New Record Added | Detect newly added records since last check (trigger). | No |
| Clear Snapshots | Clear stored trigger snapshots so the next check starts fresh. | ⚠️ Yes |
## 6. Example usage
**"Add a row to my 'Leads' table with name Jane Doe, email [jane@acme.com](mailto:jane@acme.com), status New."**
Runs **List Bases** / **List Tables** to resolve the table, then **Create Record**.
**"Find the lead with email [jane@acme.com](mailto:jane@acme.com) and mark their status as Contacted."**
Runs **Search Records** to find the record, then **Update Record**.
## 7. Permissions & data access
**UnleashX can:**
* Read, search, create, update and delete records in bases the token can reach.
* List bases, tables and fields, and create new tables.
* Watch a table for new records and reset that watch.
**UnleashX cannot:**
* Access any base the token wasn't explicitly granted.
* Change Airtable account settings, billing or sharing.
* Delete entire bases.
**To disconnect:** In UnleashX go to **Data Connectors → Airtable → Disconnect**. To fully revoke, delete the token in **Airtable → Builder hub → Personal access tokens**. Revocation is immediate.
## 8. Troubleshooting
| Problem | What it means | How to fix it |
| -------------------------- | ----------------------------------------------------- | ------------------------------------------------------------------------------ |
| `401 Unauthorized` | The token is missing, wrong or revoked. | Reconnect in UnleashX with a valid Personal Access Token. |
| `403 Forbidden` | The token lacks a scope or wasn't granted this base. | Edit the token to add the scope and add the base under Access, then reconnect. |
| `404 Not Found` | The base, table or record ID is wrong. | Use **List Bases** / **List Tables** to get correct IDs and retry. |
| `422 Unprocessable Entity` | A field name or value doesn't match the table schema. | Check field names with **List Columns** and retry. |
| `429 Too Many Requests` | You hit Airtable's rate limit (5 req/sec/base). | Wait a moment and retry. |
For general connector issues, see [/mcp/integrations](/mcp/integrations).
## 9. Frequently asked questions
**Is my Airtable data stored by UnleashX?**
No. Tools call the Airtable API live and return the result. Small snapshots of record IDs are kept only to power the "new record" trigger, and you can clear them with **Clear Snapshots**.
**Can multiple team members connect Airtable?**
Yes. Each agent stores its own token. Grant each token only the bases it needs.
**How do I rotate my token?**
Create a new Personal Access Token, reconnect in UnleashX, then delete the old token.
## 10. References
* Airtable Web API introduction: [https://airtable.com/developers/web/api/introduction](https://airtable.com/developers/web/api/introduction)
* Personal access tokens page: [https://airtable.com/create/tokens](https://airtable.com/create/tokens)
* Scopes & permissions reference: [https://airtable.com/developers/web/api/scopes](https://airtable.com/developers/web/api/scopes)
Pick the trigger or action you want. Configure its fields — required fields are marked with a red asterisk (\*).
Under **Selected account**, choose an already-connected account, or click **Add Account** to connect one now.
Fill in the remaining fields and click **Save**. Use **Test** to verify the step, then toggle **Publish** when the workflow is ready.
The steps are the same for every connector. For the full workflow builder guide, see [Using MCP in Workflows](/mcp/workflows).
## 5. Available tools
| Tool | What it does | Changes data? |
| ------------------- | -------------------------------------------------------------- | ------------- |
| Create Record | Create a new record in a table. | ✏️ Yes |
| Get Record | Read a single record by ID. | No |
| Update Record | Update fields on an existing record. | ✏️ Yes |
| Delete Record | Permanently delete a record. | ⚠️ Yes |
| Search Records | Search records by field, value, formula or date range. | No |
| List Bases | List the bases the token can access. | No |
| List Tables | List tables in a base. | No |
| Create Table | Create a new table in a base. | ✏️ Yes |
| List Columns | List the fields/columns of a table. | No |
| List Records | List records in a table. | No |
| Get Record IDs | List record IDs in a table. | No |
| On New Record Added | Detect newly added records since last check (trigger). | No |
| Clear Snapshots | Clear stored trigger snapshots so the next check starts fresh. | ⚠️ Yes |
## 6. Example usage
**"Add a row to my 'Leads' table with name Jane Doe, email [jane@acme.com](mailto:jane@acme.com), status New."**
Runs **List Bases** / **List Tables** to resolve the table, then **Create Record**.
**"Find the lead with email [jane@acme.com](mailto:jane@acme.com) and mark their status as Contacted."**
Runs **Search Records** to find the record, then **Update Record**.
## 7. Permissions & data access
**UnleashX can:**
* Read, search, create, update and delete records in bases the token can reach.
* List bases, tables and fields, and create new tables.
* Watch a table for new records and reset that watch.
**UnleashX cannot:**
* Access any base the token wasn't explicitly granted.
* Change Airtable account settings, billing or sharing.
* Delete entire bases.
**To disconnect:** In UnleashX go to **Data Connectors → Airtable → Disconnect**. To fully revoke, delete the token in **Airtable → Builder hub → Personal access tokens**. Revocation is immediate.
## 8. Troubleshooting
| Problem | What it means | How to fix it |
| -------------------------- | ----------------------------------------------------- | ------------------------------------------------------------------------------ |
| `401 Unauthorized` | The token is missing, wrong or revoked. | Reconnect in UnleashX with a valid Personal Access Token. |
| `403 Forbidden` | The token lacks a scope or wasn't granted this base. | Edit the token to add the scope and add the base under Access, then reconnect. |
| `404 Not Found` | The base, table or record ID is wrong. | Use **List Bases** / **List Tables** to get correct IDs and retry. |
| `422 Unprocessable Entity` | A field name or value doesn't match the table schema. | Check field names with **List Columns** and retry. |
| `429 Too Many Requests` | You hit Airtable's rate limit (5 req/sec/base). | Wait a moment and retry. |
For general connector issues, see [/mcp/integrations](/mcp/integrations).
## 9. Frequently asked questions
**Is my Airtable data stored by UnleashX?**
No. Tools call the Airtable API live and return the result. Small snapshots of record IDs are kept only to power the "new record" trigger, and you can clear them with **Clear Snapshots**.
**Can multiple team members connect Airtable?**
Yes. Each agent stores its own token. Grant each token only the bases it needs.
**How do I rotate my token?**
Create a new Personal Access Token, reconnect in UnleashX, then delete the old token.
## 10. References
* Airtable Web API introduction: [https://airtable.com/developers/web/api/introduction](https://airtable.com/developers/web/api/introduction)
* Personal access tokens page: [https://airtable.com/create/tokens](https://airtable.com/create/tokens)
* Scopes & permissions reference: [https://airtable.com/developers/web/api/scopes](https://airtable.com/developers/web/api/scopes)